French author and thinker Voltaire as soon as mentioned that “originality is nothing however even handed imitation” and relating to the usage of synthetic intelligence, he is completely proper.
Using a wealth of complicated math, highly effective supercomputers can be utilized to investigate billions of photographs and textual content, making a numerical map of possibilities between the 2. One such map is named Stable Diffusion and because it made an look, it has been the topic of marvel, derision, and fervent use.
And better of all, you need to use it, too, because of our detailed information on the right way to use Stable Diffusion to generate AI photographs and extra in addition to!
What precisely is Stable Diffusion?
The quick reply is that Stable Diffusion is a deep studying algorithm that makes use of textual content as an enter to create a rendered picture. The longer reply is… complicated… to say the least, however it all entails a bunch of computer-based neural networks which have been educated with chosen datasets from the LAION-5B undertaking — a group of 5 billion photographs and an related descriptive caption. The finish result’s one thing that, when given a number of phrases, the machine studying mannequin calculates after which renders the probably picture that most closely fits them.
Stable Diffusion is uncommon in its subject as a result of the builders (a collaboration between Stability AI, the Computer Vision & Learning Group at LMU Munich, and Runway AI) made the supply code and the mannequin weights publicly accessible. Model weights are basically a really massive knowledge array that controls how a lot the enter impacts the output.

There are two main releases of Stable Diffusion — model 1 and model 2. The predominant variations lie within the datasets used to coach the fashions and the textual content encoder. There are 4 main fashions accessible for model 1:
- SD v1.1 = created from 237,000 coaching steps at a decision of 256 x 256, utilizing the laion2b-en subset of LAION-5B (2.3 billion photographs with English descriptions), adopted by 194,000 coaching steps at a decision of 512 x 512 utilizing the laion-high-resolution subset (0.2b photographs with resolutions higher than 1024 x 1024).
- SD v1.2 = extra coaching of SD v1.1 with 515,000 steps at 512 x 512 utilizing the laion-improved-aesthetics subset of laion2B-en, adjusted to pick photographs with increased aesthetics and people with out watermarks
- SD v1.3 = additional coaching of SD v1.2 utilizing round 200k steps, at 512 x 512, of the identical dataset as above, however with some extra math happening behind the scenes
- SD v1.4 = one other spherical of 225k steps of SD v1.3
For model 2, the entire datasets and neural networks used had been open-source and differed in picture content material.
The replace wasn’t with out criticism however it will probably produce superior outcomes — the bottom mannequin can be utilized to make photographs which can be 768 x 768 in dimension (in comparison with 512 x 512 in v1) and there is even a mannequin for making 2k photographs.

When getting began in AI picture technology, although, it would not matter what mannequin you utilize. With the proper {hardware}, a little bit of computing information, and loads of spare time to discover the whole lot, anybody can obtain all of the related recordsdata and get caught in.
Getting began with AI picture creation
If you desire a fast and easy go at utilizing Stable Diffusion with out getting your arms soiled, you’ll be able to strive a demo of it right here.
You have two textual content fields to finish: the primary is a constructive immediate that inform the algorithm to concentrate on these enter phrases. The second, a detrimental immediate, tells the algorithm to take away such objects from the picture it’s about to generate.
There’s one extra factor you’ll be able to alter on this easy demo. Under the Advanced Options, the upper steerage scale is, the extra rigidly the algorithm will follow the enter phrases. Set this too excessive and you may find yourself with an unholy mess, however it’s nonetheless value experimenting to see what you may get.

The demo is reasonably restricted and sluggish as a result of the calculations are being carried out on a server. If you need extra management over the output, then you definately’ll must obtain the whole lot onto your personal machine. So let’s just do that!
One-click installer for Windows and a macOS different
While this text relies on a extra concerned set up technique of the Stable Diffusion webUI undertaking (subsequent part beneath), the SD neighborhood is quickly evolving and a better set up methodology is a type of issues desired by most.
As a possible shortcut, proper earlier than we revealed this text we found Reddit’s dialogue about A1111’s Stable Diffusion WebUI Easy Installer, which automates many of the obtain/set up steps beneath. If it really works for you, nice. If not, the guide course of will not be so unhealthy.
For MacOS customers, there’s additionally a simple set up possibility and app known as DiffusionBee which works nice with Apple processors (works a tad slower with Intel chips). It requires macOS 12.5.1 or increased.
Installing Stable Diffusion on Windows
Let’s start with an necessary caveat — Stable Diffusion was initially developed to be processed on Nvidia GPUs and you may want one with not less than 4GB of VRAM, although it performs quite a bit higher with double that determine. Due to the open-source nature of the undertaking, it may be made to work on AMD GPUs, although it is not as straightforward to setup and it will not run as quick; we’ll sort out this in a while within the article.
For now, head over to the Stable Diffusion webUI undertaking on GitHub. This is a work-in-progress system that manages many of the related downloads and directions and neatly wraps all of it up in a browser-based interface.
Step 1 — Install Python
The first step is to obtain and set up Python 3.10.6.
When you put in Python, ensure you test the Add to Path possibility. Everything else can stay within the default settings.

If you’ve got already acquired variations of Python put in, and also you need not use them, then uninstall these first. Otherwise, create a brand new consumer account, with admin rights, and change to that consumer earlier than putting in v3.10.6 — this can assist to forestall the system from getting confused over what Python it is supposed to make use of.
Step 2 — Install Git
The subsequent factor to do is putting in Git — this can automate gathering the entire recordsdata you want from GitHub. You can depart the entire set up choices within the default settings, however one that’s value checking is the trail atmosphere one.
Make positive that that is set to Git from the command line, as we’ll be utilizing this to put in the entire goodies we’d like.

Step 3 — Copy Stable Diffusion webUI from GitHub
With Git in your laptop, use it copy throughout the setup recordsdata for Stable Diffusion webUI.
- Create a folder within the root of any drive (e.g. C:/) — and identify the folder “sdwebui”
- Press Windows key + R, kind in cmd, to open the traditional command immediate
- Enter cd then kind in cd sdwebui
- Then kind: git clone . and press Enter
There’s speculated to be an area between the ultimate t and the interval — this stops Git from creating an additional folder to navigate, each time you need to use Stable Diffusion webUI.

Depending on how briskly your web connection is, you must see a complete stack of folders and recordsdata. Ignore them for the second, as we have to get one or two extra issues.
Step 4 — Download the Stable Diffusion mannequin
Choosing the proper mannequin may be difficult. There are 4 main fashions accessible for SD v1 and two for SD v2, however there’s a complete host of additional ones, too. We’re simply going to make use of v1.4 as a result of it is had a lot of coaching and it was the one we had probably the most stability with on our take a look at PC.
Stable Diffusion webUI helps a number of fashions, so so long as you will have the proper mannequin, you are free to discover.
The file you need ends with .ckpt however you will discover that there are two (e.g. sd-v1-1.ckpt and sd-v1-1-full-ema.ckpt) — use the primary one, not the full-ema one.
The mannequin recordsdata are massive (over 4GB), so that may take some time to obtain. Once you will have it, transfer the file to C:sdwebuimodelsStable-diffusion folder — or to the folder you created to deal with Stable Diffusion webUI.

Note that when you’re planning to make use of Stable Diffusion v2 fashions, you will want so as to add a configuration file within the above folder.
You can discover them for SD webUI right here (scroll all the way down to the underside of the web page) — click on on the one it is advisable to use, then press CTRL+S, change the Save as Type to All recordsdata, and enter the identify so that it is the similar because the mannequin you are utilizing. Finally, be sure that the identify ends with the .yaml format.
Step 5 — Running Stable Diffusion webUI for the primary time
You’re almost carried out!
To begin the whole lot off, double-click on the Windows batch file labeled webui.bat within the sdwebui folder. A command immediate window will open up, after which the system will start to retrieve all the opposite recordsdata wanted.
This can take a very long time and sometimes exhibits little signal of progress, so be affected person.

You’ll must run the webui.bat file each time you need to use Stable Diffusion, however it should hearth up a lot faster sooner or later, as it should have already got the recordsdata it wants.
The course of will at all times end with the identical ultimate few traces within the command window. Pay consideration to the URL it gives — that is the handle you’ll enter into an internet browser (Chrome, Firefox, and many others.) to make use of Stable Diffusion webUI.
Highlight and copy this IP handle, open up a browser, paste the hyperlink into the handle subject, press Enter, and bingo!
You’re prepared to begin making some AI-generated photographs.

Going all AI Bob Ross
When Stable Diffusion webUI (or SDWUI for brief) is operating, there can be two home windows open — a command window and the browser tab. The browser is the place you’ll enter inputs and outputs, so if you’re carried out and what to close down SD, ensure you shut down each home windows.
You’ll discover there’s an unlimited raft of choices at your fingertips. Fortunately, you may get began instantly, so let’s start by including some phrases to the Prompt subject, beginning with the ‘Hello World’ equal of AI-imagery:
“astronaut on a horse”
If you permit the Seed worth at -1, it should randomize the technology start line every time, so we will use a worth of 1 however you take a look at out any worth you want.
Now, simply click on the large Generate button!
Depending in your system’s specs, you will have your first AI-generated picture inside a minute or so…

SDWUI shops all generated photographs within the outputstxt2img-images folder. Don’t fear that the picture seems so small. Well, it is small — simply 512 x 512, however because the mannequin was largely educated on photographs that dimension, this is the reason this system defaults to this decision.
But as you’ll be able to see, we positively have a picture of an astronaut using a horse. Stable Diffusion may be very delicate to immediate phrases and if you wish to concentrate on particular issues, add the phrases to the immediate utilizing a comma. You also can add phrases to the Negative Prompt to inform it to try to ignore sure points.
Increasing the sampling steps tends to present higher outcomes, as can utilizing a distinct sampling methodology. Lastly, the worth of the CFG Scale tells SDWUI how a lot to ‘obey’ the prompts entered — the decrease the worth, the extra liberal its interpretation of the directions can be. So let’s have one other go and see if we will do higher.
This time, our immediate phrases had been ‘astronaut on a horse, nasa, sensible‘ and we added ‘portray, cartoon, surreal‘ to the detrimental immediate subject; we additionally elevated the sampling steps to 40, used the DDIM methodology, and raised the CFG scale to 9…

It’s arguably quite a bit higher now, however nonetheless removed from being excellent. The horse’s legs and the astronaut’s arms do not look proper, for a begin. But with additional experimentation utilizing immediate and detrimental immediate phrases, in addition to the variety of steps and scale worth, you’ll be able to finally attain one thing that you just’re pleased with.
The Restore Faces possibility helps to enhance the standard of any human faces you are anticipating to see within the output, and enabling Highres Fix provides you entry to additional controls, resembling the quantity of denoising that will get utilized. With a number of extra prompts and a few extra tweaks, we current you with our best creation.

Using a distinct seed also can assist get you the picture you are after, so experiment away!
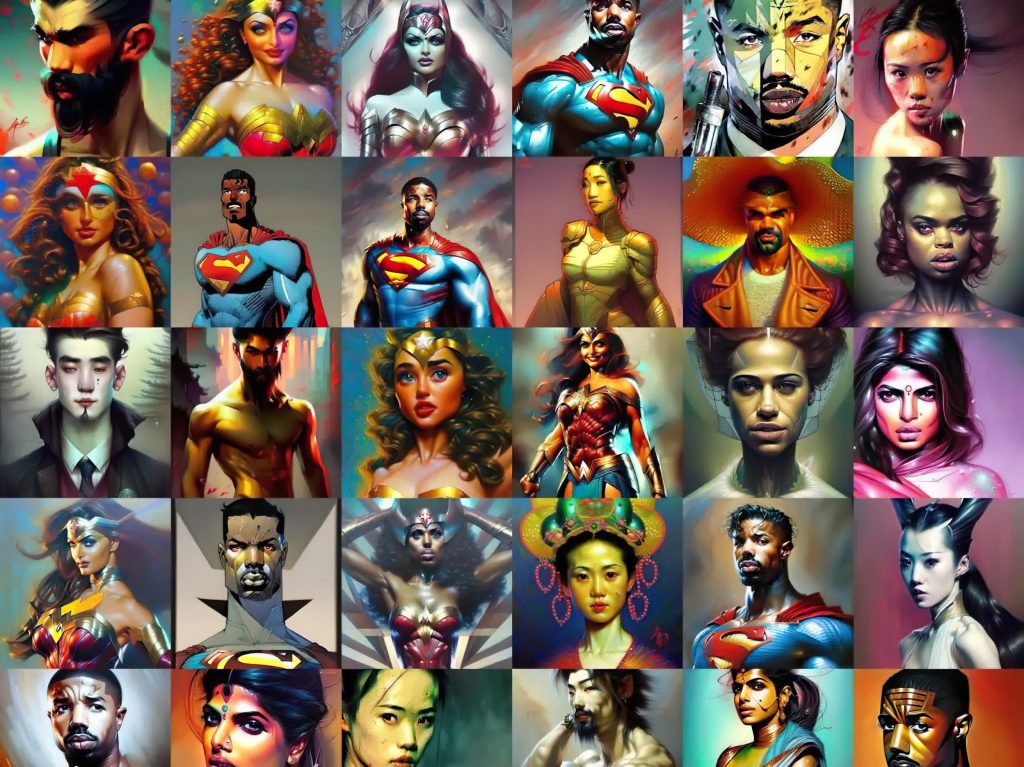
Stable Diffusion can be utilized to create every kind of themes and artwork kinds, from fantasy landscapes and vibrant metropolis scenes to sensible animals and comical impressions.
With a number of fashions to obtain and discover, there is a wealth of content material that may be created and whereas it may be argued that the usage of Stable Diffusion is not the identical as precise artwork or media creation, it may be a variety of enjoyable to play with.
Impressive “Creations”: It’s all in regards to the enter textual content
So you say, I’ve lastly perfected this astronaut and no good prompts come to thoughts about producing one thing that appears pretty much as good because the illustrations circulating on-line. Turns out, we had been capable of create a lot better photographs as soon as we understood how necessary (and detailed) the textual content enter was.
Tip: In SDWUI, there’s a paint palette icon proper subsequent to the generate button that may enter random artists names. Play round with this to create completely different takes and kinds of the identical prompts.
Tip 2: There are already loads of assets for prompts and galleries on the market.
Here are some good examples discovered on-line and their corresponding prompts to present you an concept:
Beautiful submit apocalyptic portrait
Prompt: A full portrait of an attractive submit apocalyptic offworld nanotechnician, intricate, elegant, extremely detailed, digital portray, artstation, idea artwork, clean, sharp focus, illustration, artwork by Krenz Cushart and Artem Demura and alphonse mucha

Cat Knight
Prompt (supply): kneeling cat knight, portrait, finely detailed armor, intricate design, silver, silk, cinematic lighting, 4k

Space Fantasy
Prompt (supply): Guineapig’s extremely sensible detailed floating in universe fits floating in house, nubela, warmhole, lovely stars, 4 okay, 8 okay, by simon stalenhag, frank frazetta, greg rutkowski, beeple, yoko taro, christian macnevin, beeple, wlop and krenz cushart, epic fantasy character artwork, volumetric out of doors lighting, noon, excessive fantasy, cgsociety, cheerful colors, full size, beautiful element, submit @ – processing, masterpiece, cinematic

Old Harbour
Prompt (supply): previous harbour, tone mapped, shiny, intricate, cinematic lighting, extremely detailed, digital portray, artstation, idea artwork, clean, sharp focus, illustration, artwork by terry moore and greg rutkowski and alphonse mucha

Asian warrior
Prompt (supply): portrait picture of a asia previous warrior chief, tribal panther make up, blue on crimson, facet profile, wanting away, critical eyes, 50mm portrait pictures, arduous rim lighting pictures–beta –ar 2:3 –beta –upbeta –upbeta

Kayaking
Prompt (supply): A kayak in a river. blue water, atmospheric lighting. by makoto shinkai, stanley artgerm lau, wlop, rossdraws, james jean, andrei riabovitchev, marc simonetti, krenz cushart, sakimichan, d & d trending on artstation, digital artwork.

Magical flying canine
Prompt (supply): a cute magical flying canine, fantasy artwork drawn by disney idea artists, golden color, prime quality, extremely detailed, elegant, sharp focus, idea artwork, character ideas, digital portray, thriller, journey

Upscaling with Stable Diffusion: Bigger is healthier however not at all times straightforward
So what else are you able to do with Stable Diffusion? Other than having enjoyable making photos from phrases, it can be used to upscale photos to the next decision, restore or repair photographs by eradicating undesirable areas, and even prolong an image past its unique body borders.
By switching to the img2img tab in SDWUI, we will use the AI algorithm to upscale a low-resolution picture.
The coaching fashions had been primarily developed utilizing very small photos, with 1:1 facet ratios, so when you’re planning on upscaling one thing that is 1920 x 1080 in dimension, for instance, then you definately may assume you are out of luck.
Fortunately, SDWUI has an answer for you. At the underside of the img2img tab, there’s a Script drop-down menu the place you’ll be able to choose SD Upscale. This script will break the picture up into a number of 512 x 512 tiles and use one other AI algorithm (e.g. ESRGAN) to upscale them. The program then makes use of Stable Diffusion to enhance the outcomes of the bigger tiles, earlier than stitching the whole lot again right into a single picture.

Here’s a screenshot taken from Cyberpunk 2077, with a 1366×768 in-game decision. As you’ll be able to see, it would not look tremendous unhealthy, however the textual content is considerably arduous to learn, so let’s run it via the method utilizing ESRGAN_4x to upscale every tile, adopted by Stable Diffusion processing to tidy them up.
We used 80 sampling steps, the Euler-a sampling methodology, 512 x 512 tiles with an overlap of 32 pixels, and a denoising scale of 0.1 as so to not take away an excessive amount of positive element.

It’s not an excellent outcome, sadly, as many textures have been blurred or darkened. The greatest concern is the influence on the textual content parts within the unique picture, as they’re clearly worse in any case that neural community quantity crunching.
If we use a picture modifying program like GIMP to upscale (utilizing the default bicubic interpolation) the unique screenshot by an element of two, we will simply see simply how efficient the AI methodology has been.

Yes, the whole lot is now blurry, however not less than you’ll be able to simply select the entire digits and letters displayed. But we’re being considerably unfair to SDWUI right here, because it takes time and a number of runs to seek out the right settings — there isn’t any fast resolution to this, sadly.
Another facet that the system is combating is the truth that image accommodates a number of visible parts: textual content, numbers, sky, buildings, individuals, and so forth. While the AI mannequin was educated on billions of photographs, comparatively few of them can be precisely like this screenshot.
So let’s strive a distinct picture, one thing that accommodates few parts. We’ve taken a low-resolution (320 x 200) picture of a cat and beneath are two 4x upscales — the left was carried out in GIMP, with no interpolation used, and on the proper, is the results of 150 sampling steps, Euler-a, 128 pixel overlap, and a really low denoising worth.

While the AI-upscaled picture seems a tad extra pixelated than the opposite image, particularly across the ears; the decrease a part of the subsequent is not too nice both. But with extra time, and additional experimentation of the handfuls of parameters SDWUI presents for operating the algorithm, higher outcomes may very well be achieved. You also can strive a distinct SD mannequin, resembling x4-upscaling-ema, which ought to give superior outcomes when aiming for very massive ultimate photographs.
Removing/including parts: Say good day, wave goodbye
Two extra tips you are able to do with Stable Diffusion are inpainting and outpainting — let’s begin with the previous.
Inpainting entails eradicating a particular space from a picture after which filling in that house with what ought to be there if the item wasn’t current. The characteristic is present in the primary img2img tab, after which choosing the Inpaint sub-tab.
To make this work as finest as potential, use a lot of fastidiously chosen prompts (experiment with detrimental ones, too), a excessive variety of sampling steps, and a reasonably excessive denoising worth.

We took a photograph of a shallow stream within the countryside, then added a flat icon of a rubber duck to the floor of the water. The default methodology in SDWUI is to simply the built-in masks device, which simply colours within the space you need to take away in black.
If you take a look at the prompts within the screenshot above, you will see we embody quite a lot of phrases which can be related to how the water appears to be like (reflections, ripples, shallow) and included objects that have an effect on this look too (timber, rocks).
Here’s how the unique and inpainted photographs look, side-by-side:

You can inform one thing has been eliminated and a proficient picture editor may most likely obtain the identical or higher, with out resorting to the usage of AI. But it is not particularly unhealthy and as soon as once more, with extra time and tweaks, the tip outcome may simply be improved.
Outpainting does an analogous factor however as an alternative of changing a masked space, it merely extends the unique picture. Stay within the img2img tab and sub-tab, and go to the Scripts menu on the backside — choose Poor man’s outpainting.
For this to work effectively, use as many sampling steps as your system/persistence can address, together with a really excessive worth for the CFG and denoising scales. Also, resist the temptation to increase the picture by a lot of pixels; begin low, e.g. 64, and experiment from there.
Taking our picture of the stream, minus the rubber duck, we ran it via a number of makes an attempt, adjusting the prompts every time. And here is the perfect we achieved within the time accessible:

To say it is disappointing can be an understatement. So what’s the issue right here? Outpainting is very delicate to the prompts used, and lots of hours may simply be spent looking for the right mixture, even when it’s extremely clear in your thoughts what the picture ought to be displaying.
One method to assist enhance the selection of prompts is to make use of the Interrogate CLIP button subsequent to the Generate one. The first time you utilize this can drive SDWUI to obtain a bunch of enormous recordsdata, so it will not instantly, however as soon as the whole lot has been captured, the system will run the picture via the CLIP neural community to provide the prompts that the encoder deems are the perfect match.
In our case, it gave us the phrase “a river operating via a forest crammed with timber and rocks on a sunny day with no leaves on the timber, by Alexander Milne Calder.” Calder, a US sculptor from the final century, positively wasn’t concerned within the taking of the picture however simply utilizing the remaining because the immediate for the outpainting gave us this:

See how a lot better it’s? The lack of focus and darkening are nonetheless points, however the content material that is generated is superb. What this all exhibits, although, may be very clear — Stable Diffusion is just pretty much as good because the prompts you utilize.
Training your personal mannequin
The first Stable Diffusion mannequin was educated utilizing a really highly effective laptop, full of a number of hundred Nvidia A100 GPUs, operating for a whole lot of hours. So you is perhaps stunned to be taught that you are able to do your personal coaching on a good PC.
If you utilize SDWUI and immediate it “graphics card in a pc,” you will not get something actually prefer it — most outcomes sometimes simply present a part of a graphics card. It’s arduous to say simply what number of photographs within the LAION-5B dataset would cowl this state of affairs however it would not actually matter, you’ll be able to regulate a tiny a part of the educated mannequin your self.
You’ll want not less than 20 photographs, taken from completely different angles and so forth, and so they should all be 512 x 512 in dimension for Stable Diffusion 1.x fashions or 768 x 768 for SD 2.x fashions. You can both crop the photographs your self or use SDWUI to do it for you.

Go to the Train tab and click on on the Preprocess photographs sub-tab. You’ll see two fields for folder areas — the primary is the place your unique photographs are saved and the second is for the place you need the cropped photographs to be saved. With that data all entered, simply hit the Preprocess button and also you’re all set to begin coaching.Store them in a folder, someplace in your PC, and make an observation of the folder’s handle.
First create an embedding file — click on on the Create embedding sub-tab, give the file a reputation, adopted by some initialization textual content. Pick one thing easy so will probably be straightforward to recollect if you kind in prompts for text2img.

Then set the variety of vectors per token. The increased this worth is, the extra correct the AI technology can be, however you will additionally want more and more extra supply photographs, and it’ll take longer to coach the mannequin. Best to make use of a worth of 1 or 2, to start with.
Now simply click on the Create embedding button and the file can be saved within the sdwebuiembeddings folder.
With the embedding file prepared and your assortment of photographs at hand, it is time to begin the coaching course of, so head on to the Train sub-tab.

There are fairly a number of sections right here. Start by getting into the identify of the embedding you are going to strive (it ought to be current within the drop-down menu) and the dataset listing, the folder the place you’ve got saved your coaching photographs.
Next, take a look on the Embedding Learning fee — increased values provide you with sooner coaching, however set too excessive and you may run into every kind of issues. A worth of 0.005 is acceptable when you chosen 1 vector per token.
Then change the Prompt template file from style_filewords to subject_filewords and decrease the variety of Max steps to one thing beneath 30,000 (the default worth of 100,000 will go on for a lot of hours). Now you are able to click on the Train Embedding button.
This will work your PC arduous and take a very long time, so be certain your laptop is secure and never wanted for the subsequent few hours.

After about 3 hours, our coaching try (carried out on an Intel Core i9-9700K, 16GB DDR4-3200, Nvidia RTX 2080 Super) was completed, having labored via a complete of 30 photographs scraped from the net.
All of the outcomes of the coaching get saved within the textural_inversion folder and what you get are a number of embeddings and an related picture for each. Go via the photographs within the photographs folder and make an observation of the identify of the one that you just like probably the most, which wasn’t straightforward in our case.

Most of them are fairly terrible and that is down to 2 issues — the standard of the supply photographs for the coaching and the variety of steps used. It would have been higher for us to have taken our personal images of a graphics card in a pc, so we may guarantee that almost all of the image centered on the cardboard.
Once you’ve got chosen the perfect picture, go into the embeddings folder and choose the file that has the identical identify. Copy and paste it into embeddings folder in the primary SDWUI one. It’s a good suggestion to rename the file to one thing that signifies the variety of vectors used when you’re planning on coaching a number of occasions.
Now all it is advisable to do is restart SDWUI and your educated embedding can be mechanically included within the AI technology, as proven beneath.

If, like us, you’ve got solely carried out a handful of photographs or simply educated for a few hours, you could not see a lot distinction within the txt2img output, however you’ll be able to repeat the entire course of, by reusing the embedding you created.
The coaching you’ve got carried out can at all times be improved by utilizing extra photographs and steps, in addition to tweaking the vector depend.
Tweak ‘until the cows come residence
Stable Diffusion and the SDWUI interface has so many options that this text may simply be thrice as lengthy to cowl all of them. You can take a look at an outline of them right here, however it’s surprisingly enjoyable simply exploring the varied features your self.
The similar is true for the Settings tab — there is a gigantic quantity of issues you’ll be able to alter, however for probably the most half, it is positive to go away them as they’re.
Stable Diffusion works sooner the extra VRAM your graphics card has — 4GB is absolutely the minimal, however there are some parameters that can be utilized to decrease the quantity of video reminiscence used, and there are others that may make the most of your card extra effectively, too.
Batch file settings
Right-click on the webui batch file you utilize to begin SDWUI and click on on Create shortcut. Right-click on that file and choose Properties. In the Target subject, the next parameters may be added to change how SDWUI performs:
- –xformers = permits the usage of the xFormer library which might considerably enhance the velocity that photographs are generated. Only use if in case you have an Nvidia graphics card with a Turing or newer GPU
- –medvram = reduces the quantity of VRAM used, at a value of processing velocity
- –lowvram = considerably reduces the quantity of VRAM wanted however photographs can be created quite a bit slower
- –lowram = shops the secure diffusion weights in VRAM as an alternative of system reminiscence, which is able to enhance efficiency on graphics playing cards with enormous quantities of VRAM
- –use-cpu = a few of the predominant options of SDWUI can be processed on the CPU as an alternative of the GPU, resembling Stable Diffusion and ESRGAN. Image technology time can be very lengthy!
There are much more parameters that may be added, however remember that it is a work-in-progress undertaking, and so they might not at all times operate appropriately. For instance, we discovered that Interrogate CLIP did not begin in any respect, when utilizing the –no-half (prevents FP16 from being utilized in calculations) parameter.
While we’re on the purpose of GPUs, keep in mind that Stable Diffusion was developed for Nvidia graphics playing cards. SDWUI may be made to work on AMD GPUs by following this set up course of. Other implementations for Stable Diffusion can be found for AMD graphics playing cards, and this one for Windows has detailed set up directions. You will not get a UI with that methodology, so you will be doing the whole lot through the command immediate.
With many of the fundamentals lined, you must have sufficient information to correctly dive into the world of AI picture technology. Let us know the way you get on within the feedback beneath.