
[ad_1]
Microsoft Word is the de facto normal in phrase processing. Simple on the floor, but immensely succesful and feature-rich whenever you poke round. It’s a type of productiveness purposes that almost all of us have come throughout at our college and office for getting ready assignments, essays, enterprise reviews, analysis tasks, resumes, and extra.
Word can even come in useful for primary graphic design. You can create cowl pages, enterprise playing cards, brochures, and even full-on magazines and e-books for digital publishing. But its wealth of capabilities make it equally good for informal, on a regular basis customers.
Learning Word’s ins-and-outs might be very rewarding, making you extra productive, plus your colleagues may also admire a Microsoft Word guru by their facet.
In this text, we have rounded up a couple of necessary ideas and tips that may make novice and superior Word customers simpler and environment friendly at documentation. For this function, we’re utilizing Microsoft Word 2021 on a Windows 10 PC. But don’t fret, in case your Word, Office or OS model is totally different, almost the entire ideas will work should you’ve bought a Windows or Mac PC operating at the very least MS Office/Word 2013 or later…
1. Use Word’s built-in clipboard historical past instrument
Working with paperwork can often contain plenty of copy and pasting motion. While Word does help drag and drop, in addition to Ctrl+X / Ctrl+C / Ctrl+V shortcuts, the Office Clipboard permits assortment of as much as 24 gadgets (textual content and pictures) directly.
We’ve documented earlier than how helpful clipboard historical past might be, but when you do not have a any such instrument put in in your system, you may depend on Microsoft Office’s. Utilizing this function correctly will prevent from incessantly leaping forwards and backwards between totally different packages. Also, being an ‘Office’ clipboard means you may freely transfer and handle gadgets between different MS Office apps like Excel, PowerPoint or Outlook.
It is price mentioning that gadgets copied from the File Explorer that go into the Windows Clipboard will not seem within the Office Clipboard, although you may nonetheless paste them in your doc.
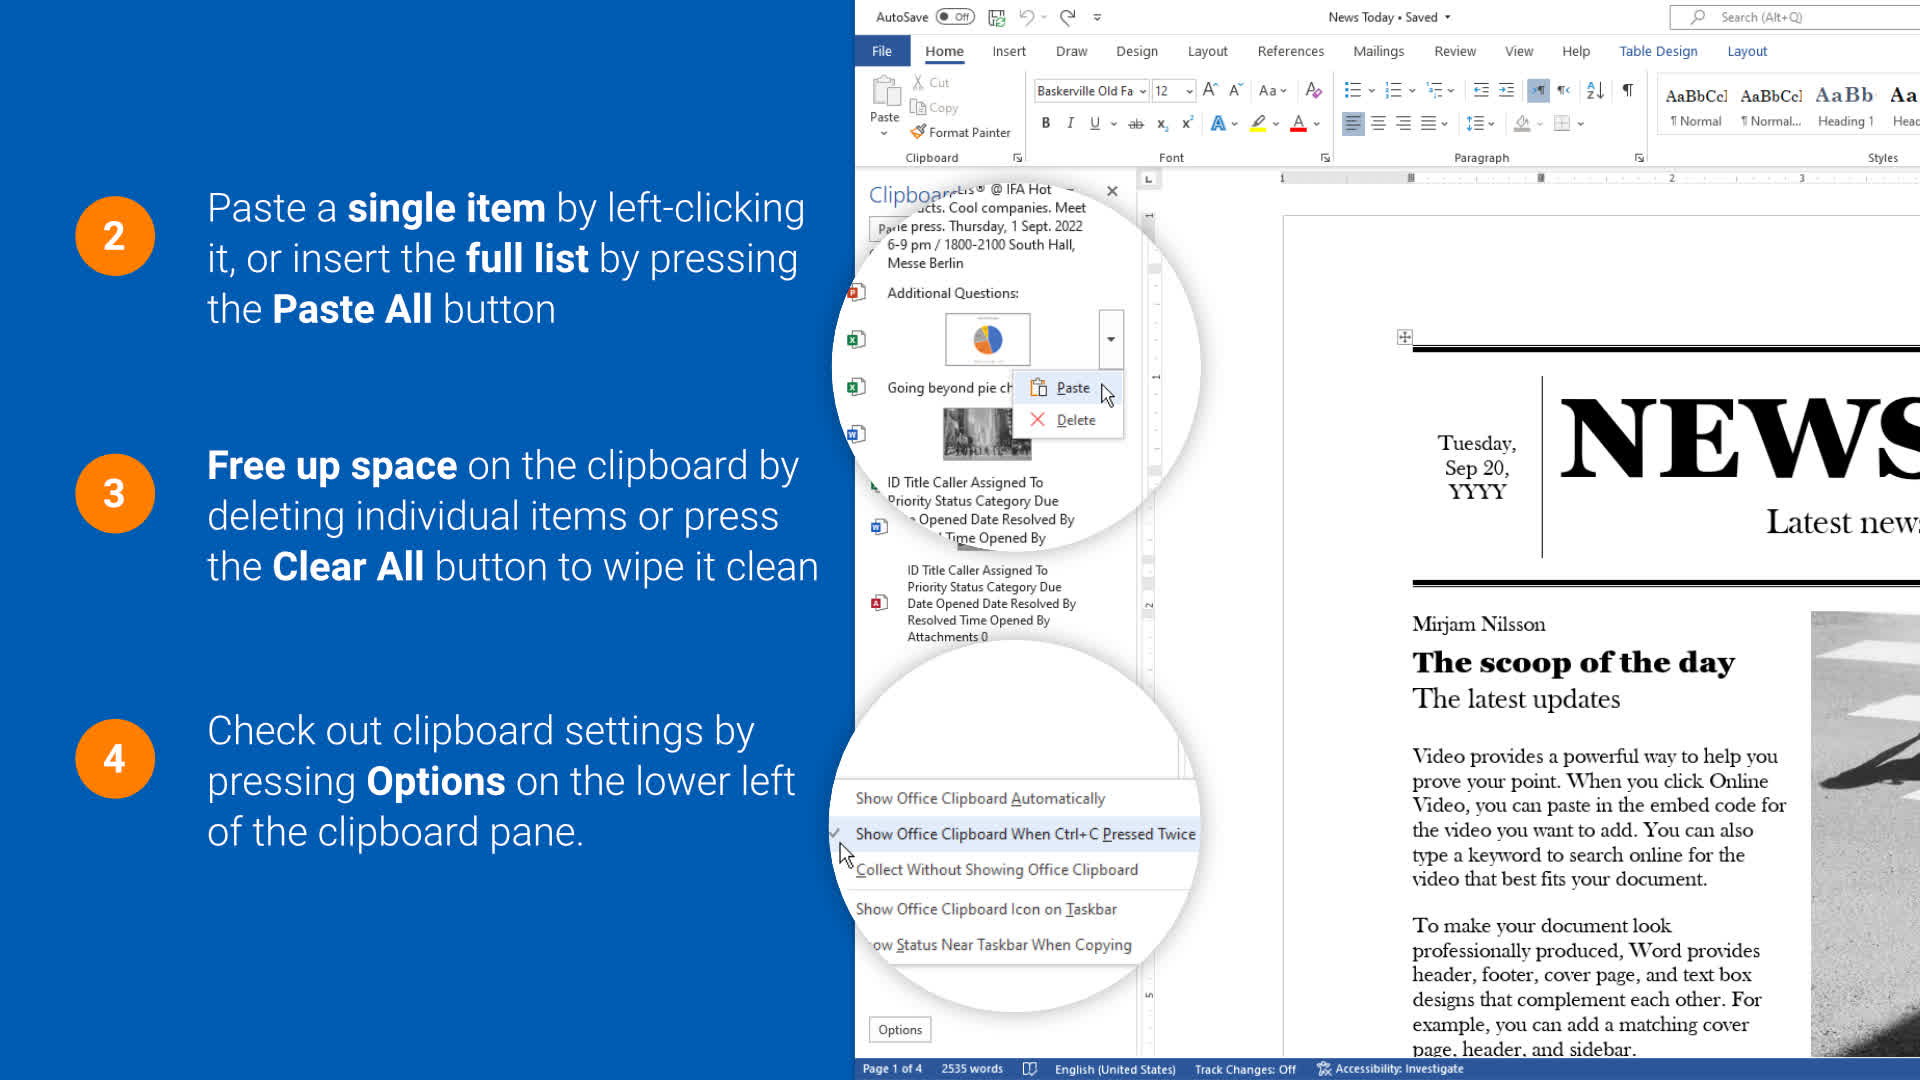
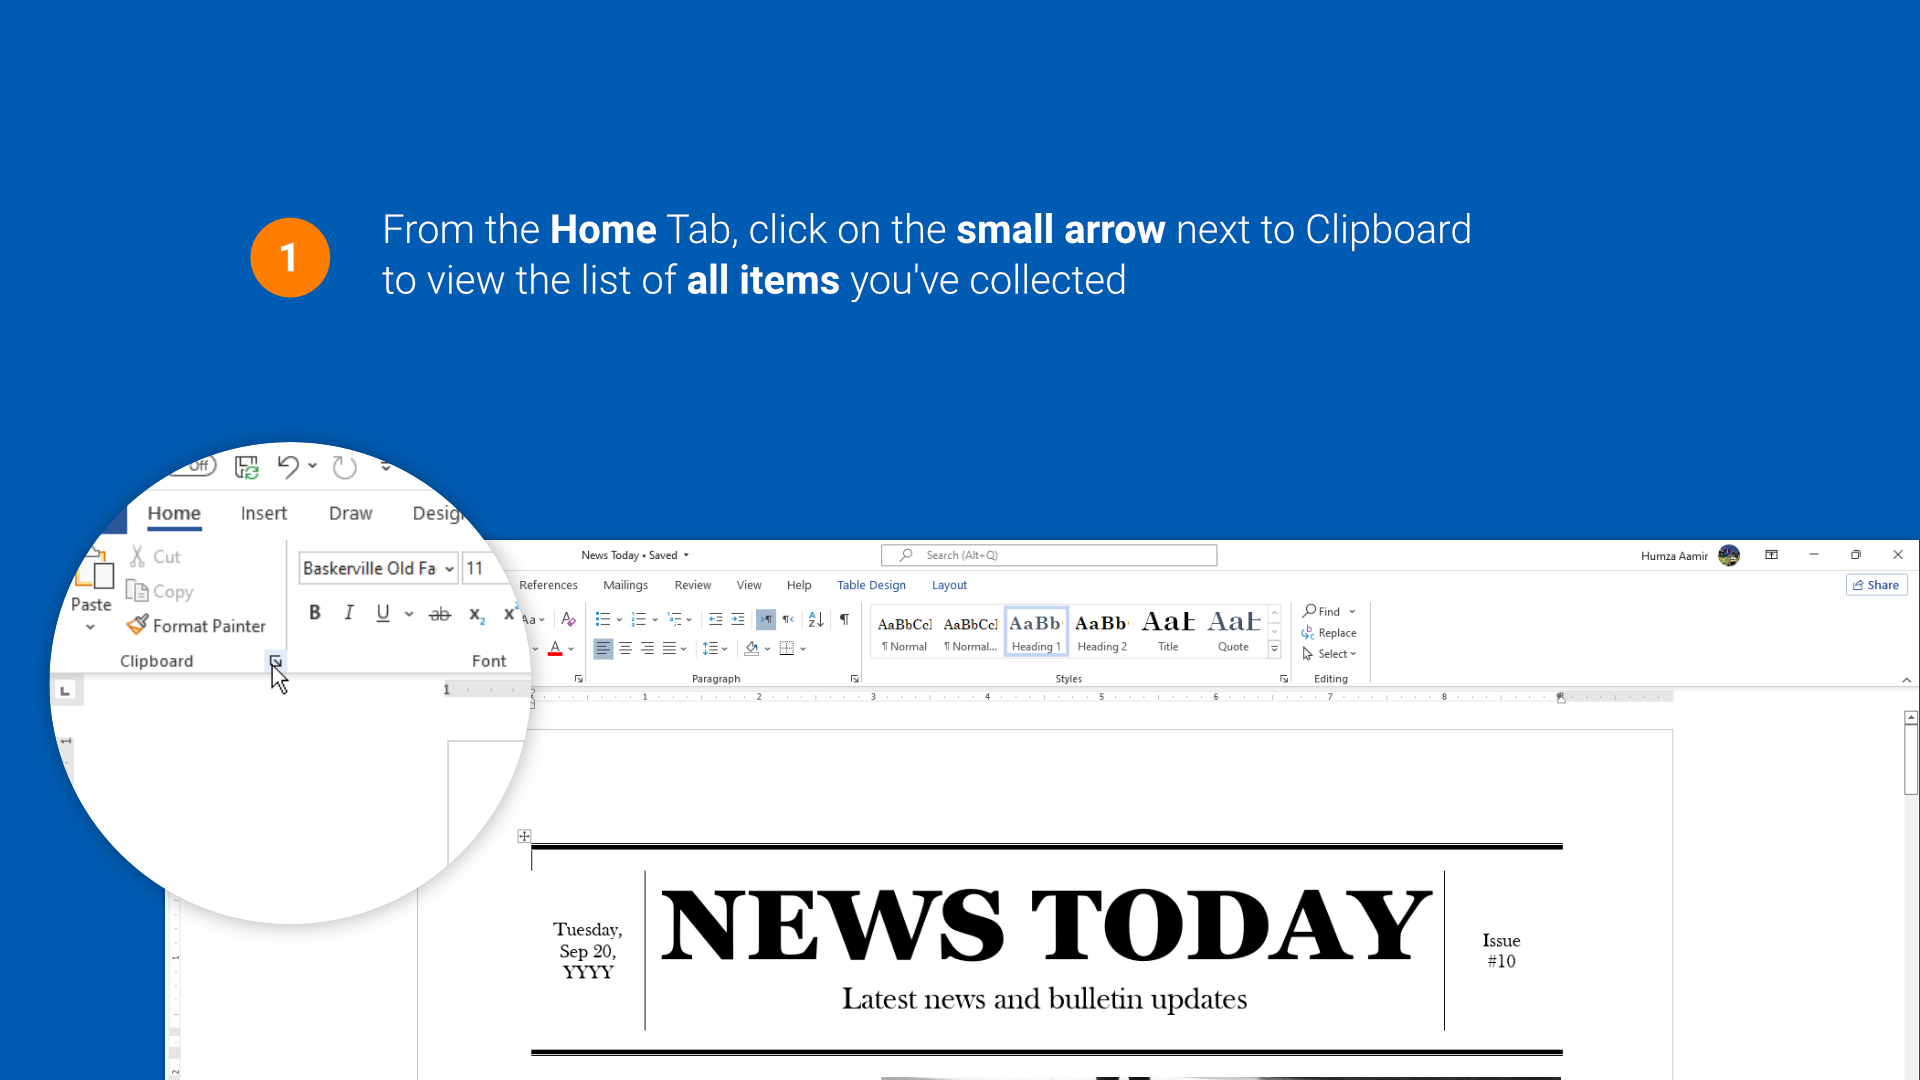
You can entry the Office Clipboard Pane by clicking the small arrow subsequent to the Clipboard label beneath the Home Tab. An even quicker method to do it’s by urgent Ctrl+C twice. To allow this shortcut, click on on the Options button on the decrease left of the Clipboard pane and choose the corresponding setting.
The Clipboard pane sequentially lists down the final 24 texts/photos that you’ve got copied from one other program like a browser hyperlink, e-mail textual content, information from a worksheet, or a picture from a presentation.
You can paste a single merchandise by double-clicking it, or insert all of them into your doc directly by clicking on “Paste All.” Once you are achieved along with your challenge, it is a good suggestion to clear contents of the clipboard by clicking ‘Clear All.’ An empty clipboard is sweet for privateness functions, plus it offers you a recent begin to your subsequent project.
2. Create, edit, and import/export PDFs
The potential to export and import PDFs with MS Word is among the program’s most helpful options. There are some limitations relating to changing/leaping between .pdf and .docx codecs, particularly if there’s heavy formatting concerned, however you may nonetheless extract or edit textual content fairly simply, even when it is a part of a picture in a PDF file.
Export (From Word to PDF)
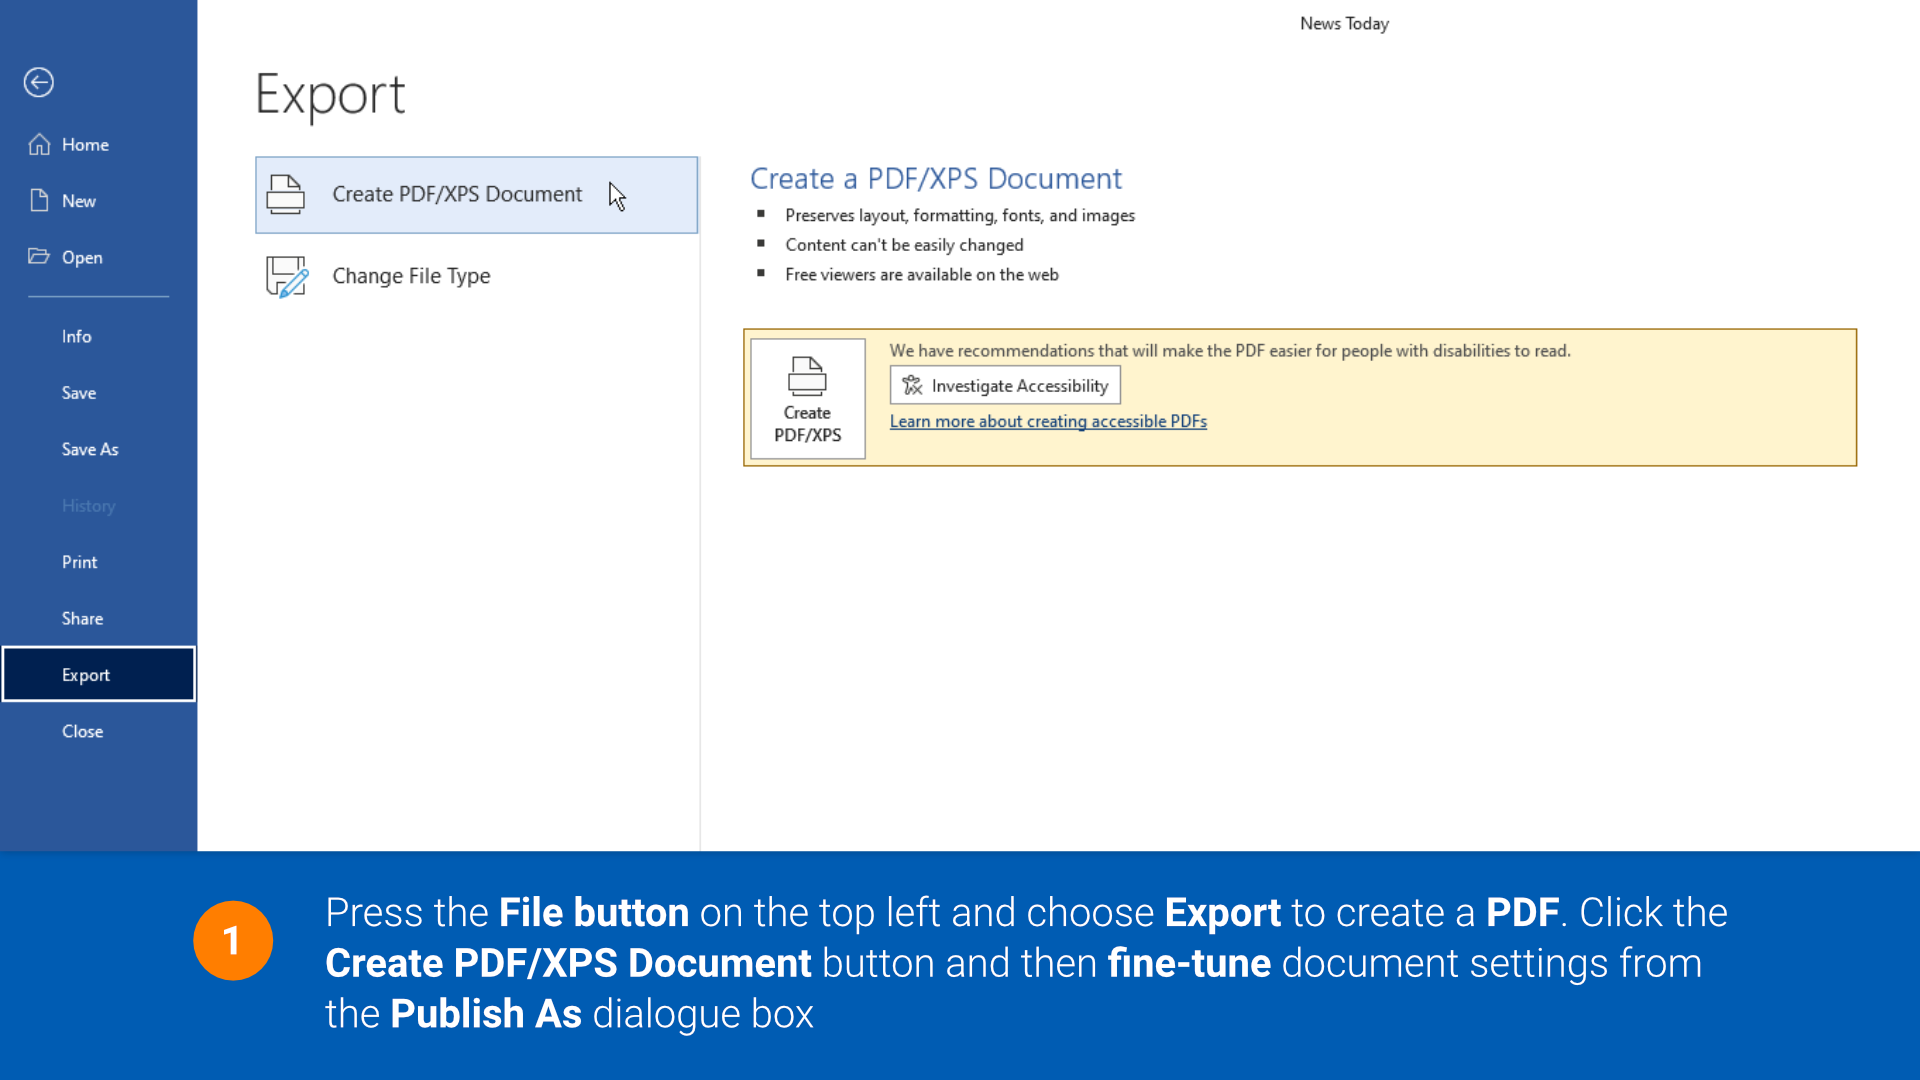
By exporting your Word file as a PDF, you may decrease the chance of modifications to your doc or shield it with a password.
Go to File > Export and click on the “Create PDF/XPS” button. An identical dialog field will open should you go the “Save As” route, albeit with much more file codecs out there.
After selecting your choice, press the Options button to additional finalize a couple of necessary attributes. Note that on Word for Mac, it’s possible you’ll not see this button, however it’s nonetheless price studying on to search out out what you are lacking.
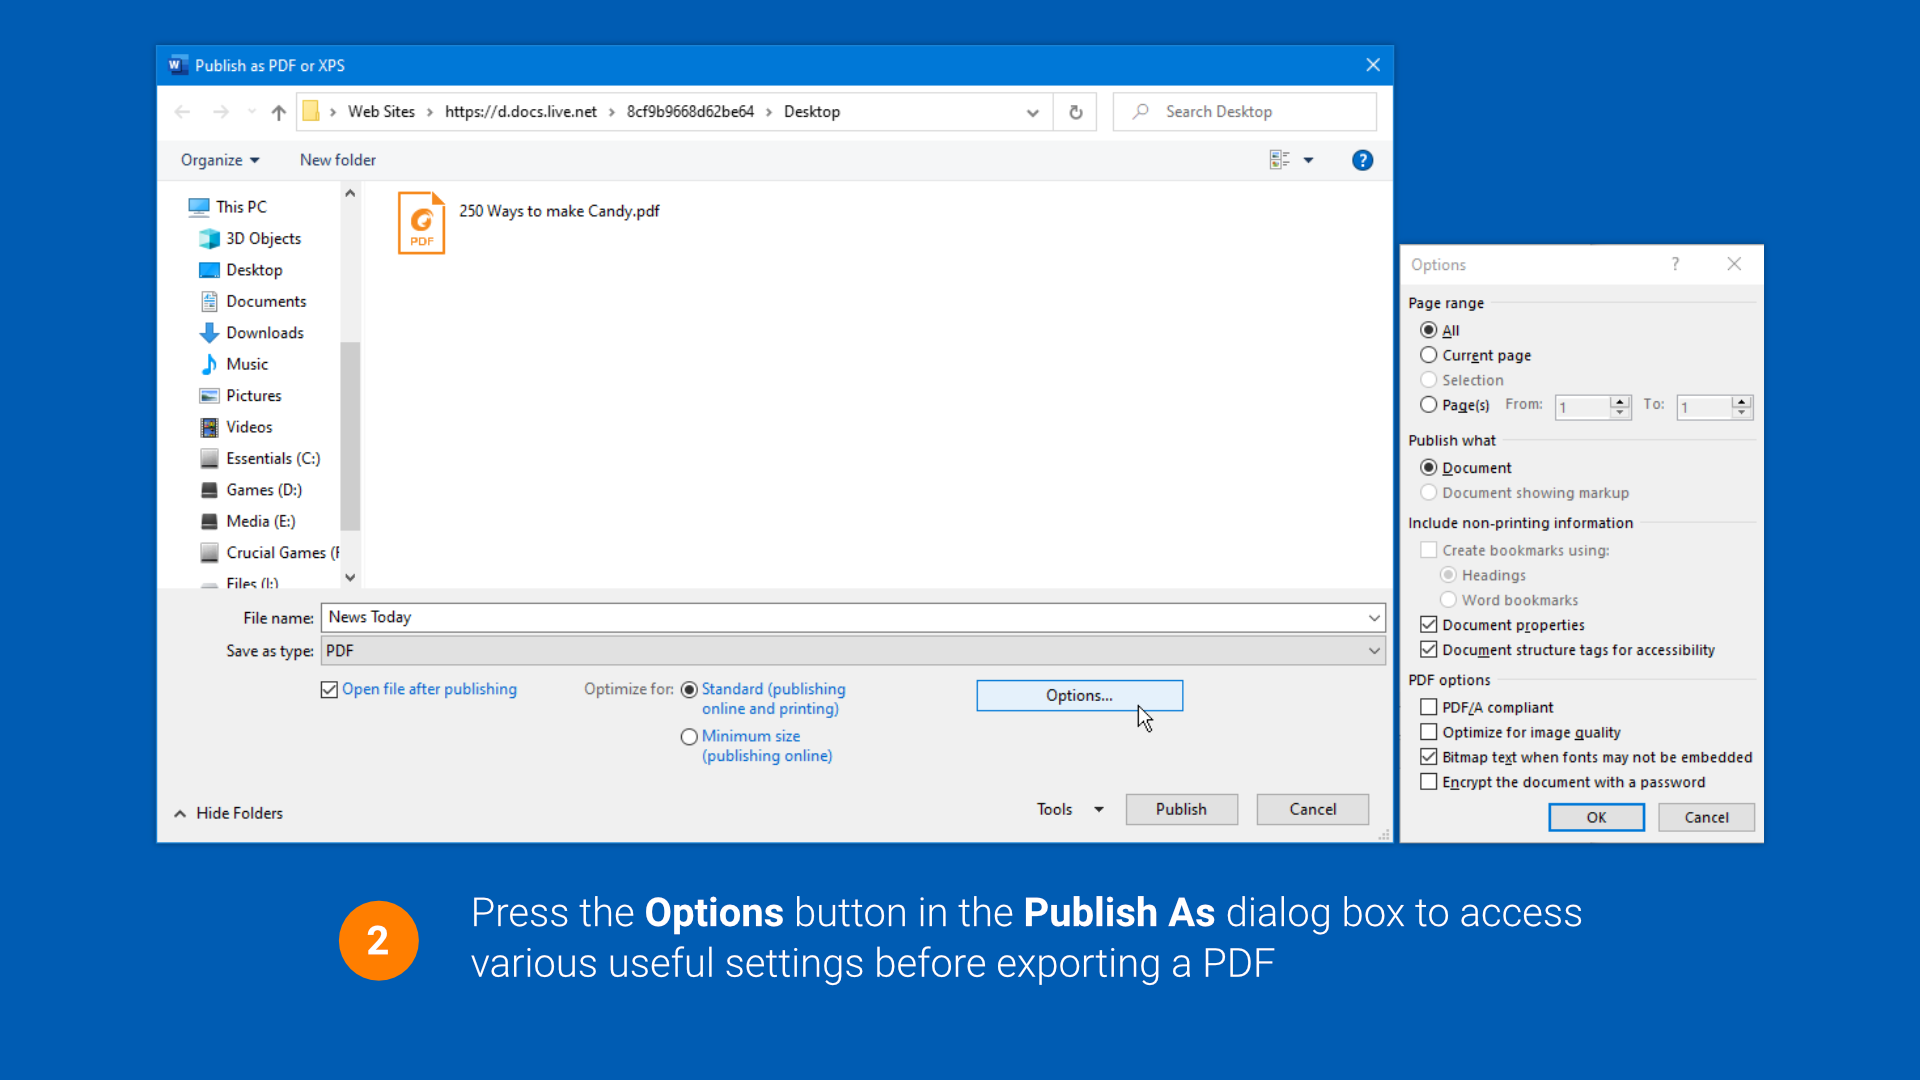
Ticking the PDF/A compliant test field embeds all of your content material throughout the PDF to make sure that it opens reliably on any gadget/show, and is helpful in case your doc is supposed to be archived and reproduced within the long-term.
It disables JavaScript to stop alternation, forbids using embedded video/audio and likewise does not help password encryption in order that the file’s contents are at all times absolutely out there.
- Optimize for Image high quality
This setting is fairly easy. You’ll get a PDF that preserves picture high quality at the price of file measurement, making it unsuitable for sharing on-line or as an e-mail attachment. Tick this feature when your doc and its high-resolution photos are headed for the printers.
For digital printing on a big scale, it’s possible you’ll be higher off utilizing devoted software program like MS Publisher, Affinity Publisher or Adobe InDesign.
- Bitmap textual content when fonts will not be embedded
It can occur {that a} font you want doesn’t present up within the PDF that you’ve got exported. This is as a result of the font’s license restrictions forestall it from being embedded in PDFs or the gadget viewing the doc does not have the required font put in.
To get across the limitation, tick this feature and MS Word will try and convert your textual content into the bitmap picture format in order that your doc seems in the identical font that you simply supposed.
- Encrypt the doc with a password
In addition to password safety for Word information, MS Word can even save and encrypt PDFs with a password. Tick this feature, thereby disabling PDF/A compliance, and assign a password between 6-32 characters.
Once exported as a PDF, your doc will now be locked upon opening and would require a password for unlocking/decryption.
Import (From PDF to Word)
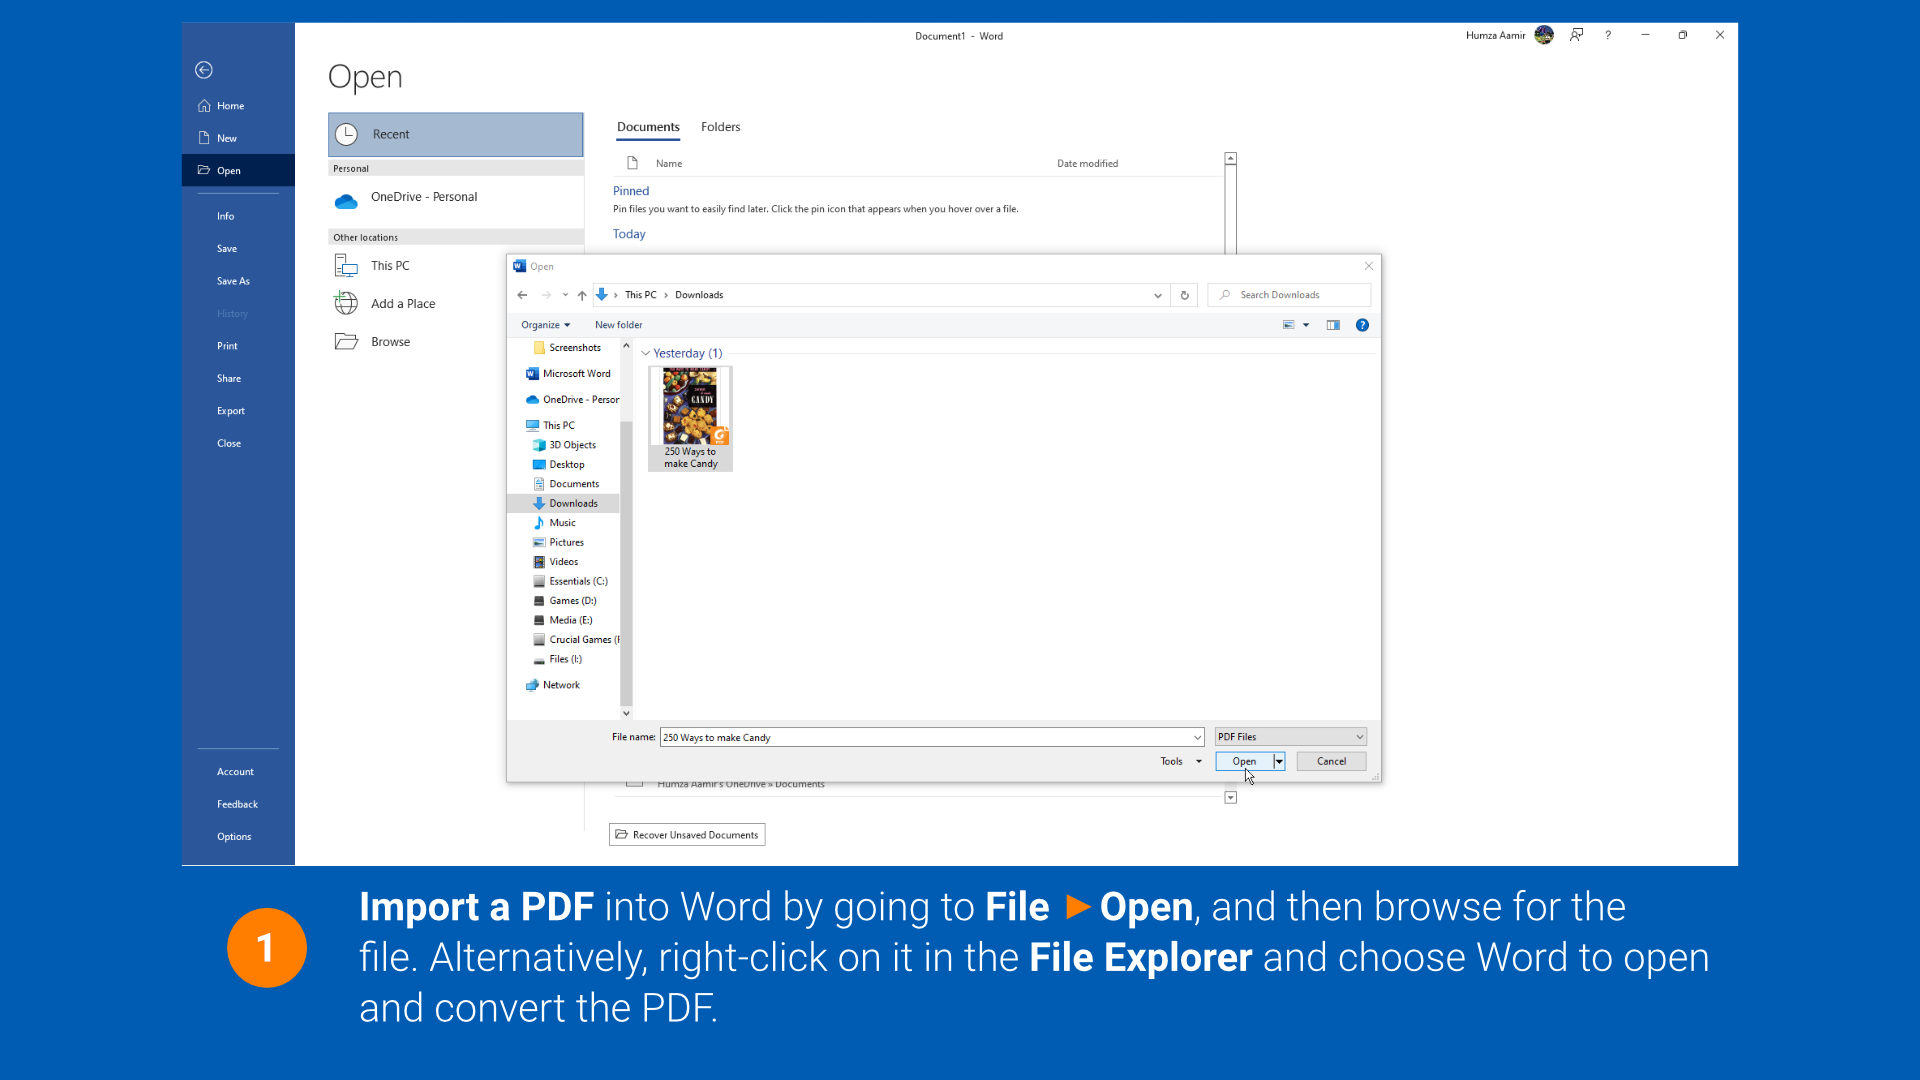
You can even do a good bit of PDF textual content modifying inside Word. The utility lets you realize of the restrictions that would apply to your doc earlier than it begins the conversion.
To import a PDF, click on on File > Open, press Browse and navigate to your doc. Choose PDF in doc sorts in case your file is not showing within the listing.
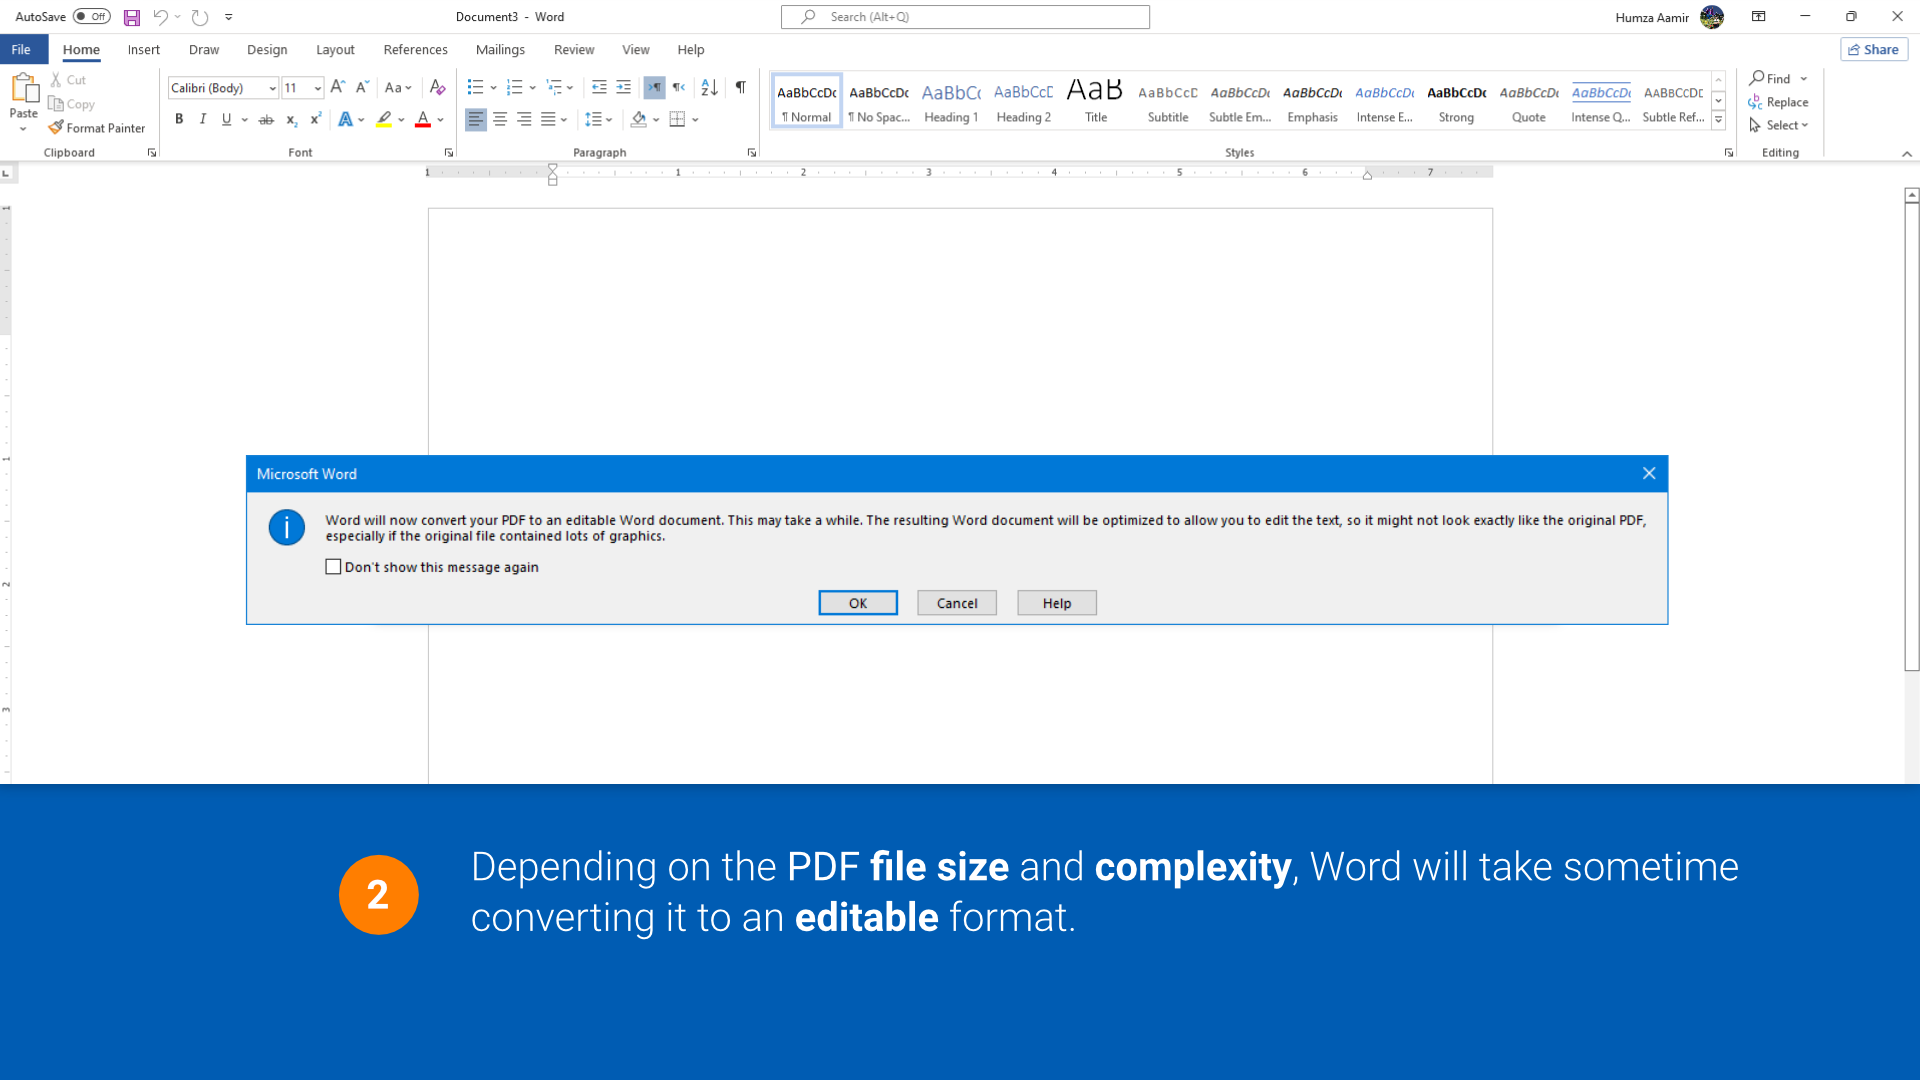
Alternatively, you may start the conversion and modifying course of by straight right-clicking in your PDF doc and setting it to open with MS Word. As lengthy as your imported doc is not overly sophisticated when it comes to formatting and graphics, you may tweak all its contents inside Word and export it again as a PDF once more.
3. Use Outline View to reorganize lengthy paperwork

When working with massive paperwork, you need to use Outline View to get a bulleted checklist of content material that may assist with restructuring shortly.
The Outline View skips all photos within the doc and allows you to see totally different heading ranges and subtexts for a greater understanding of the doc’s hierarchy.
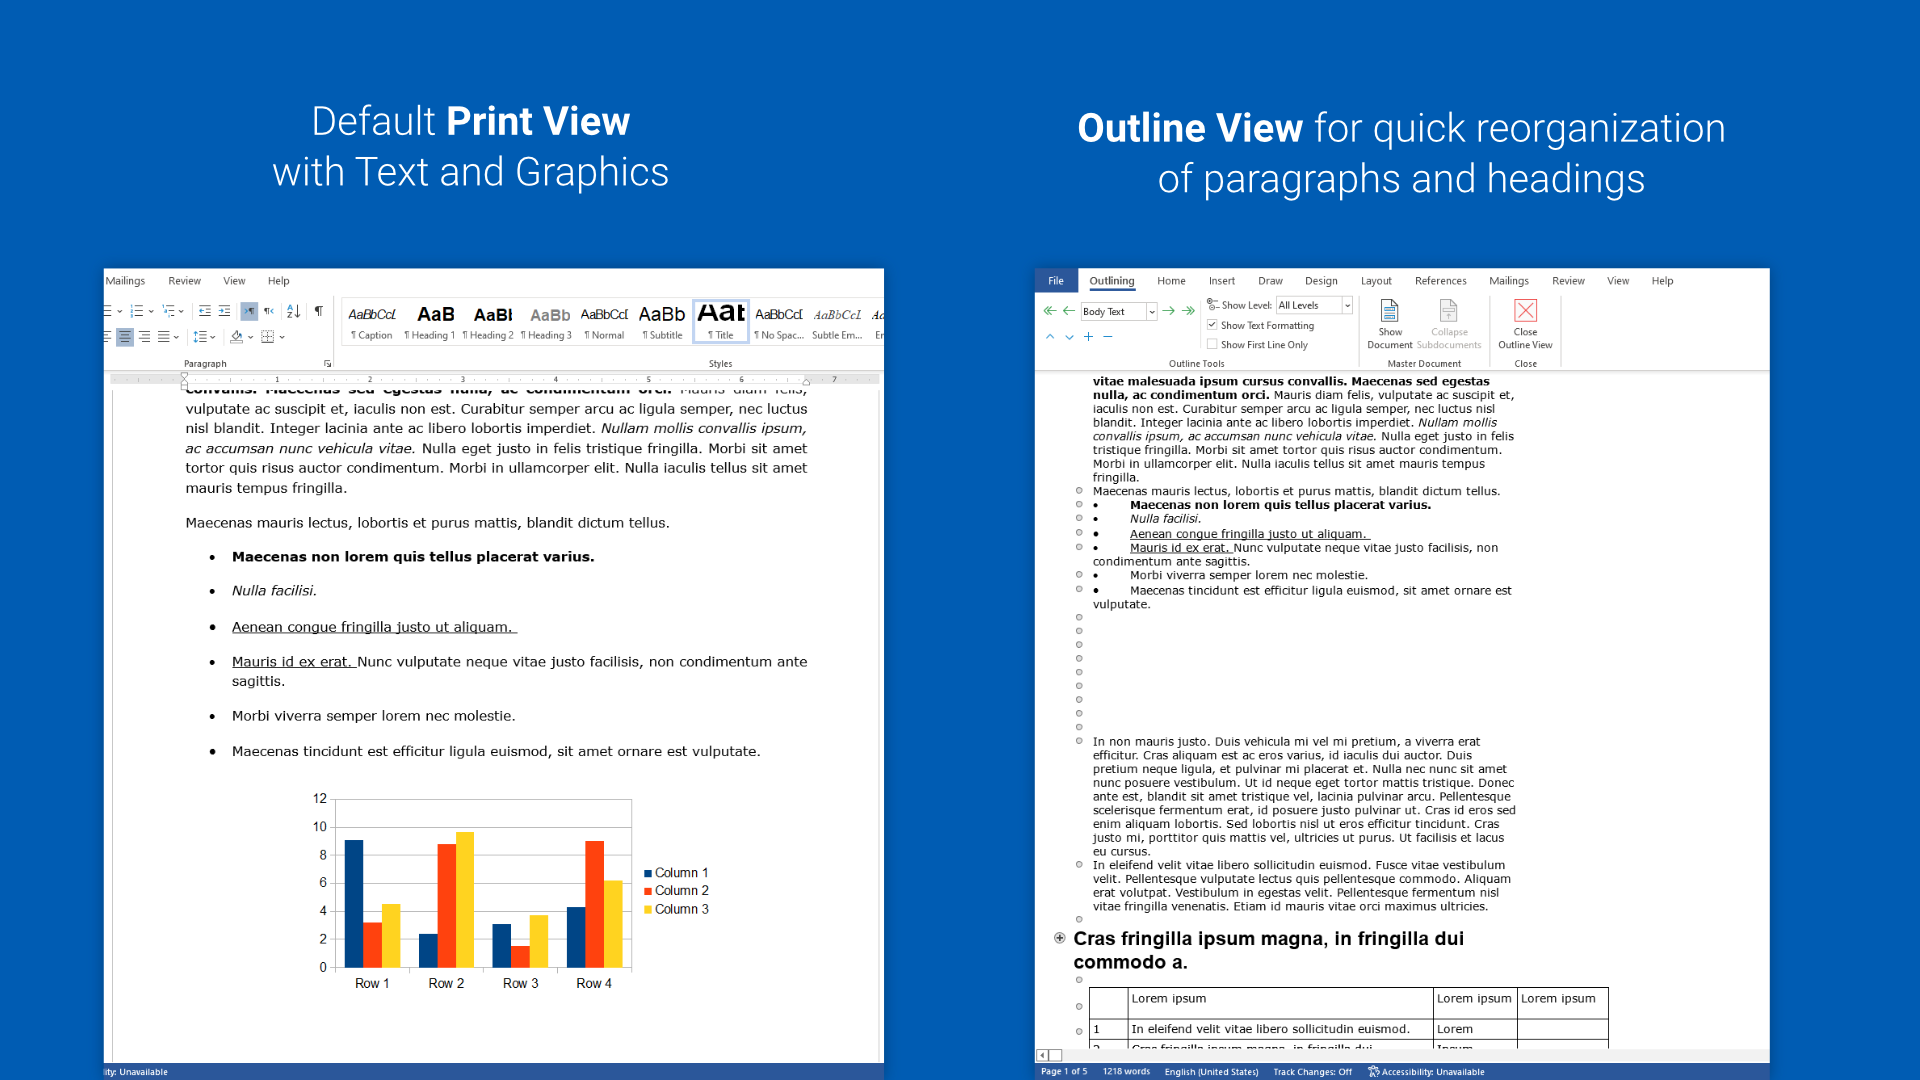
In addition to faster navigation, Outline View helps you to drag and drop for quick reorganization. Switch to this view by clicking on the View tab in Word’s ribbon/toolbar and urgent Outline.
4. Get a Readability rating
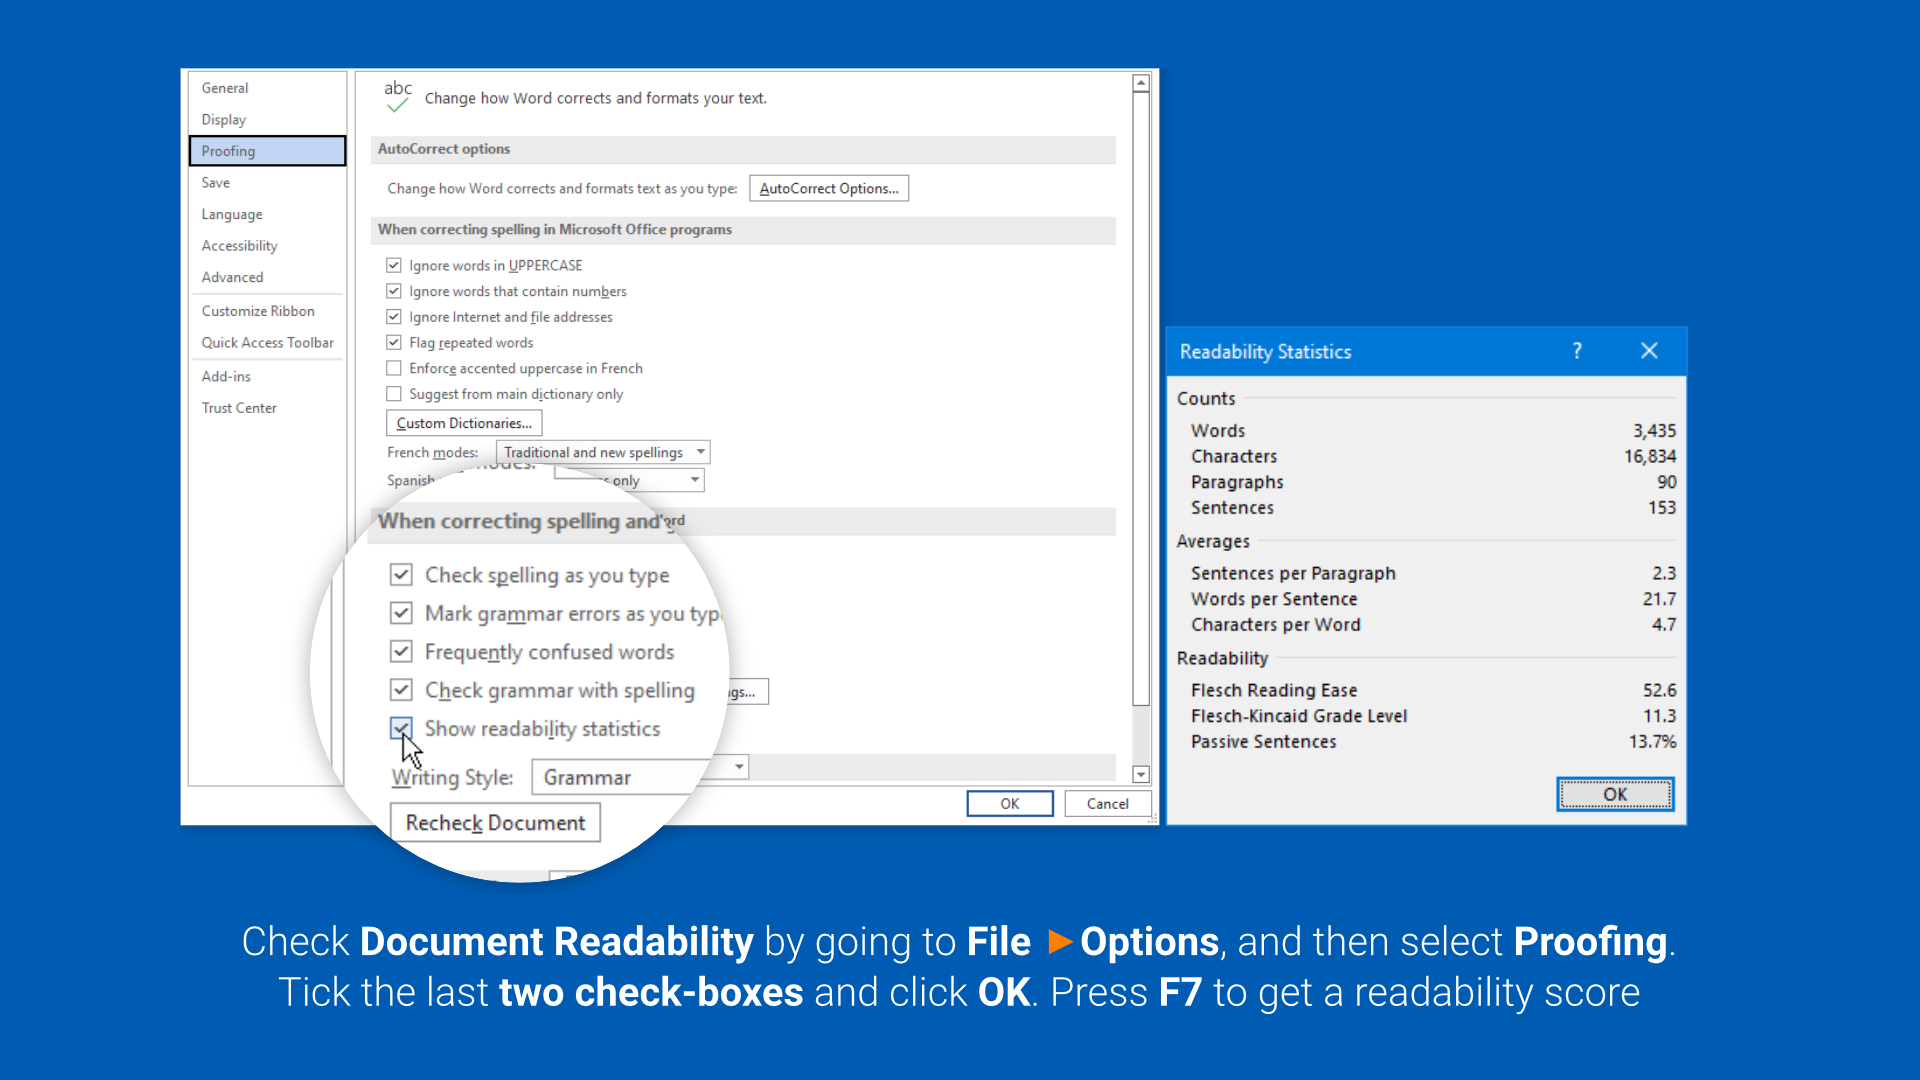
It’s at all times a good suggestion to spend some further time at bettering your doc’s readability. You can use Word’s built-in proofing capabilities to get a readability rating and make modifications to the textual content for enchancment.
Go to File > Options after which choose Proofing.
Under “When correcting spelling and grammar in Word” tick the final two choices in sequence to allow this function. The shortcut key (F7) for spell test can now even be used to immediately get readability statistics to your doc.
Activating this function takes your doc via Word’s spelling and grammar test, after which assigns it a studying stage in accordance with the Flesch Reading Ease take a look at and Flesch-Kincaid Grade Level take a look at. You can study extra about these exams right here, however the gist of it’s that they take into accounts the typical sentence size and variety of syllables per phrase.
Microsoft suggests scoring between 60 and 70 (Flesch Reading Ease take a look at) and seven.0 to eight.0 for the Grade Level take a look at. Don’t be too arduous on your self should you’re unable to attain these outcomes regardless of a number of revisions. Your purpose needs to be to refine and simplify your doc.
5. File restoration… to the rescue
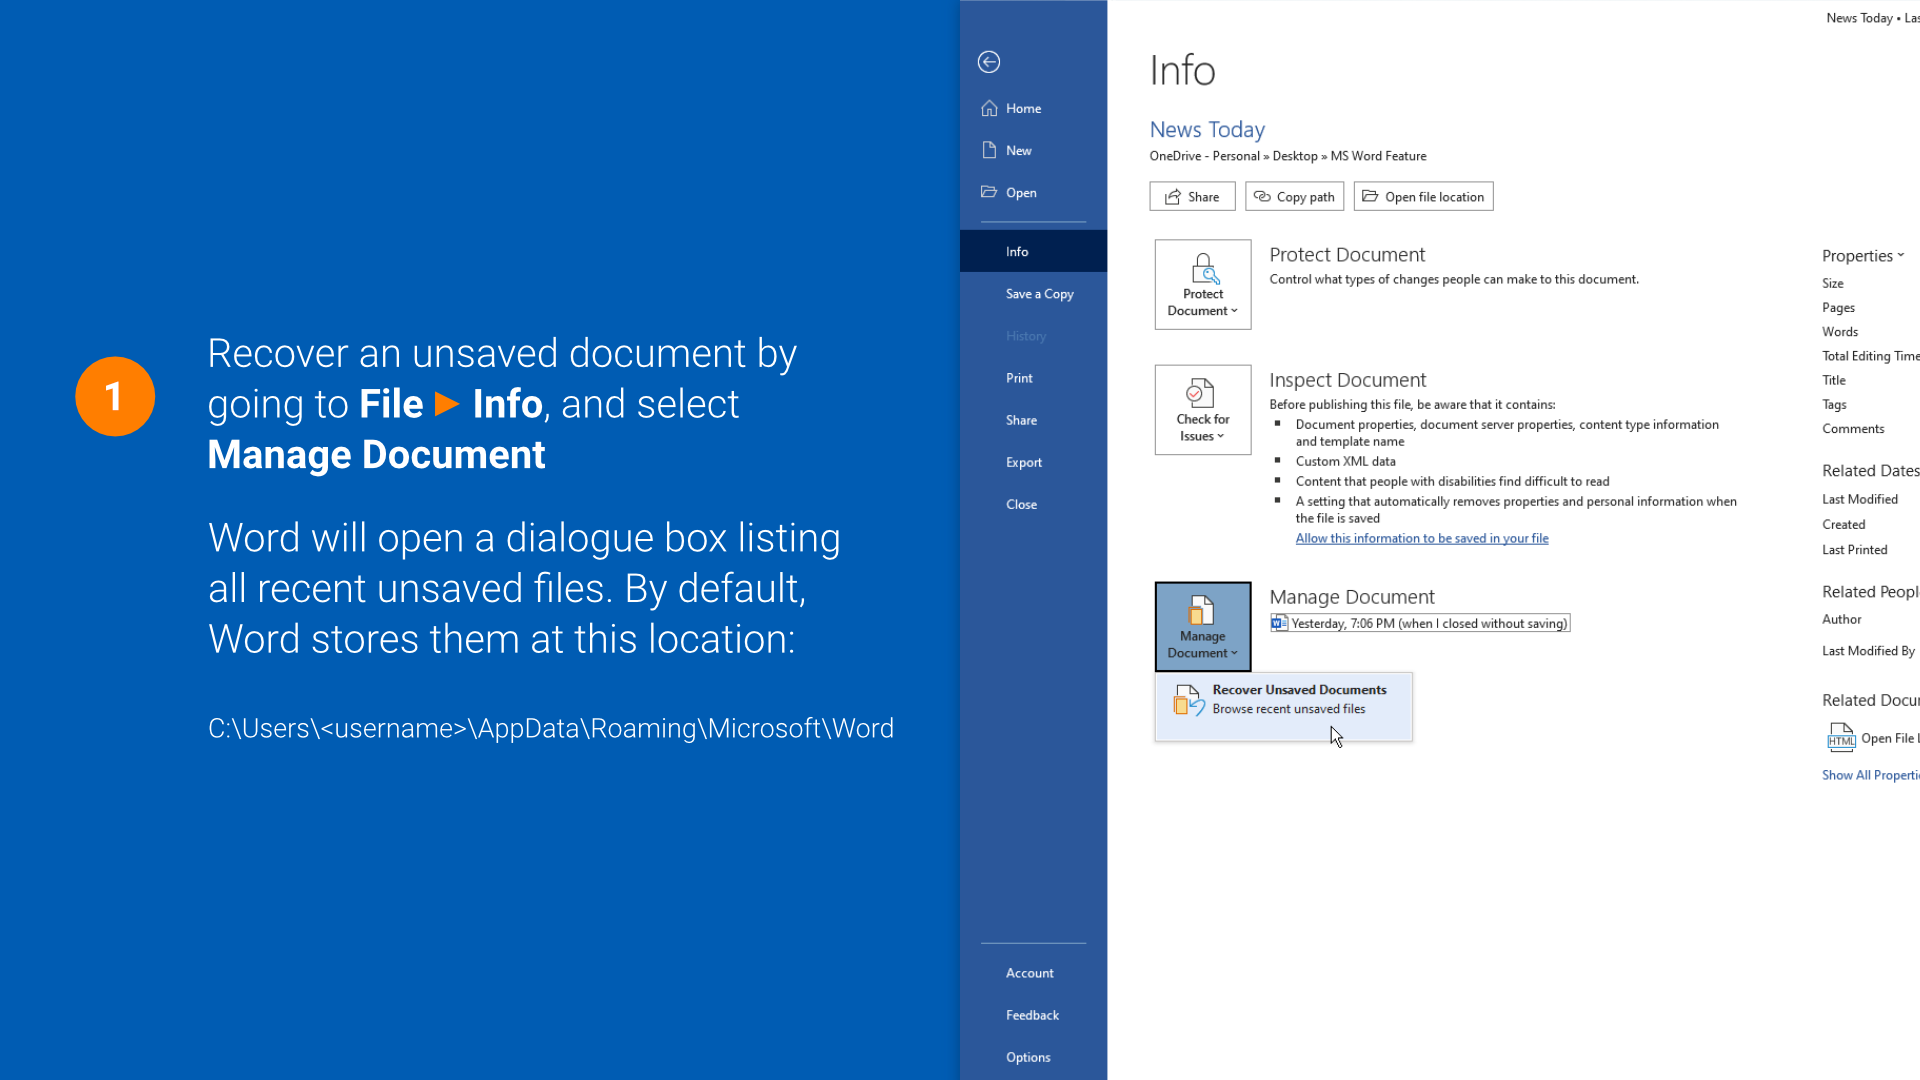
A sudden PC crash, energy loss, or a misclick may cause you to lose hours of unsaved work immediately. This is why Word is supplied with AutoSave and a doc restoration function that briefly retains a duplicate of your current unsaved paperwork.
To view these information, go to File > Info and select Manage Document. Click on “Recover Unsaved Documents” and choose from the information which are listed within the dialog field.
You could not at all times discover the restored model to your liking, and a file can also want repairing if Word deems it to be broken or corrupt. Nevertheless, even {a partially} recovered doc is best than beginning with a clean slate.
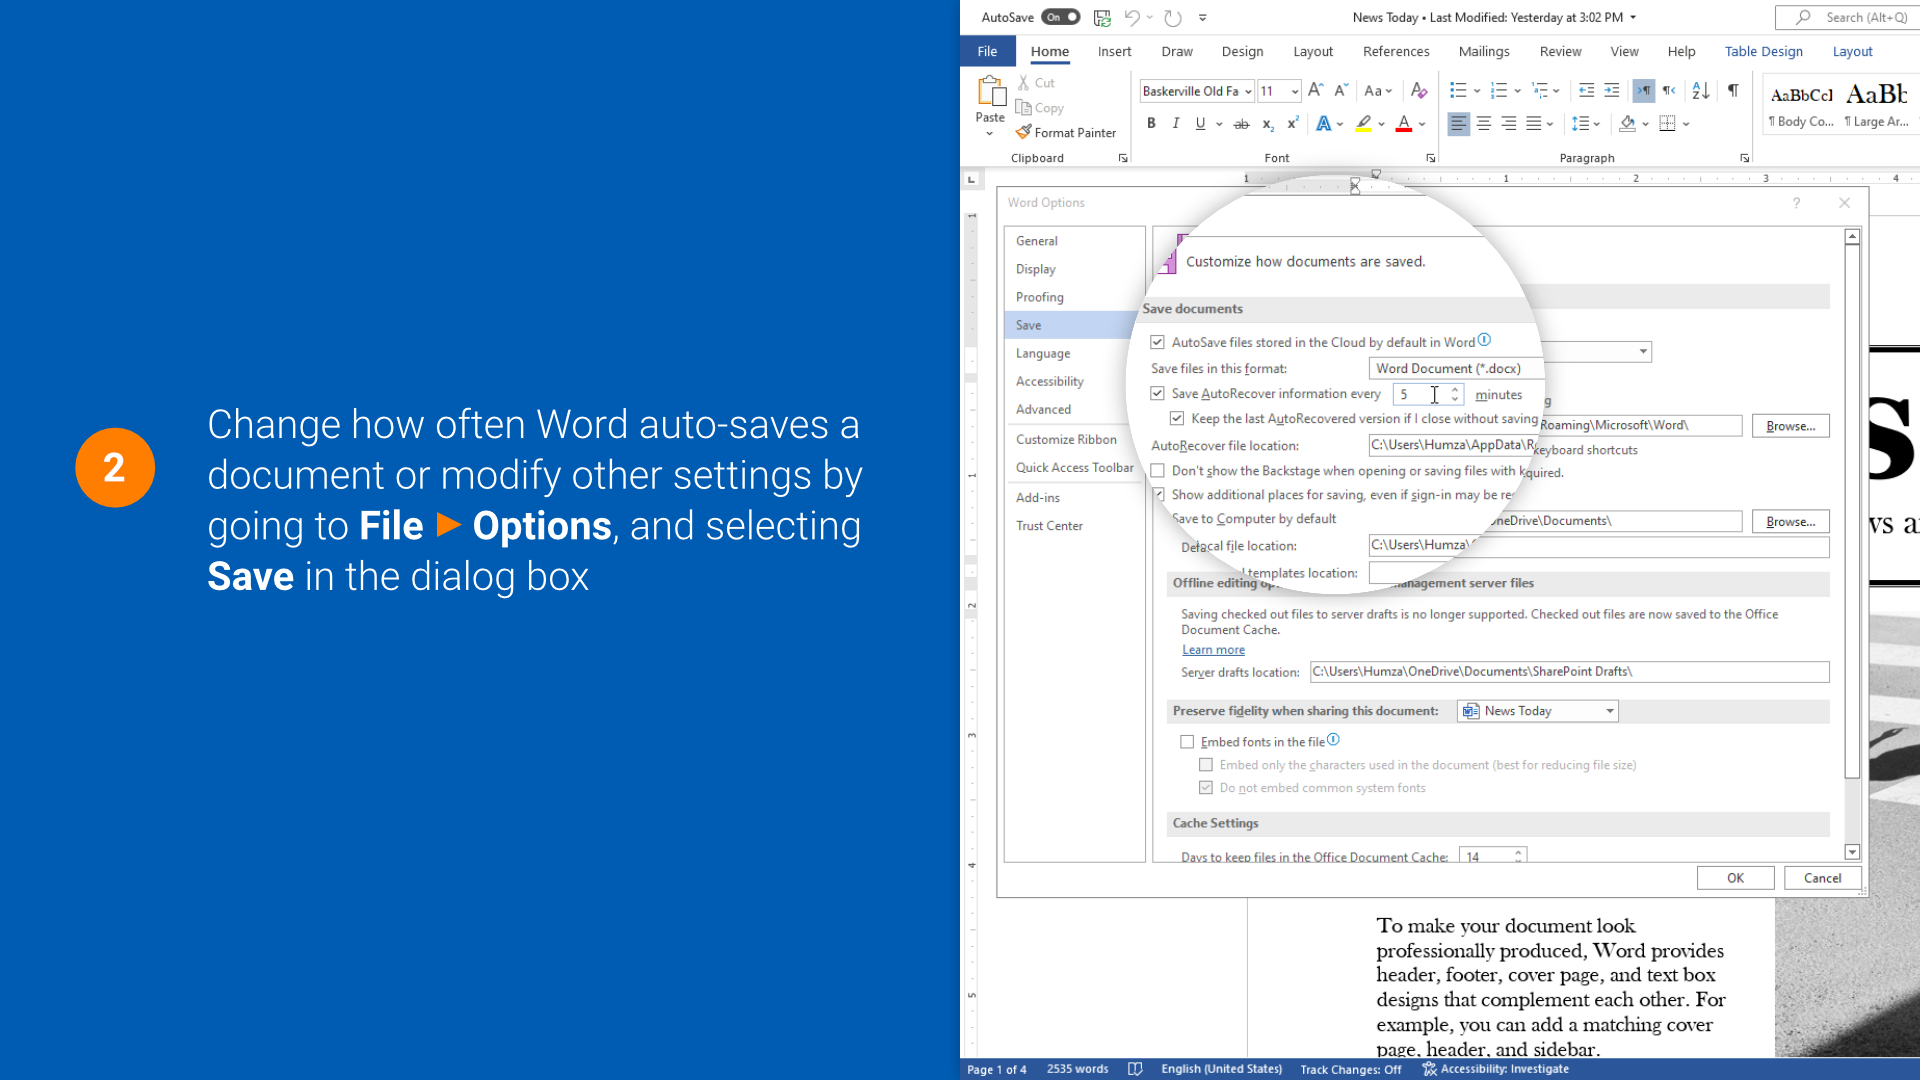
You can even tweak Word’s auto restoration settings to extend the frequency at which this system autosaves, in addition to change the non permanent location of unsaved information. To do that, click on on File > Options and choose Save from the pop-up menu. Here, amongst different settings, you may specify the variety of minutes after which Word autosaves, and select one other location for storing auto restoration information.
6. Reduce file measurement of Word paperwork
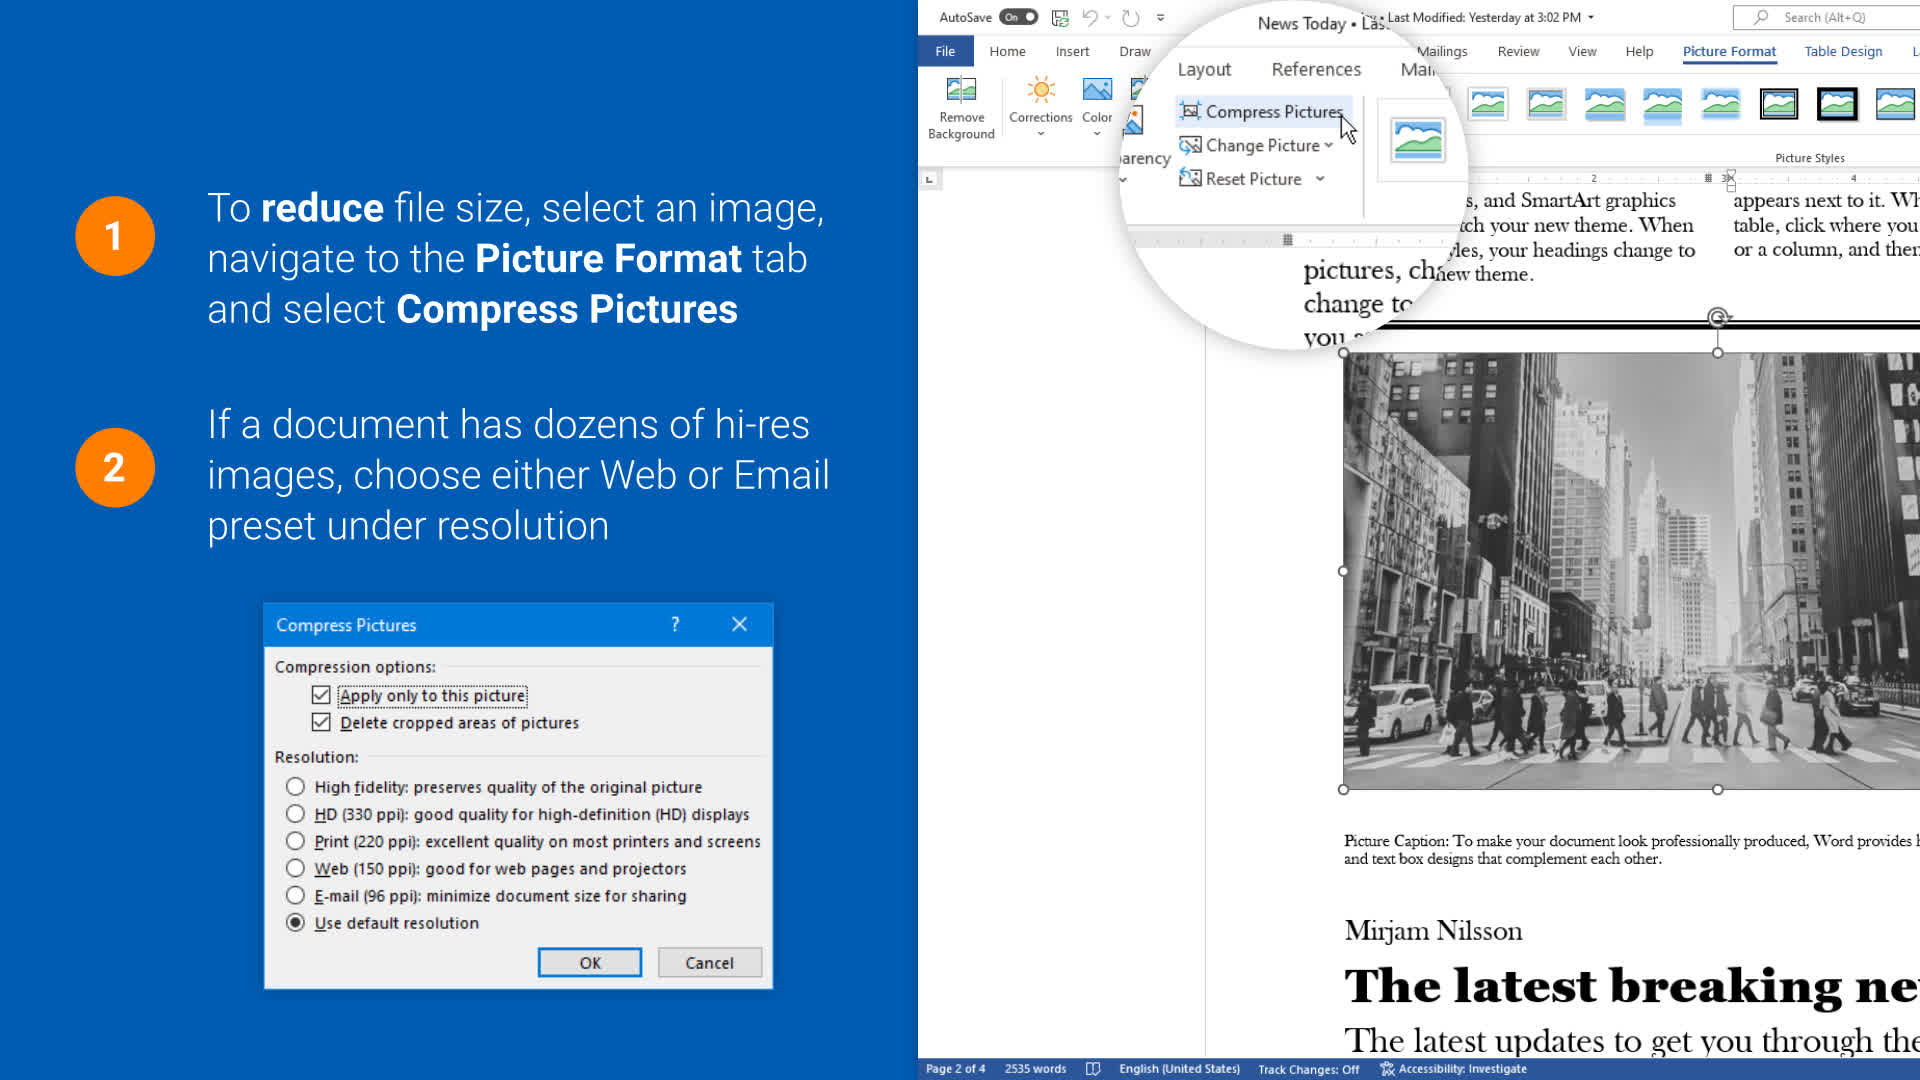
A Word doc comprising a couple of pages of textual content will not be of a lot concern. However, file measurement can improve noticeably as soon as photos and different customizations begin piling up. Consequently, your doc could turn out to be tougher to share and open on-line, or turn out to be too huge to be despatched as an e-mail attachment.
There are a lot of methods to scale back the dimensions of a Word doc. First, make certain to put it aside within the extra environment friendly .docx format, however you too can compress photos and deciding on a decision that most closely fits your use case, keep away from embedding fonts, and disable monitoring as soon as collaboration is now not wanted.
Compress Images
Select a picture in your doc and click on on the Picture Format tab (ribbon menu). Click on Compress Pictures and specify a decrease decision for the chosen picture or all photos in your doc.
Avoid embedding fonts
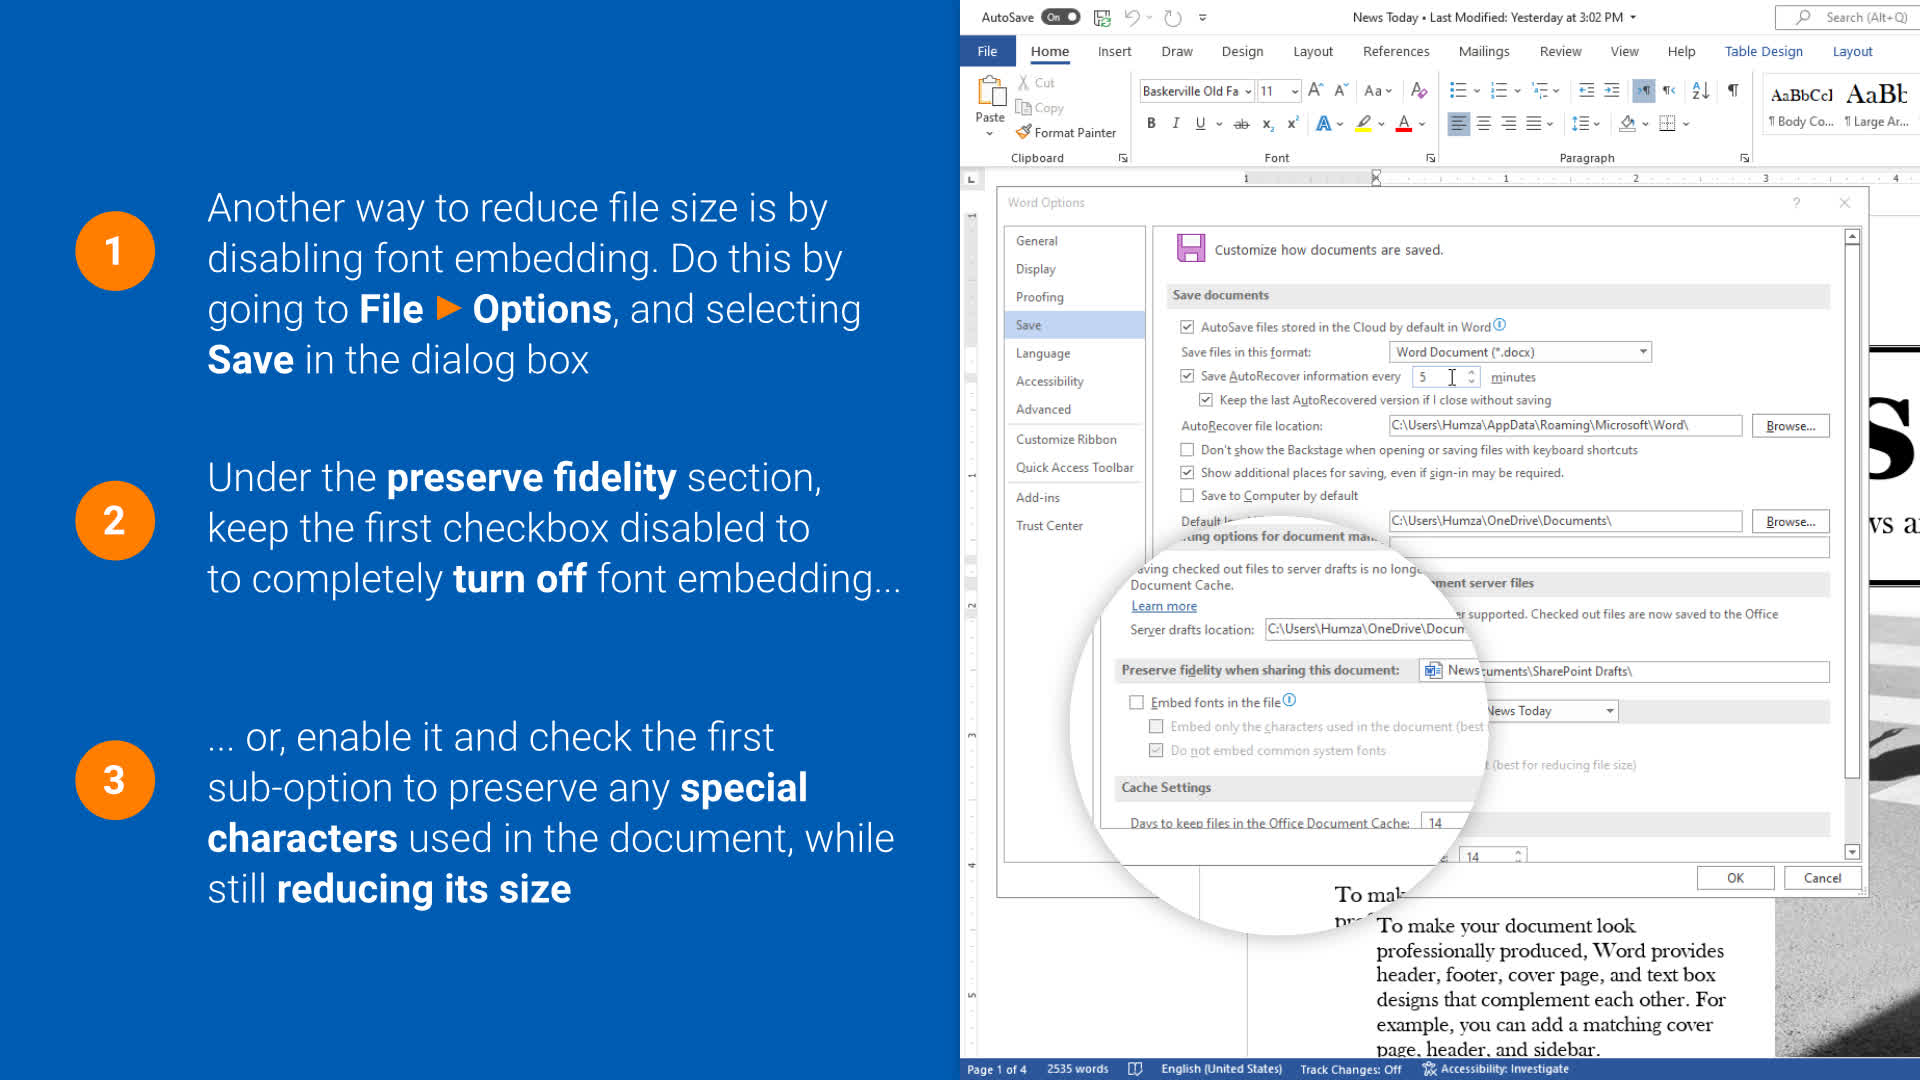
MS Word can embed TrueType and OpenSort fonts, in order that they are often seen as supposed on different PCs even when they do not have these fonts put in.
While embedding fonts is sweet for consistency, they will add to the dimensions of a doc. Although the choice is disabled by default, you may be sure that Word does not embed a font by going to File > Options and deciding on the Save tab.
Under constancy settings, uncheck “Embed fonts within the file” to keep away from embedding altogether. However, you may nonetheless get a discount in doc measurement whereas preserving high quality by checking the primary sub-option. This helps you to maintain any particular characters or styling that you’ve got used however places some modifying restrictions for different customers. It’s beneficial to maintain this feature unchecked if additional modifying on a doc is predicted.
Disable/Stop monitoring
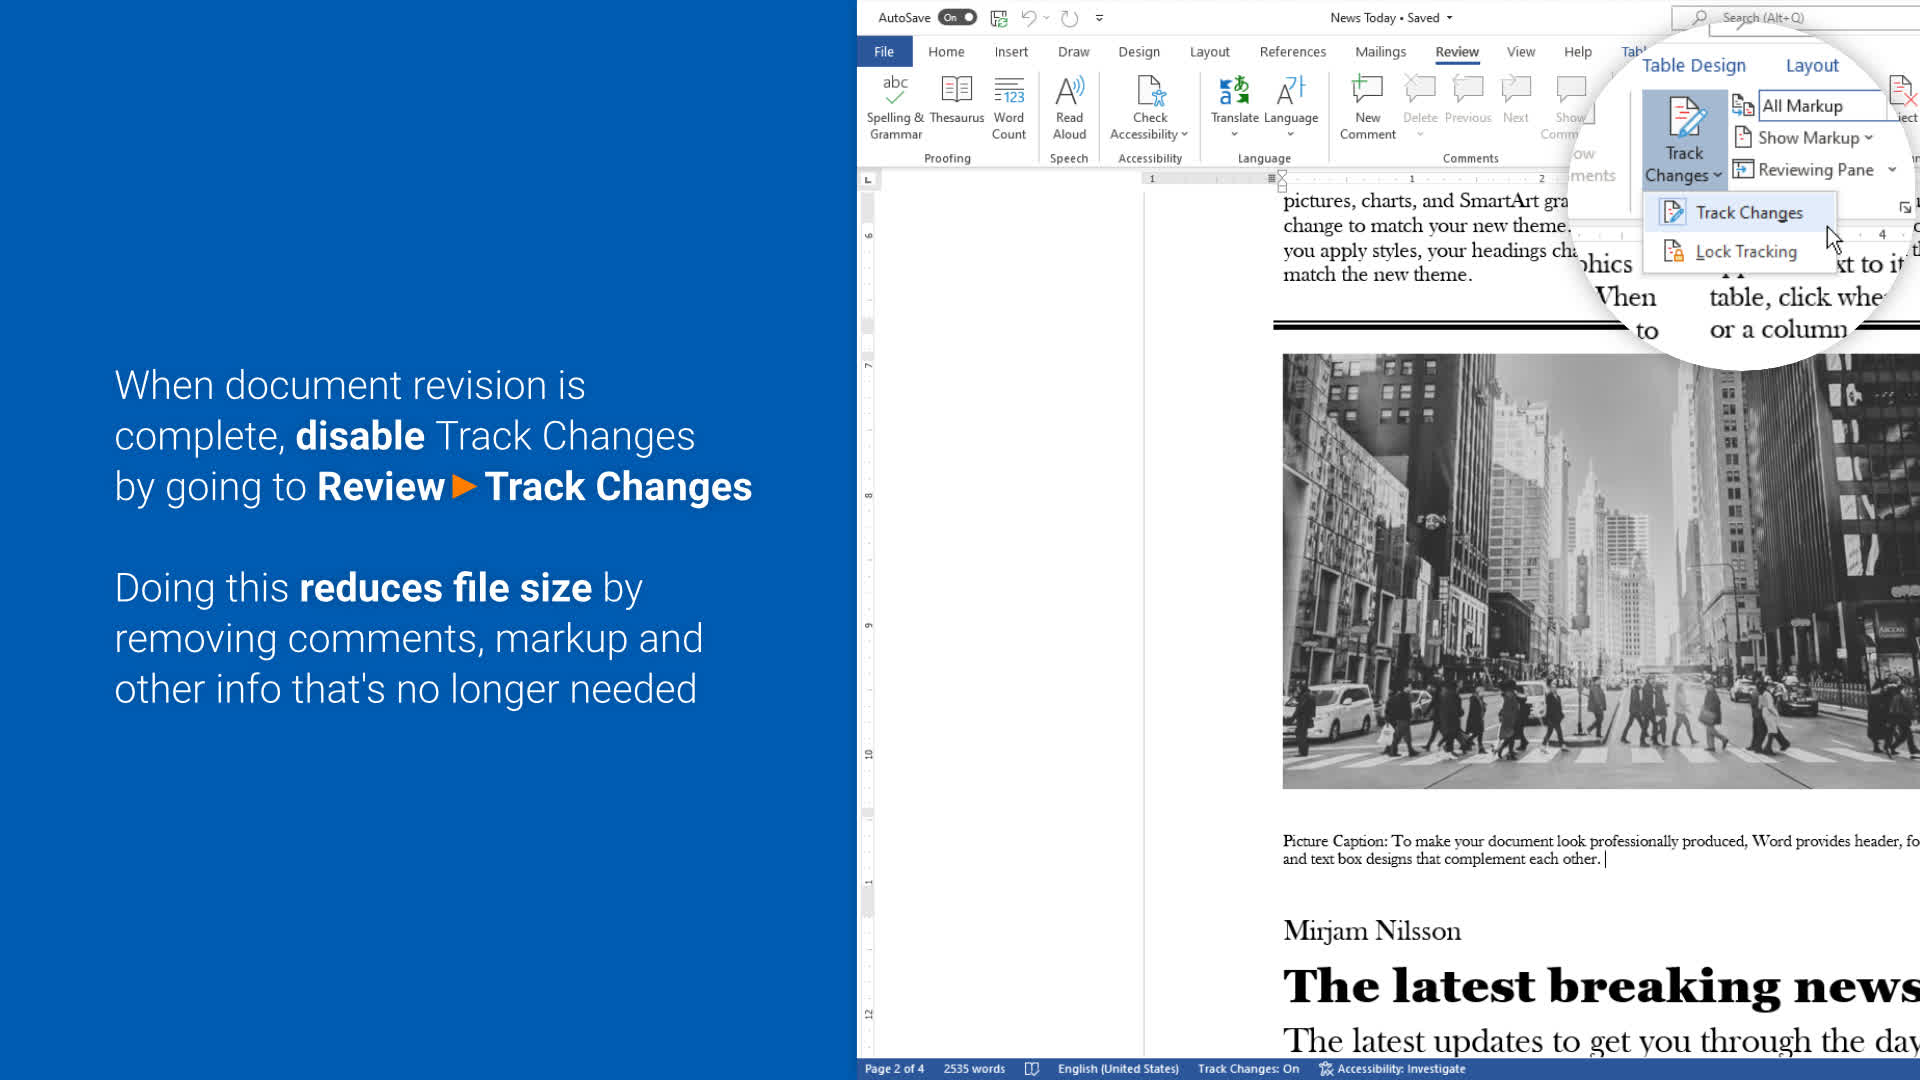
The potential to trace modifications is kind of an helpful function, permitting others to edit a doc, suggest modifications, make feedback after which return it to the unique creator.
Over time, nonetheless, this information can add to the doc’s measurement and it could be unnecessarily holding this data on the ultimate revision of a doc.
You can due to this fact disable/cease monitoring modifications as soon as you’ve got accomplished collaboration along with your colleagues. Go to the Review tab, and choose Track Changes to toggle it off. Alternatively use the Ctrl+Shift+E shortcut to allow/disable this setting.
7. Password shield paperwork, make them read-only
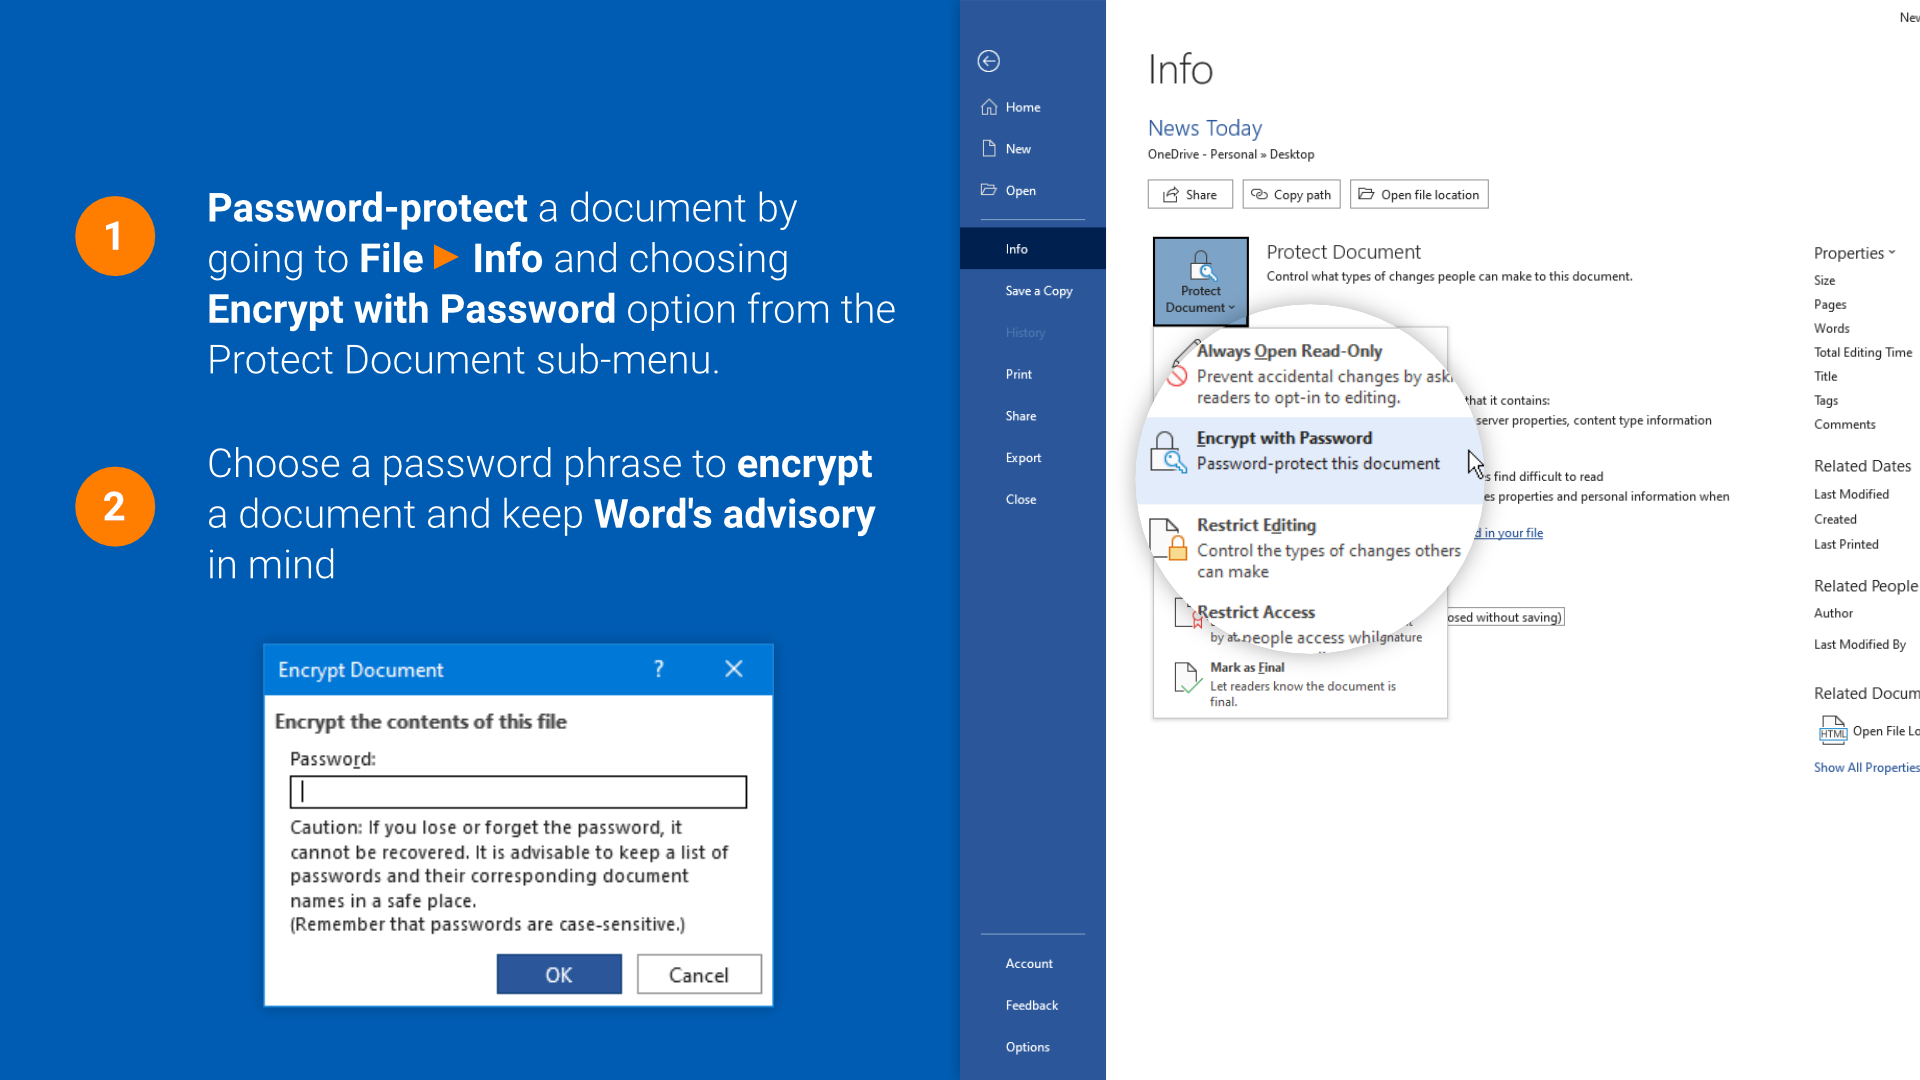
It’s necessary to take safety measures when working with paperwork of delicate or private nature. MS Word makes it pretty simple to encrypt your file with a password, in addition to assigning modifying and entry restrictions. You can even set a doc as read-only to stop any additional modifications.
To set a password, go to File > Info and click on Protect Document. From the pop-up menu choose “Protect with Password” and observe the directions proven. Once you’ve got set a password, Word will encrypt the file and immediate you for it when opening the doc sooner or later.
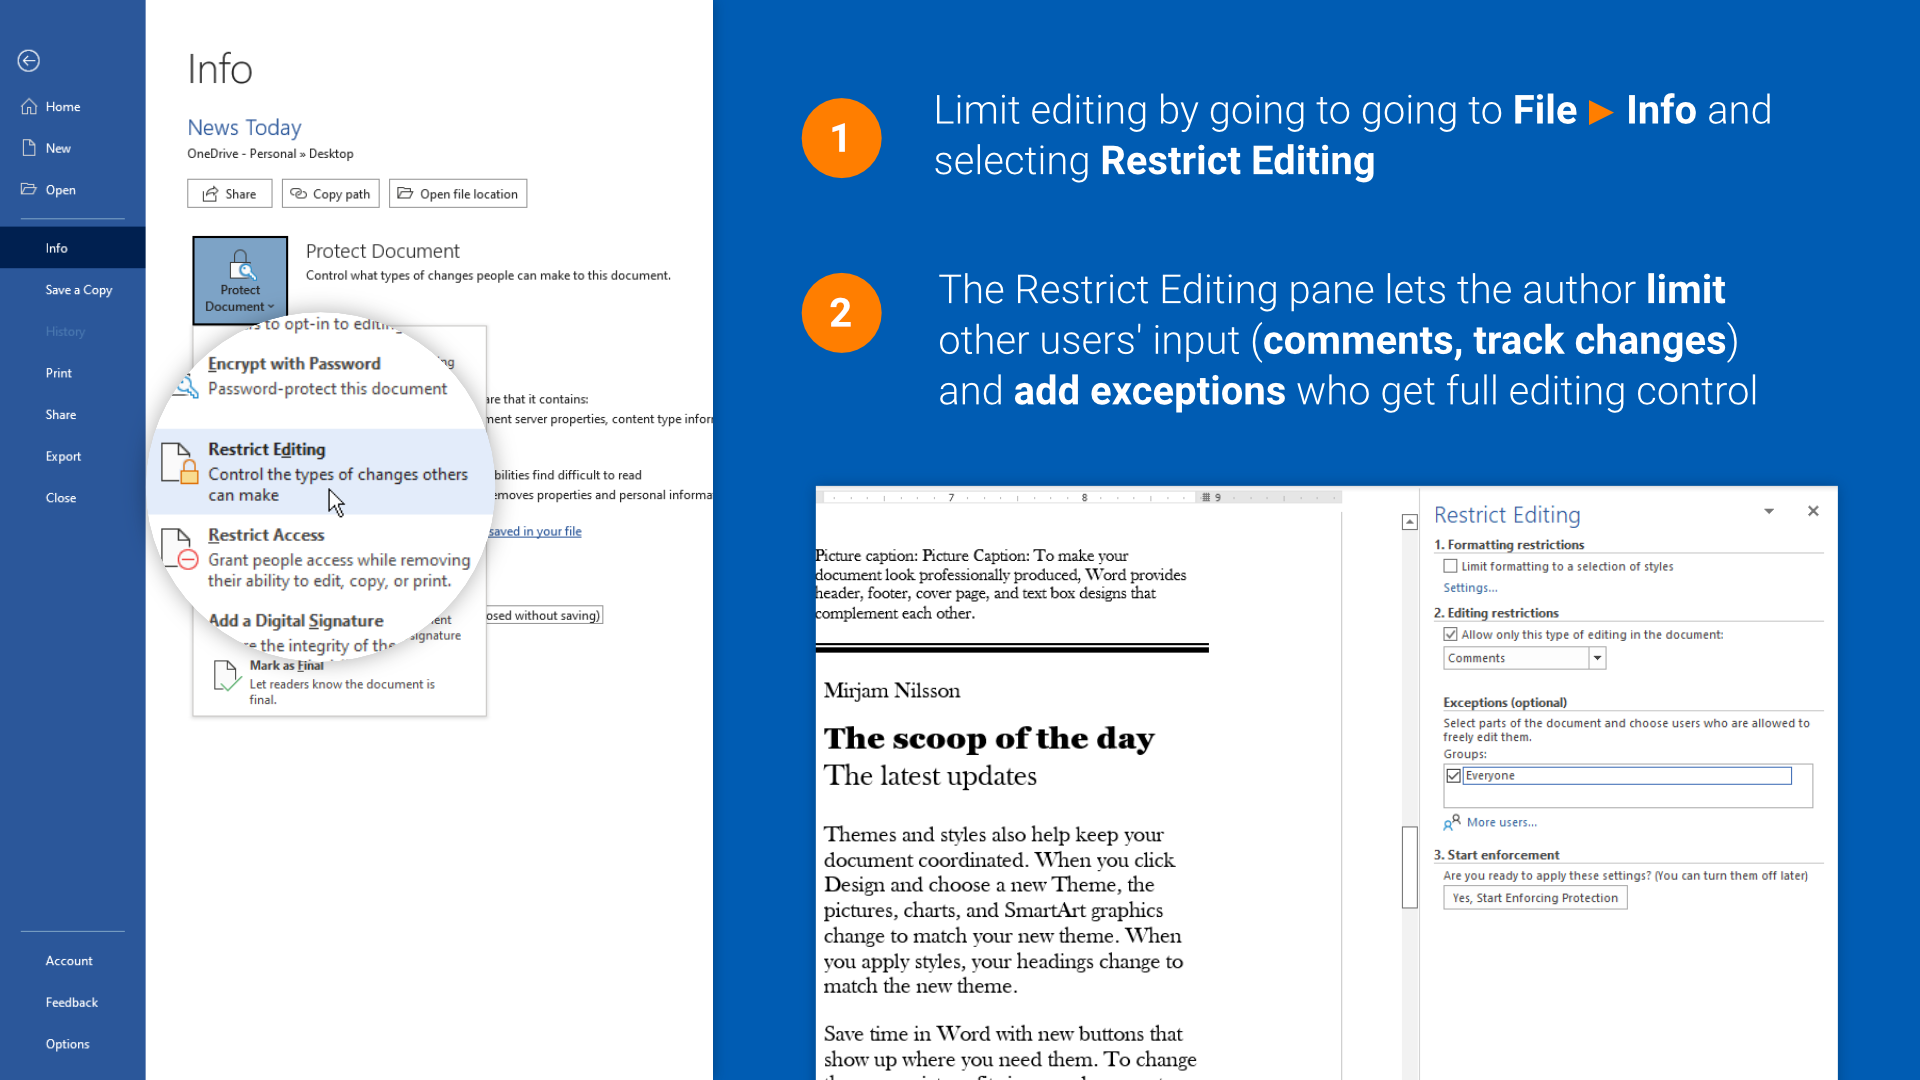
Another method to shield your doc is by placing modifying restrictions in place. This helps you to restrict formatting to a number of kinds (formatting for tables, headings, and many others.) and specify if you need different customers to have the ability to monitor modifications, insert feedback, fill in types, or simply set the doc as read-only.
If you do want a colleague to make modifications to a part of a doc or need choose customers to make modifications, you may choose the required chunk of textual content and add their title beneath exceptions. Activate these settings by urgent the “Yes, Start Enforcing Protection” button.
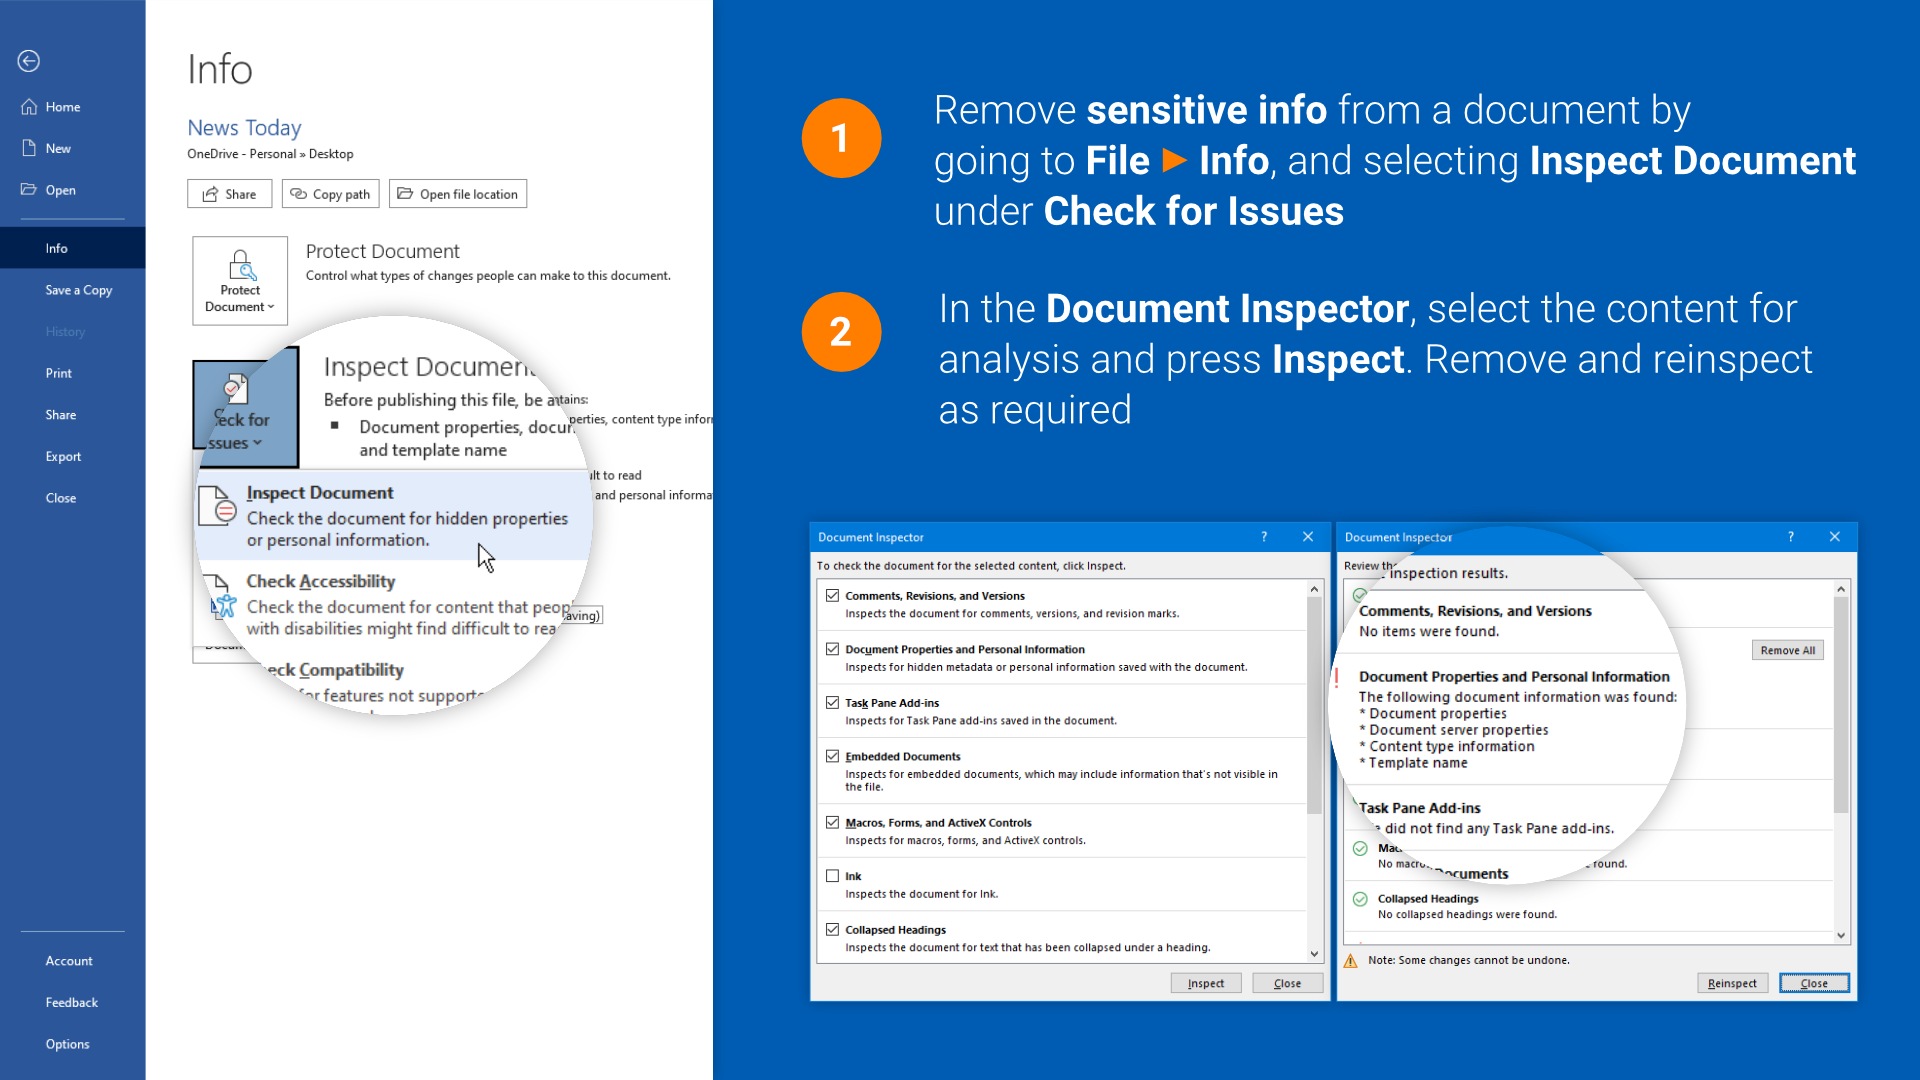
MS Word’s Inspect Document function may also be used to test or take away doc metadata equivalent to creator title, topic, title, macros, and different personally identifiable data equivalent to e-mail headers, routing slips (doc circulation) and hidden textual content.
You may also need to use this for eradicating collaboration historical past with colleagues (feedback, monitor modifications, revisions) earlier than sharing the doc with others.
The Inspect Document function might be activated by going to File > Info and clicking Check for Issues. From the pop-up menu, choose the primary possibility, which is able to open a brand new window itemizing all of the gadgets that Word can test for you. Click Inspect after making your choice and let Word analyze the doc. Review and take away data as required by urgent Remove All subsequent to an merchandise class and click on Close to finish the doc inspection course of.
8. Add or take away watermarks
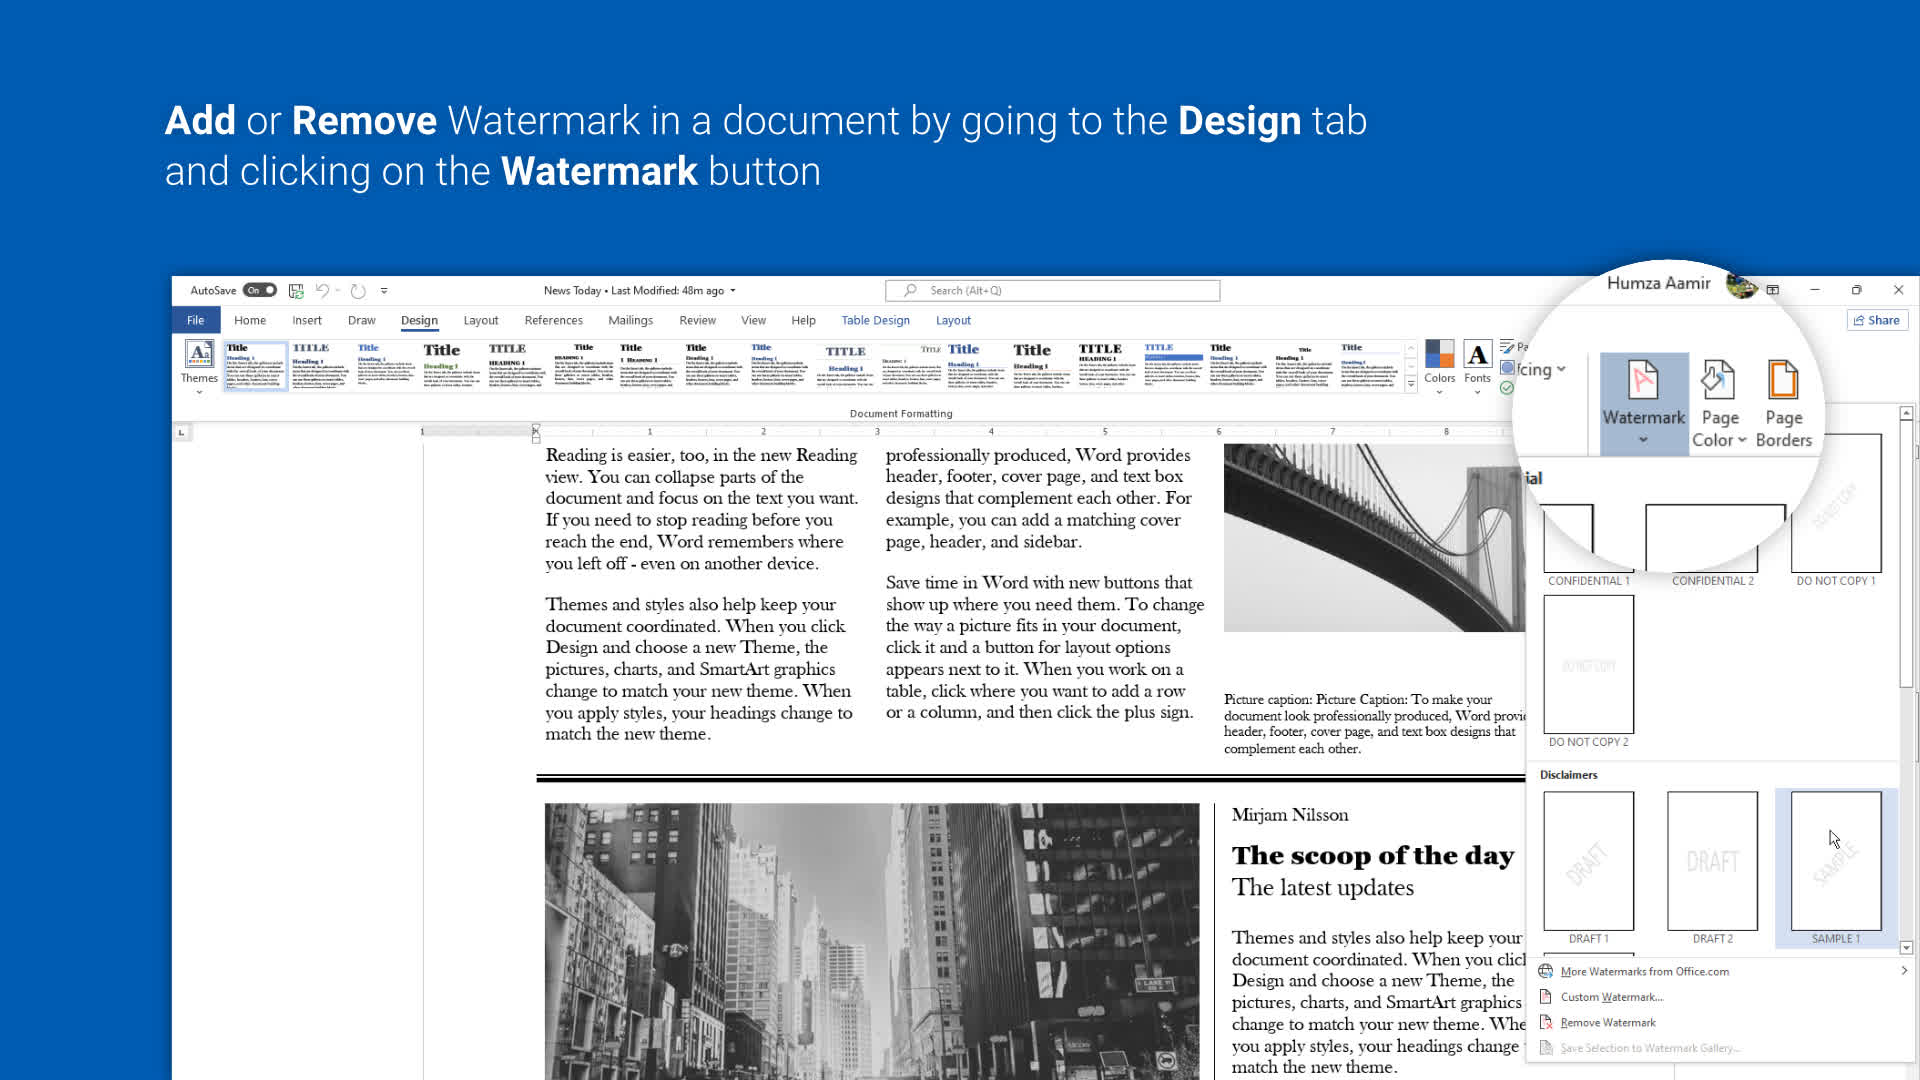
Using watermarks is one other method of defending your doc, however this time you need to assert possession of content material, outline its objective to readers by utilizing phrases like Draft and Urgent, or warn them about its secrecy by having Confidential or Top Secret seem behind the primary textual content all through the doc.
Alternatively, you need to use a picture like your organization emblem as a watermark.
To do that, click on on the Design tab and choose Watermark. Choose from one of many out there samples or apply your personal textual content/image-based watermark by clicking on Custom Watermark.
Regardless of the kind you employ, it is suggested that you simply use the washout impact with an image watermark, and semi-transparency for textual content as a way to maintain the primary content material seen and simple to learn. Want to do away with a watermark in a doc? Simply go the Design tab within the ribbon and choose the Remove Watermark possibility within the Watermark sub-menu.
9. Usability tweaks: Toolbars and darkish mode
Word has a ton of options working actively within the background and instruments within the foreground that will help you keep productive. We’ll concentrate on the Quick Access Toolbar positioned on the title bar, the ribbon that sits under it and the standing bar positioned on the underside of the Word window.
Quick Access Toolbar
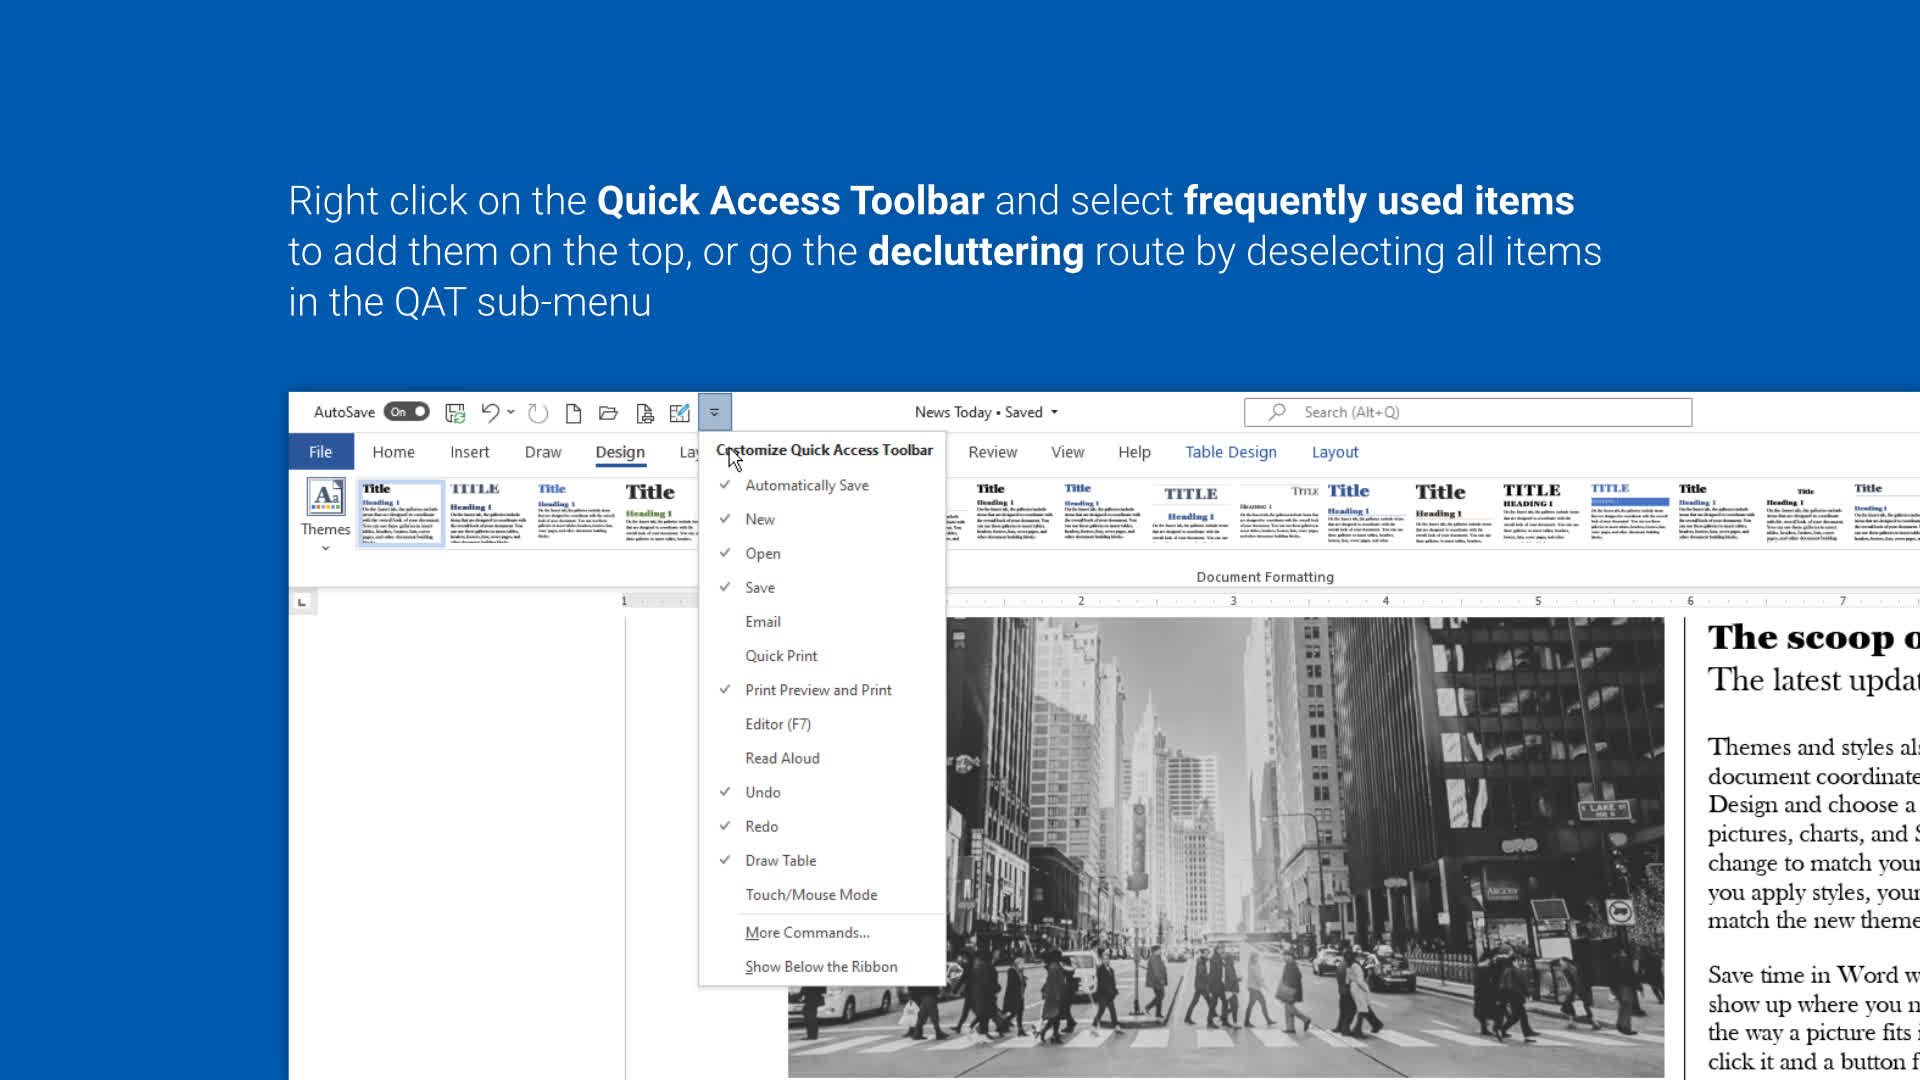
The Quick Access Toolbar is the place the floppy save icon resides, alongside Undo and Redo buttons. Newer Word variations additionally embrace the AutoSave toggle for frequently saving your work to the cloud (OneDrive, SharePoint).
You can click on the customise button with the small arrow or right-click an present merchandise to switch this toolbar. The sub-menu shows a listing of things you can choose like opening a brand new doc, drawing a desk or accessing print preview. You can even set this toolbar to show under the ribbon to make it much less crowded on the high.
Ribbon
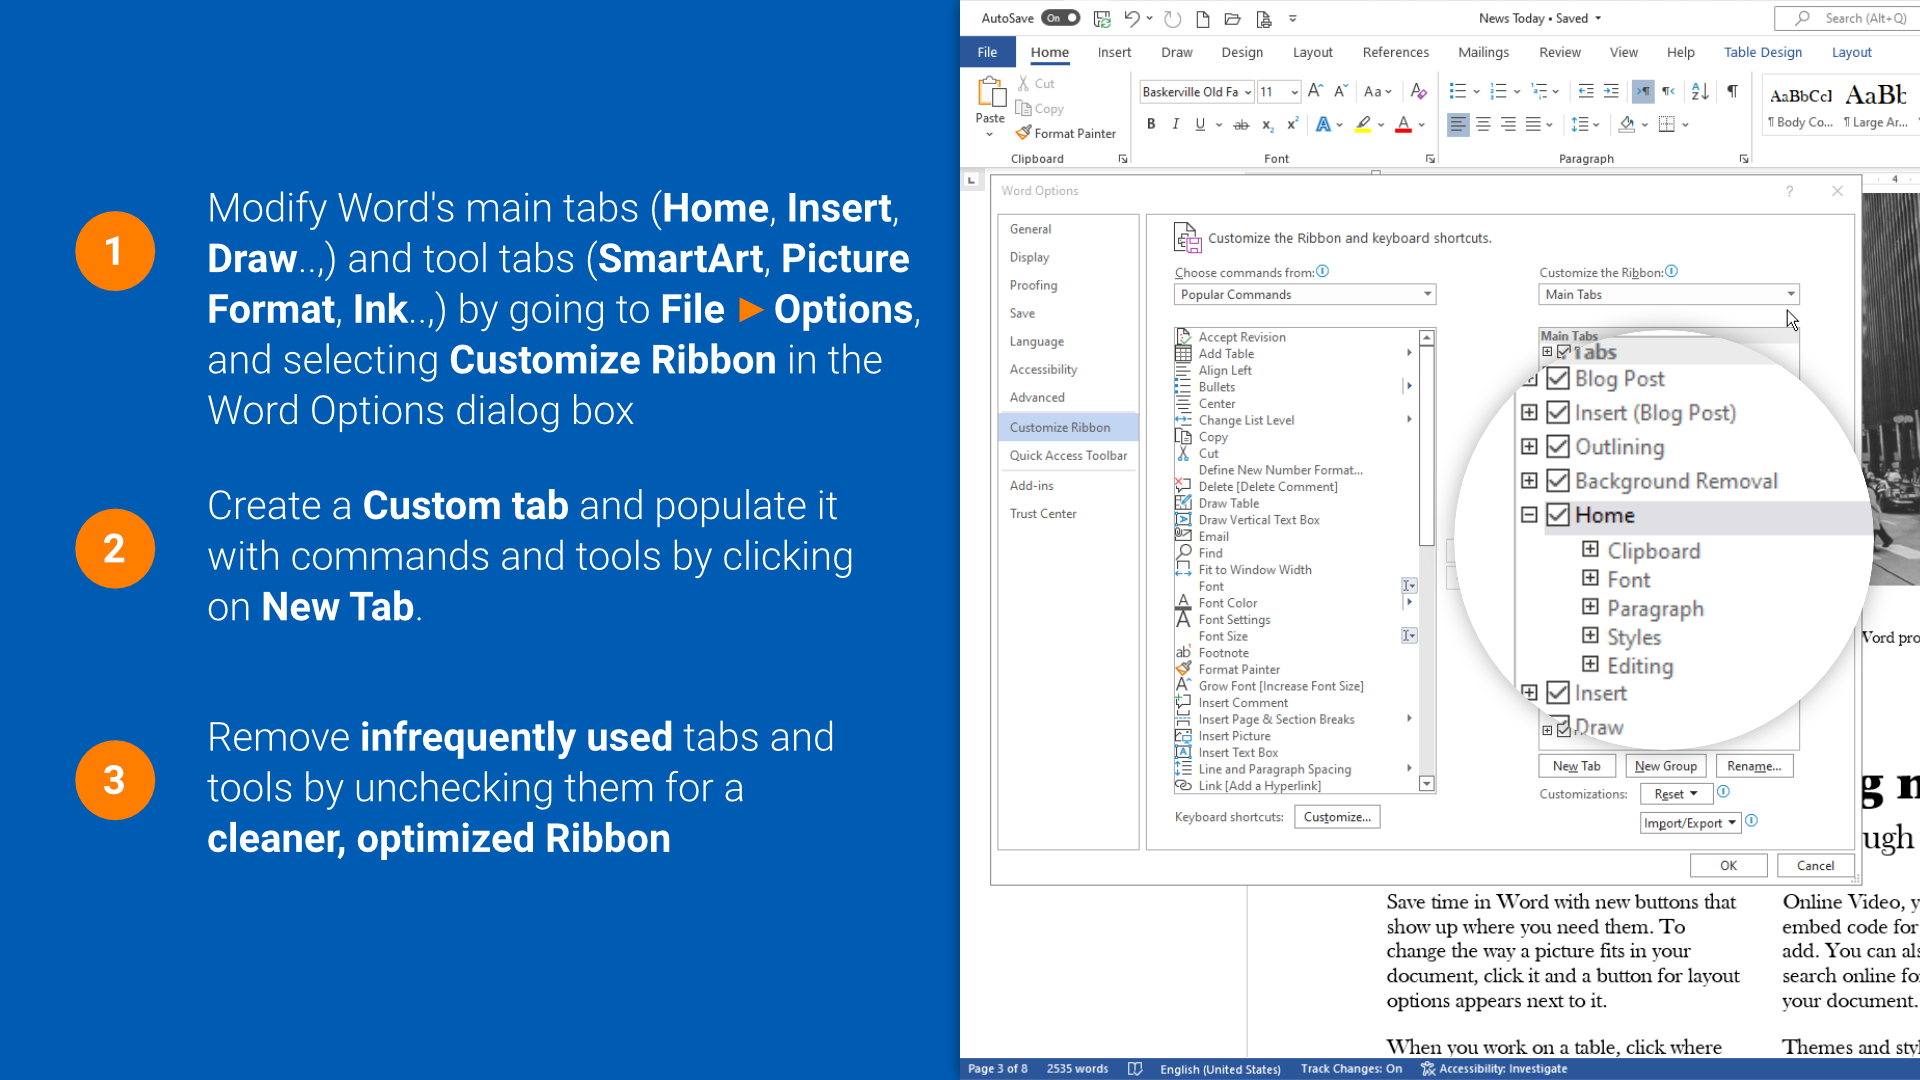
The Ribbon is just a collection of tabs, every labelled to recommend the number of instruments inside for modifying and formatting a doc. You can modify the ribbon by right-clicking on a tab or by going to File > Options and deciding on Customize Ribbon.
The gadgets you see and might add to the ribbon are related as proven for the Quick Access Toolbar. However, you may personalize the expertise additional by creating a brand new tab and populating it with a set of instructions that fit your particular workflow. Although MS Word’s default ribbon format is sweet sufficient for many customers, it is nonetheless good to have the pliability to tweak it to your personal liking.
Find the ribbon too crowded? Simply deselect the tabs you do not use from the Customize Ribbon menu, or collapse it to simply present the tab names by clicking the up arrow on the appropriate facet (Shortcut: Ctrl+F1) for a distraction-free typing expertise.
Status Bar
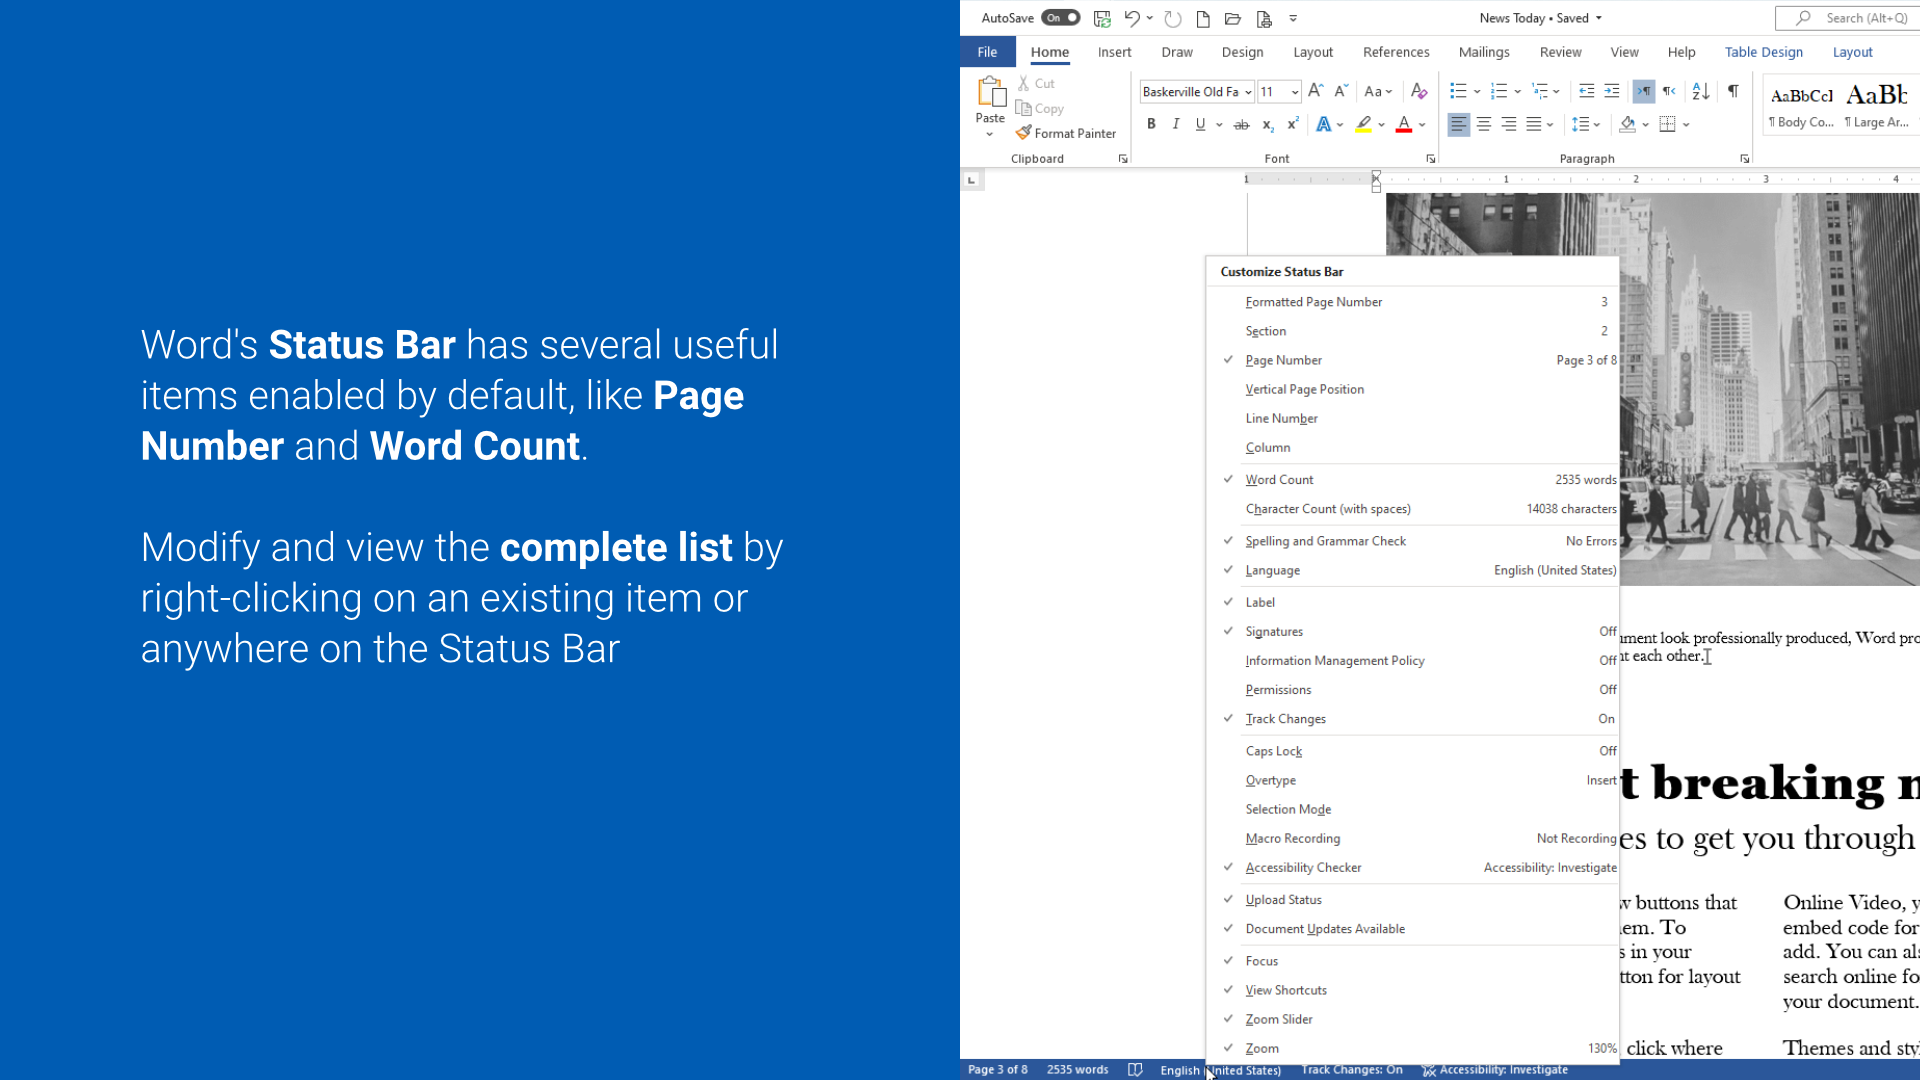
The Status Bar (on the backside) is the place Word reveals and dynamically updates related attributes of your doc, in addition to the varied studying modes (Focus, Read, Print and Web layouts), and the zoom slider.
You can customise by right-clicking on it wherever after which deciding on/deselecting gadgets from the sub-menu. Some helpful gadgets to have right here embrace the web page quantity and phrase depend for whenever you’re aiming for that essay phrase restrict.
Also, any spelling or grammatical errors will mirror within the proofing standing indicator you can click on for extra particulars. Moreover, Word’s monitor modifications function might be positioned right here for fast entry, as a substitute of getting to navigate to it through the Review tab.
Turn off the lights with Dark Mode
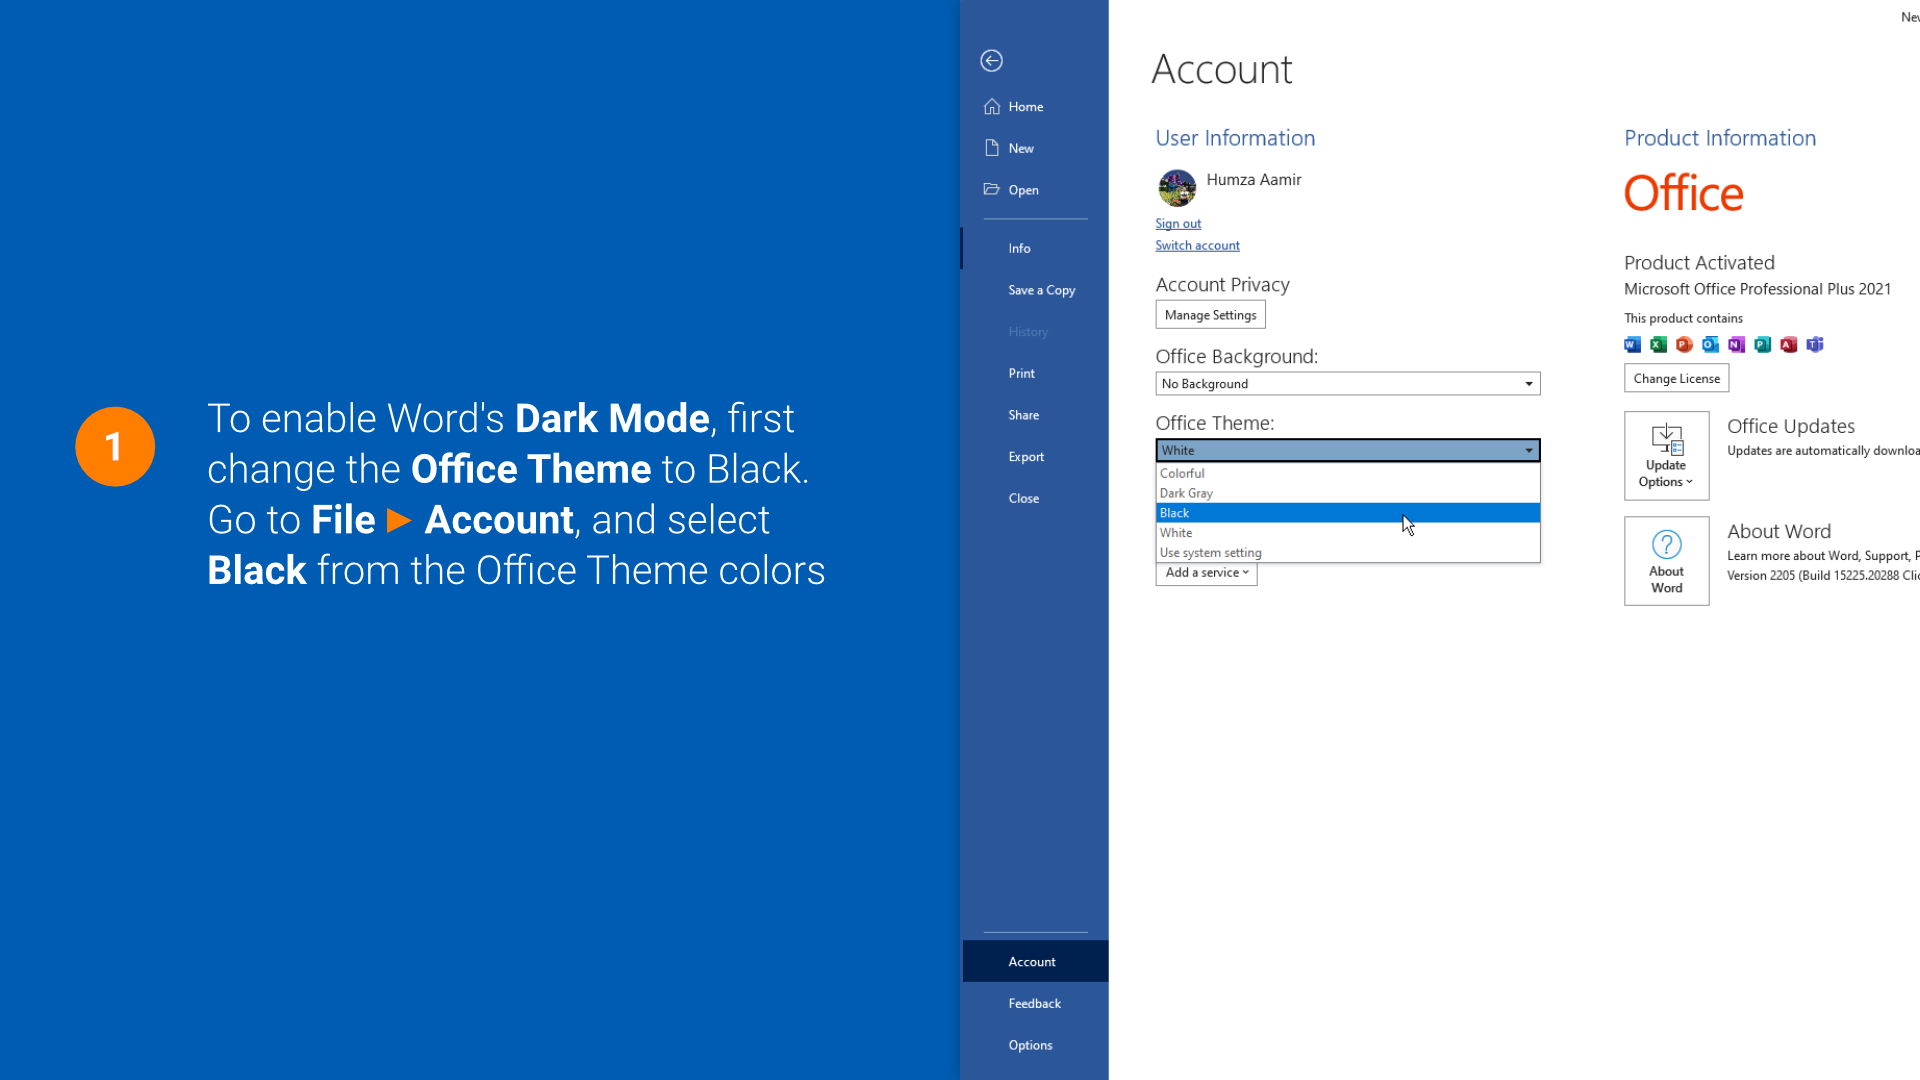
There’s hardly any widespread app or service as of late that does not provide a darkish mode possibility. Although Word is a bit late to this celebration, customers can lastly change this system’s retina burning white canvas right into a darkish gray coloration for comfortably working within the late hours of the evening.
To allow darkish mode via Word, you first must set the Office Theme to Black.
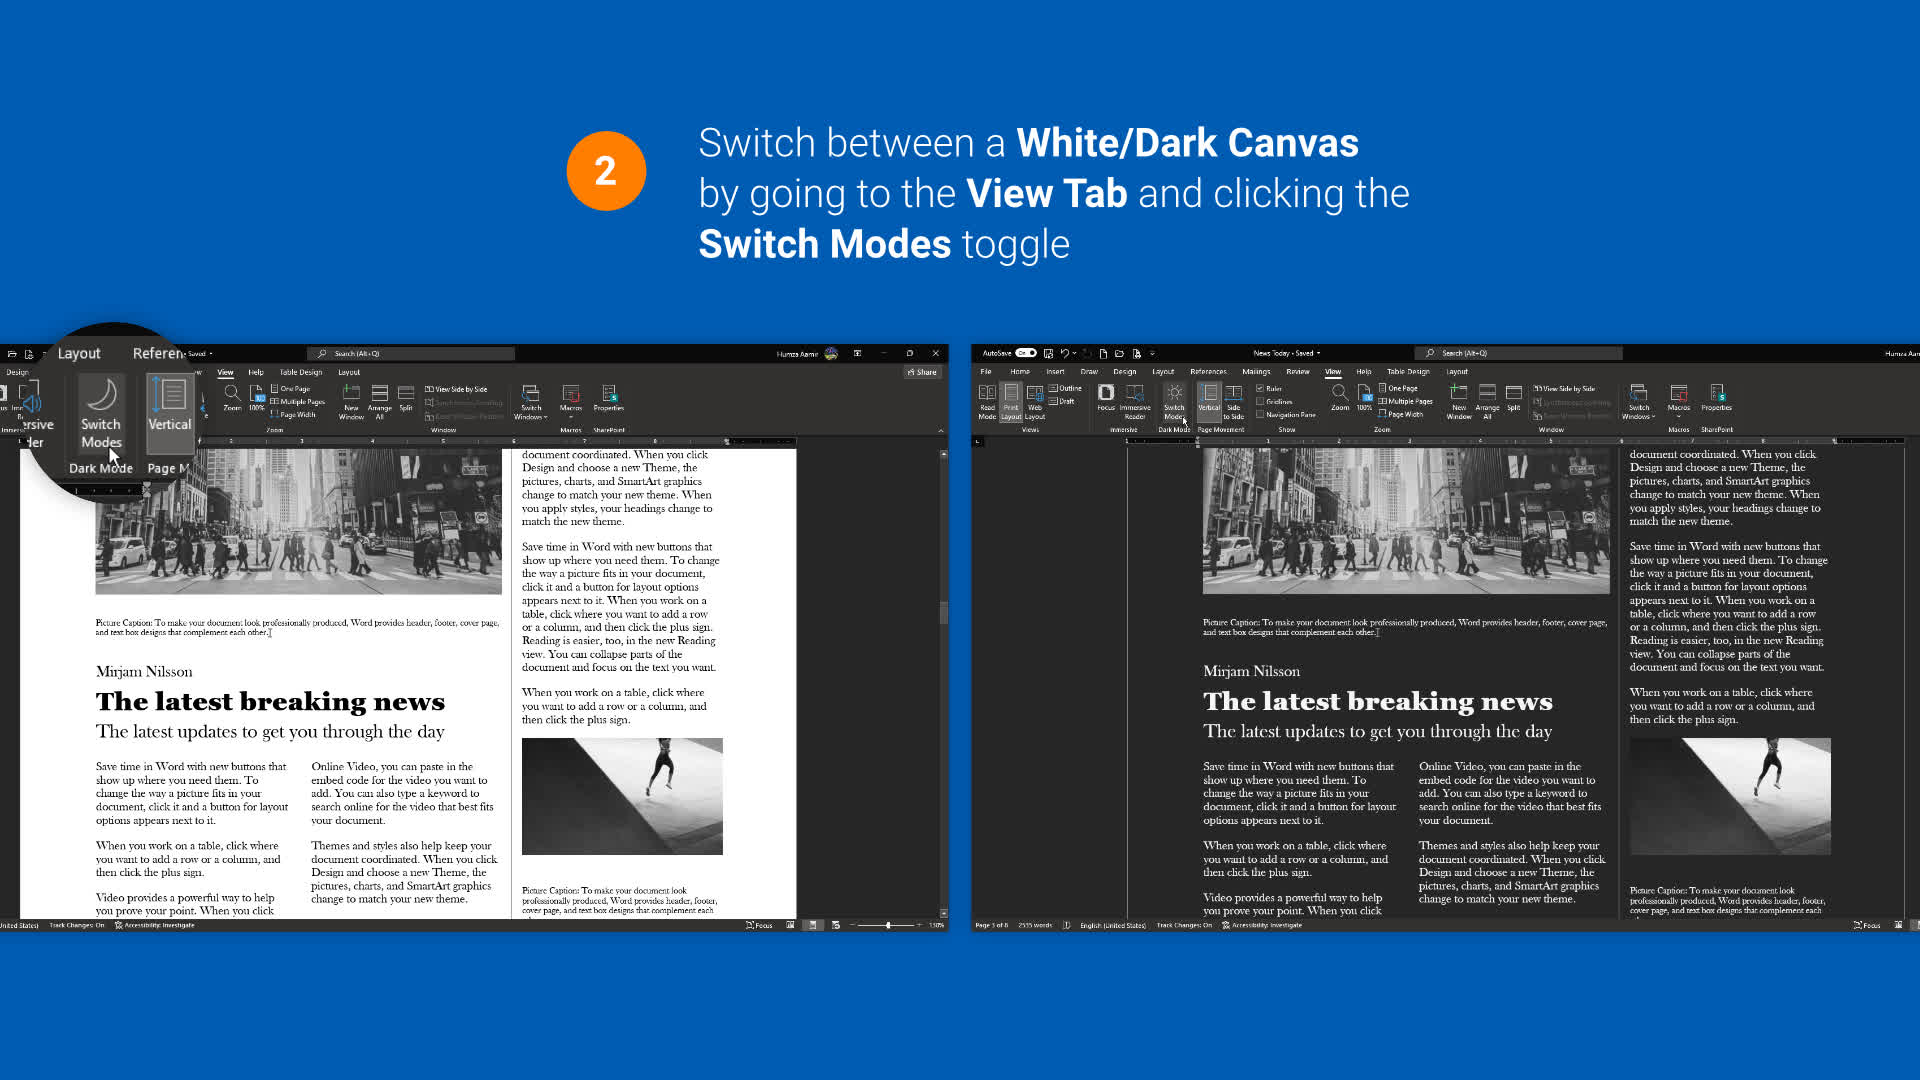
This might be achieved by going to File > Account and deciding on Black from the out there themes. Now, all areas of MS Word, together with the canvas will flip darkish, with textual content coloration and different colourful parts within the app adjusting accordingly.
You can nonetheless toggle between a white and darkish canvas by clicking click on on the View tab within the ribbon and deciding on Switch Modes. Note that the latter possibility solely seems when the Office Theme is about to Black.
10. Go past phrases by utilizing flowcharts and thoughts maps
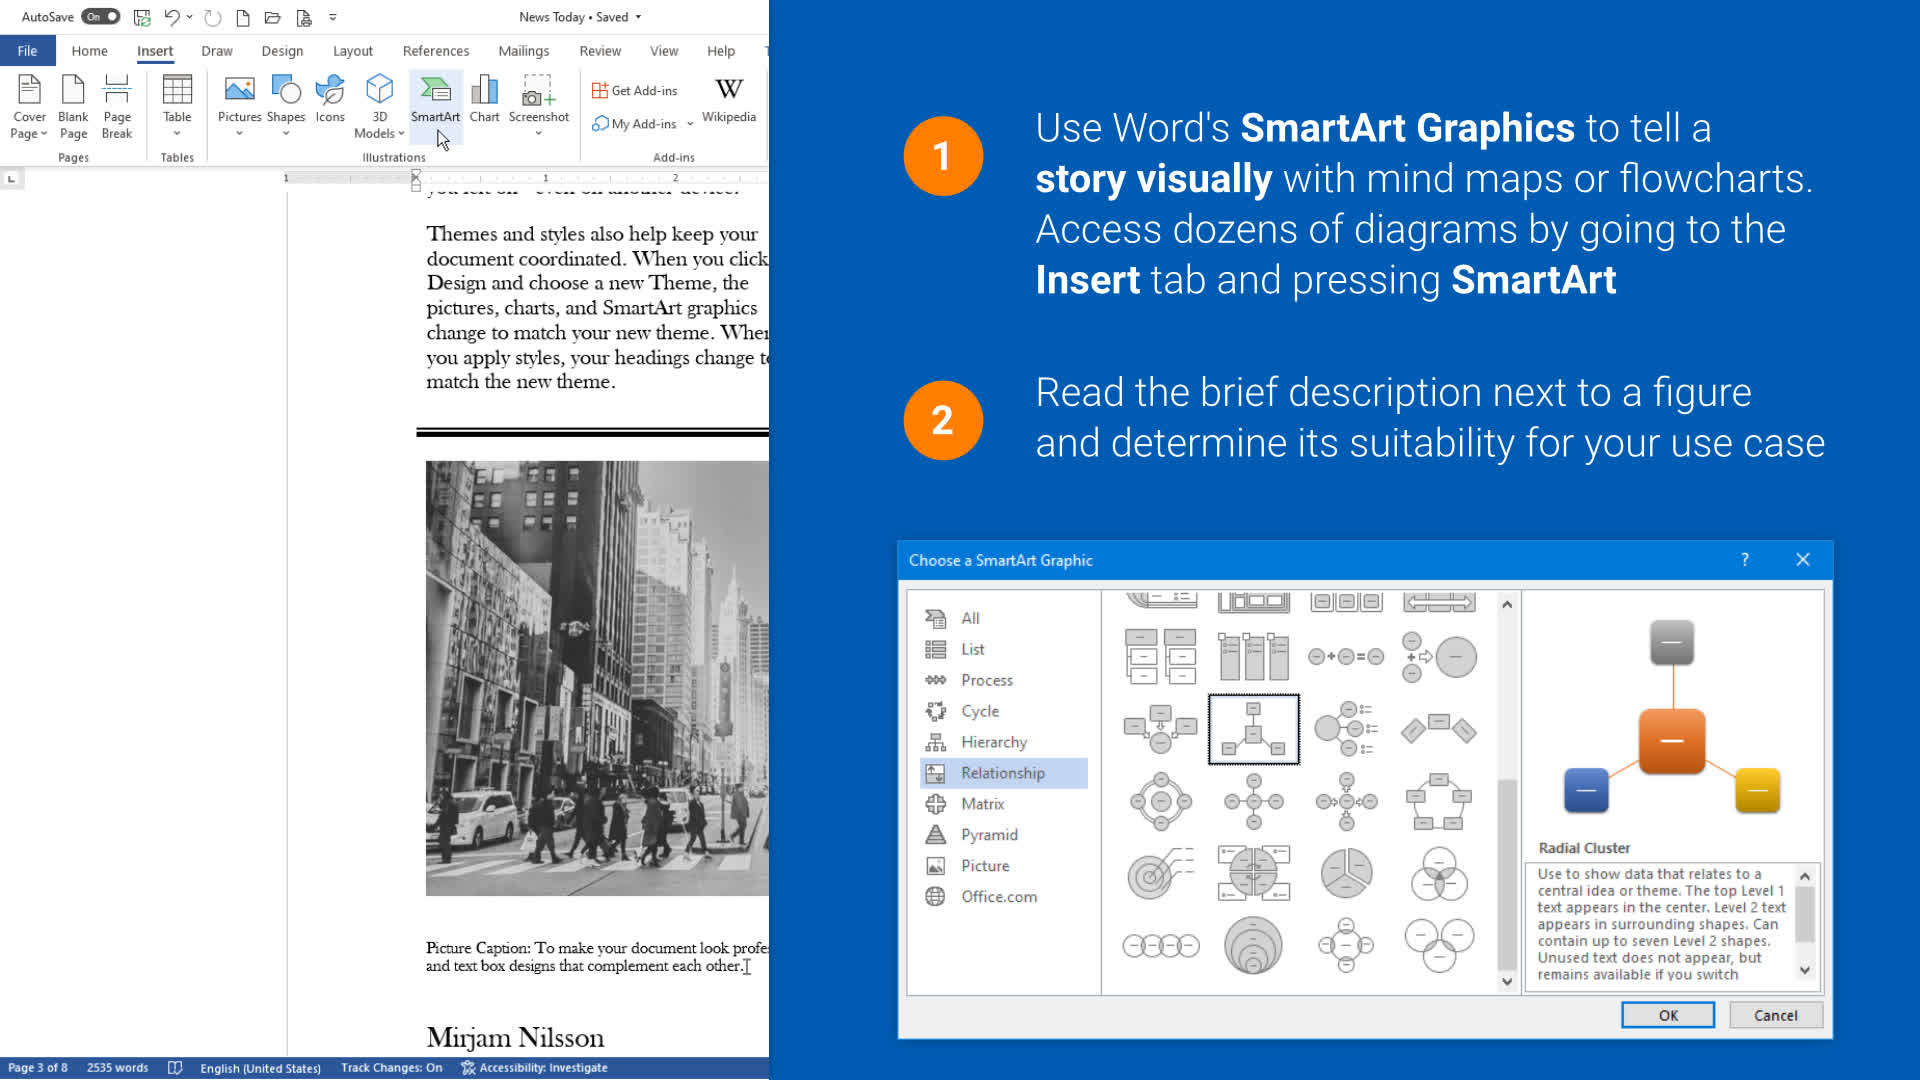
In addition to an awesome function set for constructing textual content paperwork, Word may also be used to convey data in different attention-grabbing methods. Ideas and ideas might be represented visually by creating thoughts maps or flowcharts to grasp the connection between parts in a course of.
You can begin making a thoughts map or flowchart by inserting primary shapes and features or faucet into Word’s assortment of SmartArt graphics. These might be accessed by navigating to the Insert ribbon, and clicking SmartArt.
The SmartArt dialogue field lists a lot of diagram classes, with various kinds of graphics beneath every kind based mostly on workflow necessities. You can, as an example, use the Horizontal Bullet List beneath Lists to briefly clarify the distinction between tiers/packages of a service (Basic, Premium, Pro and many others.) or use a Radial Cluster to start out off with a central concept as achieved in a thoughts map after which broaden it to incorporate all related parts.
If you are not sure the place to start with, choose any diagram within the SmartArt dialogue field and undergo the its description to see if that determine is a greater match to your use case.
[ad_2]