[ad_1]
Dual booting is an effective way to get the very best of each worlds of Windows and Linux. It’s comparatively simple to put in the 2 working techniques alongside one another, and it is also an incredible alternative to study extra about computer systems and the way software program works.
When constructing your individual pc, you get to select from numerous {hardware} parts that can go into your system. There are some compatibility restrictions to concentrate on, however you are still left with loads of choices even when you go Team Green, Team Red, or Team Blue.
Once you set every part collectively and get that wonderful POST beep, you are in your method to having fun with your new rig! However, earlier than you begin to recreation on it, phrase course of, or simply browse the web, there’s one essential element that also must be put in: the working system!
The variety of OS choices shortly reduces to only a handful of them. For most, Windows is the defacto working system for the PC. Many use it for his or her day-to-day jobs, it helps many functions natively, and there’s a entire market presence in its wake.
macOS is Apple’s proprietary working system. However, you possibly can’t merely set up macOS in your new rig, given the licensing and restrictions positioned on non-Apple {hardware}. Folks have found out tips on how to pull it off, however based on Apple, such strategies are unlawful.
Dual booting is a good alternative to study extra about computer systems and the way software program works
Third, there’s Linux. As we’ve lined earlier than, there are various flavors of Linux, and you’ll select the one which most accurately fits your wants. Fundamentally although, all of them are derived from one Linux kernel, so we’re going to bunch them up all collectively for the sake of argument.
So basically, you come right down to a easy selection: do you put in Windows or Linux? In this text, we’re going to discover the choice, “Why not each?”
Why Linux? And Why Dual Boot?
If you might be like most individuals, the safer and closer-to-home possibility is to easily “set up Windows.” You most likely use it extra anyway, and it ought to work out of the field. So why even hassle with Linux?
Well, for one, most Linux distros are free, so you possibly can probably avoid wasting cash. Since the core Linux kernel is open-source, and most Linux OSs stay free, you possibly can even monitor the newest OS options by following its growth.
Linux can be comparatively light-weight upon set up. It comes with little bloatware and the {hardware} necessities are usually way more modest than Windows: it wants much less RAM, takes up a smaller set up dimension in your disk, helps older CPUs, and let’s not even deliver up TPM. This could make some Linux distributions superb OS selections if making an attempt to resurrect an previous pc.
For most folk although, Linux affords a wealth of customization alternatives — ranging from the selection of the Linux distro itself! Each distro is exclusive in its personal method. We refer the reader to this text we wrote some time again for a rundown on many widespread selections.
Even inside a distro, you possibly can customise the feel and appear by selecting totally different window managers, animation selections, desktop choices, you identify it. And with a robust and vibrant neighborhood, you possibly can usually get the very best tech help on many boards for what you is perhaps in search of.
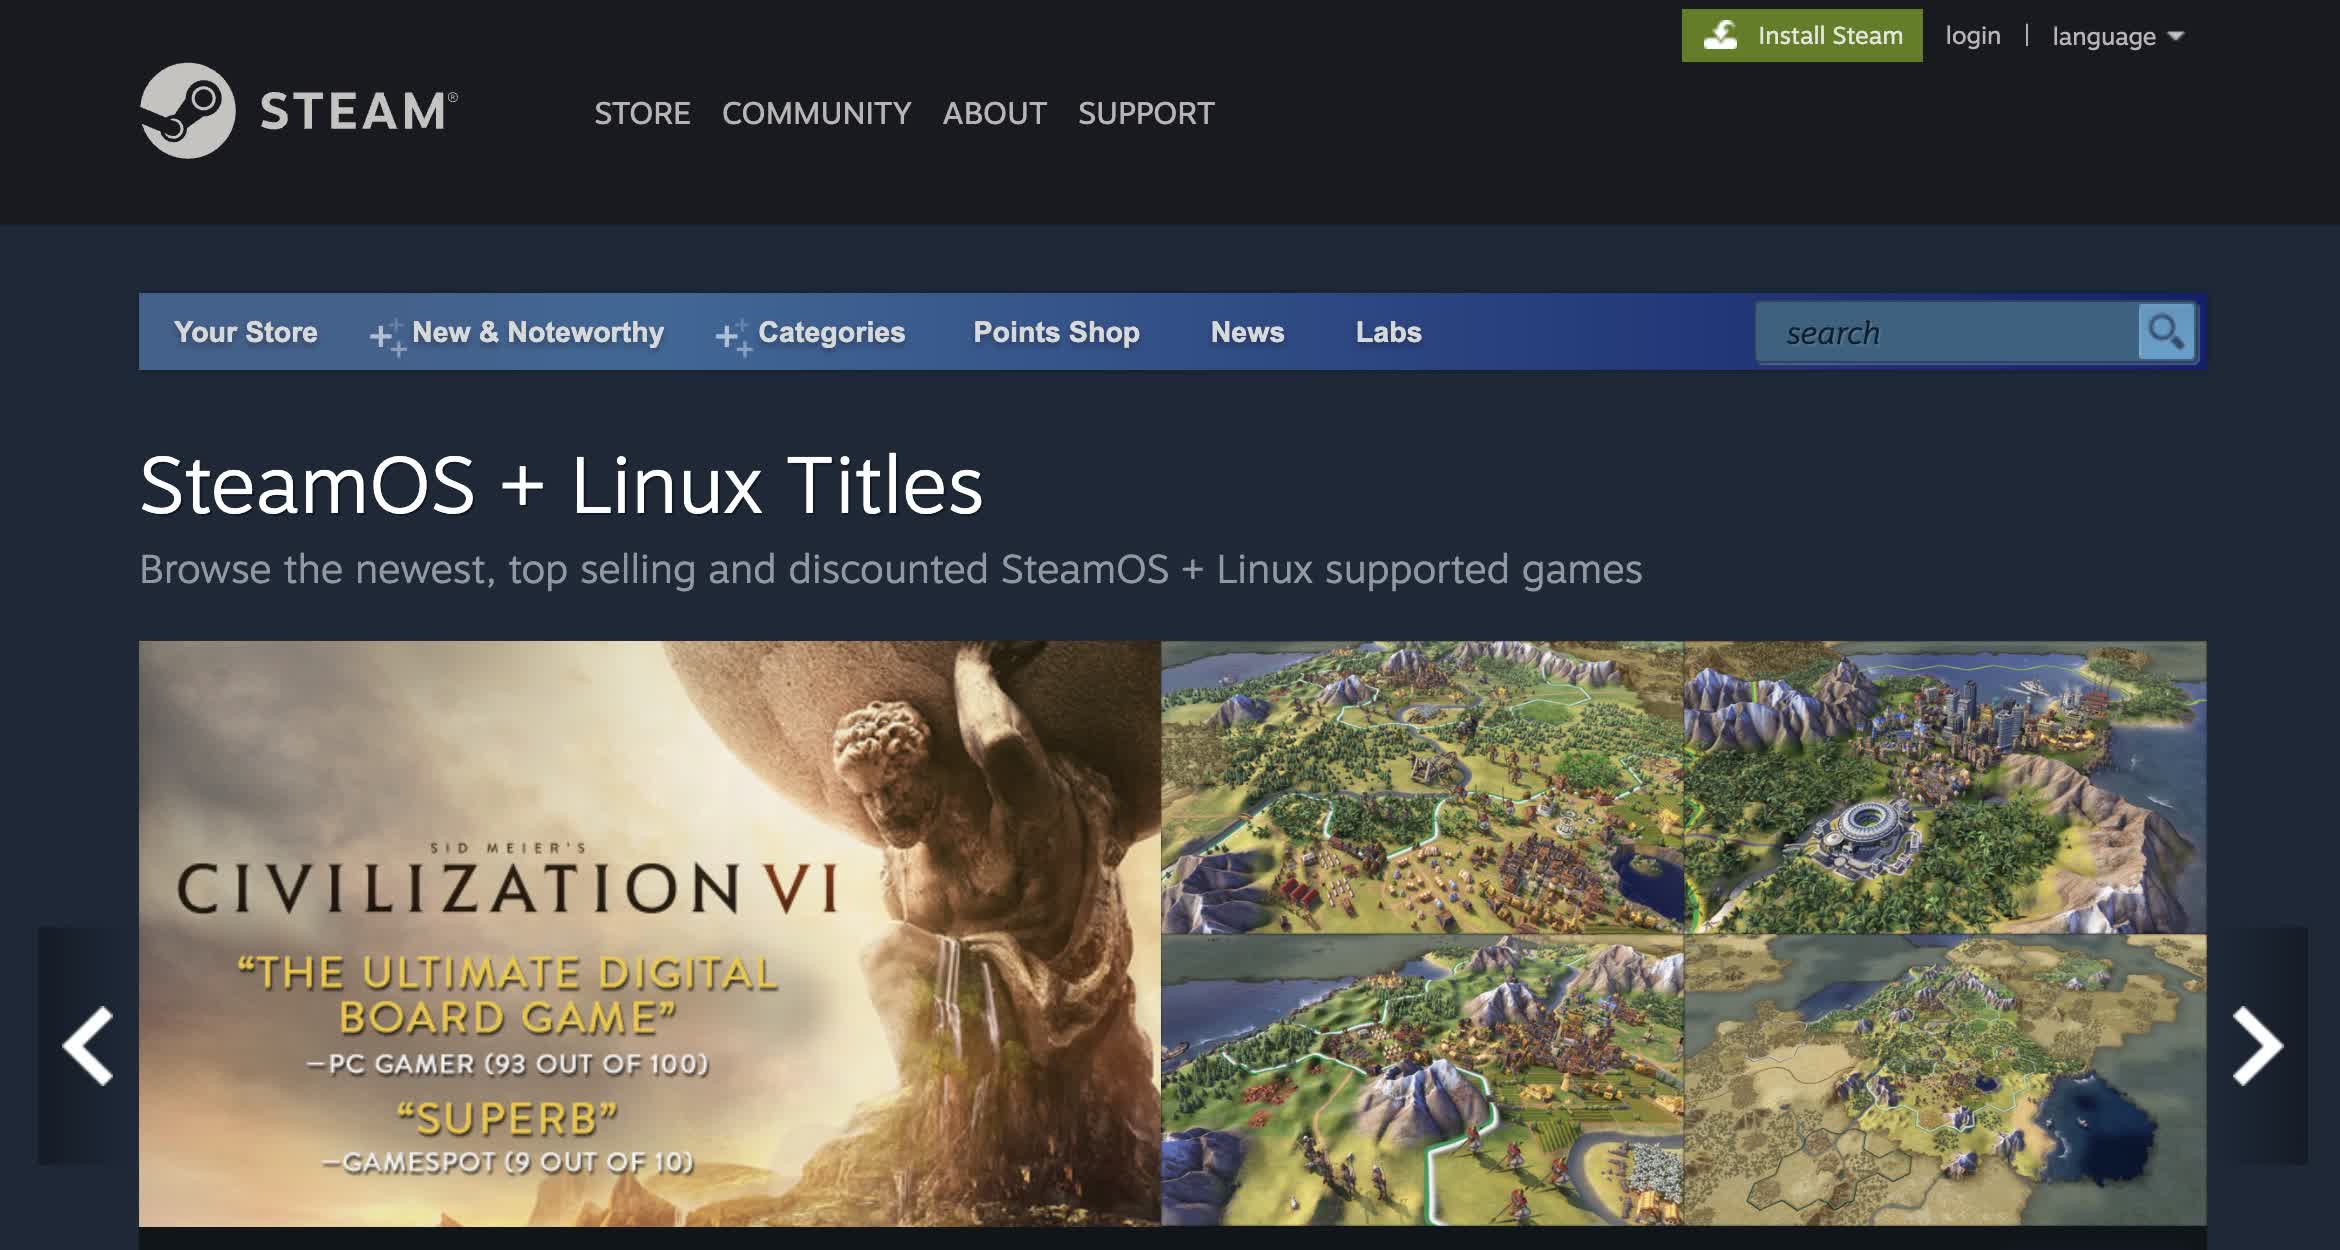
Linux doesn’t have every part although. For instance, sure functions is perhaps particularly coded up for a Windows or Mac setting, and thus not work in Linux. There are a plethora of open-source options that you should use, however sure issues (like video games) is perhaps manifestly lacking. This has began to vary — Steam has begun supporting many video games on Linux — however these are some trade-offs you’d want to think about earlier than deciding to desert Windows altogether for the open-source life.
But once more, why abandon something? Why not set up each Windows and Ubuntu side-by-side, and profit from the very best of each worlds? This is exactly the idea of “twin booting,” and it requires just a bit little bit of steering to get you alongside the best way.
Before leaping in, we wished to present a little bit of an explainer on what’s going on underneath-the-hood in your pc when twin booting. The following part isn’t a requirement to twin booting, however will present a sure background within the numerous selections and complexities about why there must be a information on this within the first place.
What Happens Underneath the Hood at Bootup?
When you press your PC’s energy button, the motherboard takes maintain and begins the boot course of. Control is handed off to the BIOS, which can run some fundamental diagnostics and test that the required {hardware} is in place and purposeful (RAM, storage, keyboard, mouse, and so forth).
The BIOS will then search the grasp boot report to start booting up the OS and help you begin working functions in your {hardware}.

The grasp boot report (MBR) is often saved as the primary block of a bootable disk (whether or not a HDD, SSD, USB drive, and so forth). The MBR location is hardcoded to verify it may be discovered throughout the boot course of. Its job is comparatively easy: discover and boot the OS. However, that is the place a few of the magic begins.
The MBR itself is just too small to incorporate all the knowledge on tips on how to boot an OS. Instead, it usually factors to a bootloader, which is tasked with the precise technique of studying the OS particulars and loading the mandatory recordsdata into RAM, and start the overall technique of making ready the OS for use. Different OSes usually have totally different boot loaders. Windows naturally names it the Windows Boot Manager, whereas on Linux the bootloader is known as grub.
When twin booting, you now wish to introduce a number of OSes into the combo, and likewise give your self the choice to pick out the OS you want to boot up from. How do you do this? Well, you want an OS for choosing the OS! In the Linux world, that “working system” is (additionally) referred to as grub.
The normal simplistic process for twin booting then is as follows:
- Install the primary OS. It is extremely really useful to start out with Windows, since grub can simply acknowledge Windows, whereas the Windows Boot Manager is optimized to work only for Windows.
- Partition the disk. Split up your disk to supply space for storing for every OS individually.
- Install the second OS. In this case, that may be a Linux distribution comparable to Ubuntu.
Once the set up is completed, you’ll mechanically overwrite the Windows bootloader with grub.
Grub then scans the disk, and identifies all of the totally different OS variations put in on it. It will report the disk location of every OS’ bootloader, in order that it may possibly bounce to the respective bootloader as soon as the consumer makes their selection.
Grub is often put in as a part of the Linux set up course of for many distros (comparable to Ubuntu). This makes it straightforward to only comply with the set up information, and the method is seamless. Installing a brand new OS requires a flash drive that’s separate from the principle storage, because you technically need to boot from the USB to carry out the set up of the primary and second OS.
You don’t have to essentially know all of this data to twin boot your PC. We’ll clarify every course of alongside the best way, however be happy to leap again to this part when you’re curious what every step is doing.
Before you Start
There are sure belongings you want earlier than starting, in addition to a number of extremely really useful issues to bear in mind. In this tutorial, we’ll be twin booting Windows 11 alongside Ubuntu 20.04 LTS (long run help).
The fundamentals:
- Make positive your PC satisfies the OS necessities for Windows 11.
- Make positive your PC satisfies the OS necessities for Ubuntu 20.04 LTS:
- 2 GHz dual-core processor
- 4 GB RAM (however 1 GB can work)
- 25 GB of arduous drive house
- VGA able to 1024×768 display decision
- Enough space for storing to carry each working techniques.
- According to present specs, the really useful dimension of Windows 11 and Ubuntu LTS 20.04 is 25 GB every. So the minimal storage medium ought to have not less than 50 GB of house.
- We extremely suggest twin booting with not less than 128 GB of storage.
You will want two (2) flash drives for the set up course of, every with not less than 8GB of space for storing. We suggest not less than 8 GB for the storage medium that will likely be used to put in Ubuntu, and not less than 16 GB for the storage medium for putting in Windows 11. You shouldn’t use a single flash drive to carry each pictures. This will trigger a headache when making an attempt in addition from the flash drive for set up.
When twin booting, you possibly can determine how a lot space for storing to allocate to every OS. There is one essential caveat to bear in mind although: whereas utilizing Ubuntu, you’ll have entry to all of your Ubuntu recordsdata in addition to your Windows recordsdata by way of the file system.
However, when you find yourself in Windows, you won’t be able to entry the recordsdata in your Ubuntu partition. The purpose is that Windows doesn’t help the Linux file system, together with ext4. As a outcome, Windows can’t straight learn or detect an ext4 partition or gadget.
A easy workaround is which you can nonetheless have a number of bodily drives in your system, and use the “different” gadgets for shared file entry. As lengthy because the secondary drives are formatted in an NTFS file format, then the extra drive will likely be seen while you’re in both OS.
Finally, though you possibly can technically twin boot throughout two totally different SSDs, we’d not suggest it. It provides a variety of complexity that may not be value managing and debugging (as defined briefly within the earlier part).
Step-by-Step for Dual Booting
After checking that you’ve your PC as much as spec, selected an SSD for the set up, and have your two flash drives on the prepared, you possibly can dive proper in and start the method!
1. Download the ISO for every working system
You can obtain each Windows 11 and Ubuntu 20.04 ISOs straight from our obtain part.
2. Create bootable thumb drives for every OS
After the downloads are full, you’ll want to maneuver them over to a flash drive and make the flash drives bootable. Unlike copying recordsdata straight onto a flash drive, making the drive bootable requires including sure metadata to suggest to the BIOS that the drive consists of OS-related recordsdata throughout bootup. The utility device will do this mechanically for you.
2.1 Download a utility device for creating bootable USB drives
There are loads of instruments for this, however we suggest Rufus. Not solely is it a easy device, however it additionally works nicely for each Windows and Ubuntu ISOs.
2.2 Create a bootable thumb drive for OS 1: Windows 11
This step is determined by whether or not or not you propose to twin boot on a machine that has Windows 11 put in on it (in different phrases, you propose to only add Ubuntu to a pre-existing system), or in case you are putting in on a brand new machine with none working techniques.
If you have already got Windows put in as your first OS, then you possibly can skip ahead to Step 2.3, and also you simply want to arrange one bootable flash drive containing Ubuntu.
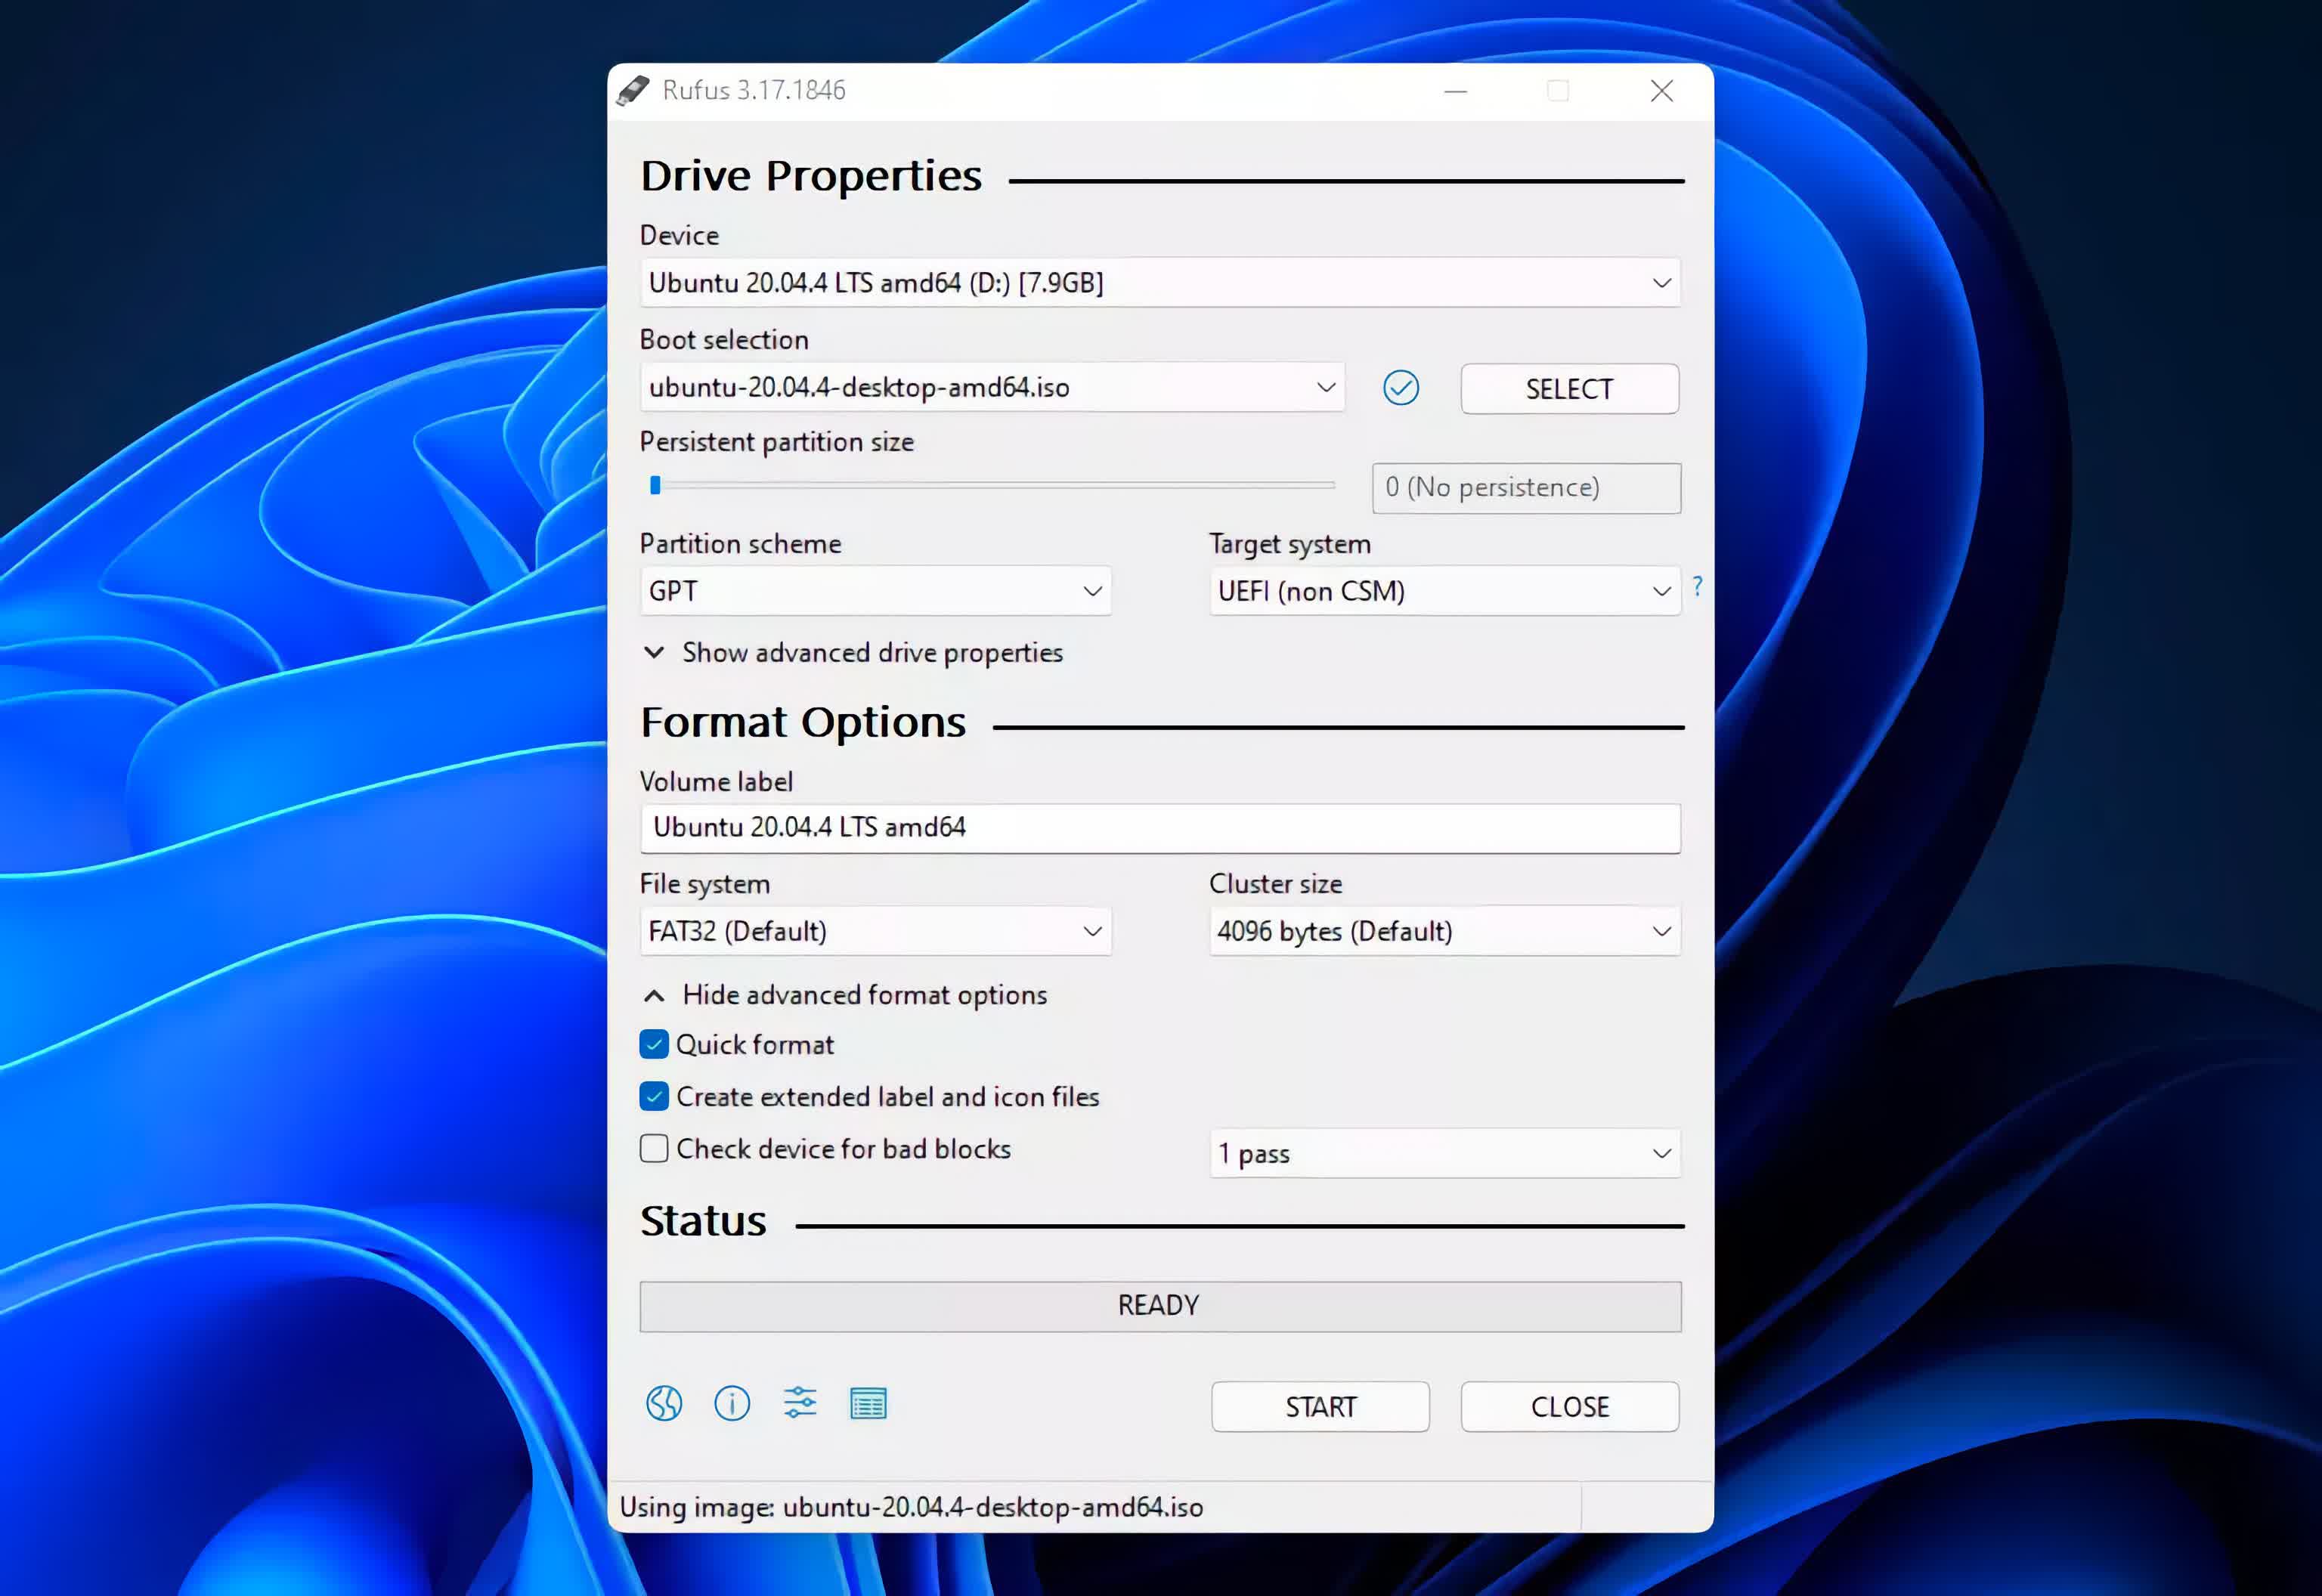
Otherwise, proceed ahead by utilizing Rufus to create a bootable flash drive with Windows 11. The picture under reveals our configuration.

2.3 Create a bootable thumb drives for OS 2: Ubuntu
Follow the identical process as above, and create a bootable flash drive for the second OS you may be twin booting. Remember: use one other USB drive altogether, to make sure that every flash drive incorporates just one bootable working system on it. In truth, making an attempt to make use of a single flash drive for each will not work, because the second OS will drive you to format the drive earlier than making ready it.
Below is the configuration we used for creating our bootable USB drive with Ubuntu 20.04.
3. Install OS 1: Windows 11
If you have already got Windows 11 put in, you possibly can skip this step. Otherwise, plug in your Windows 11 flash drive, and undergo the steps to put in Windows.
4. Partition Management
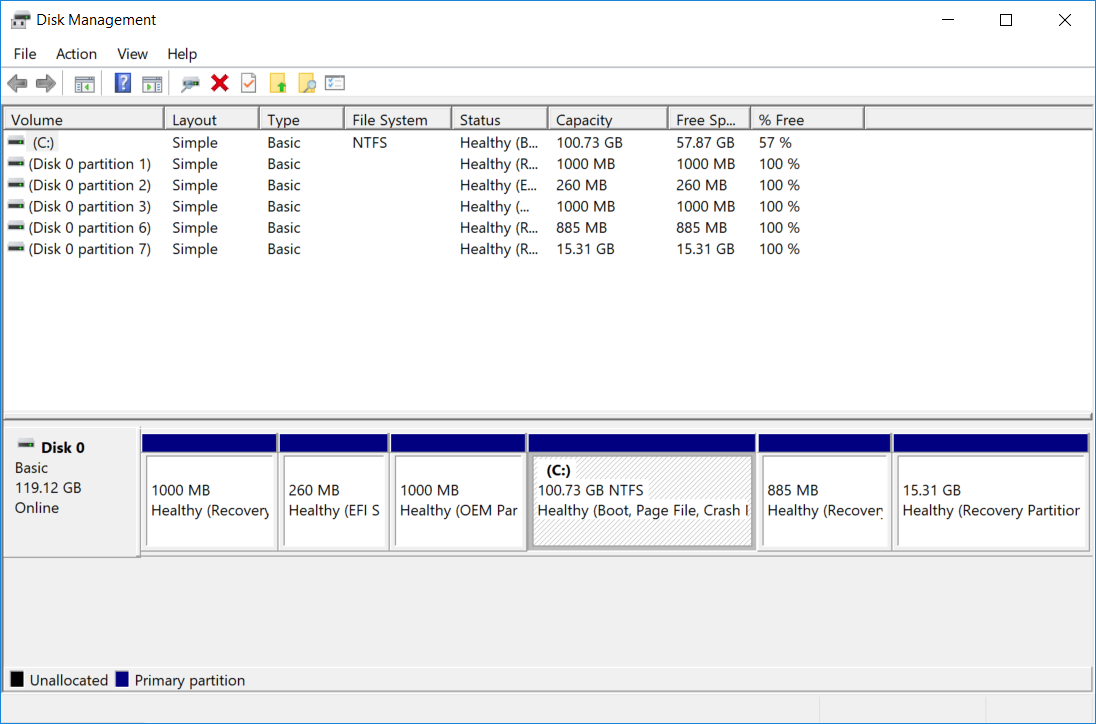
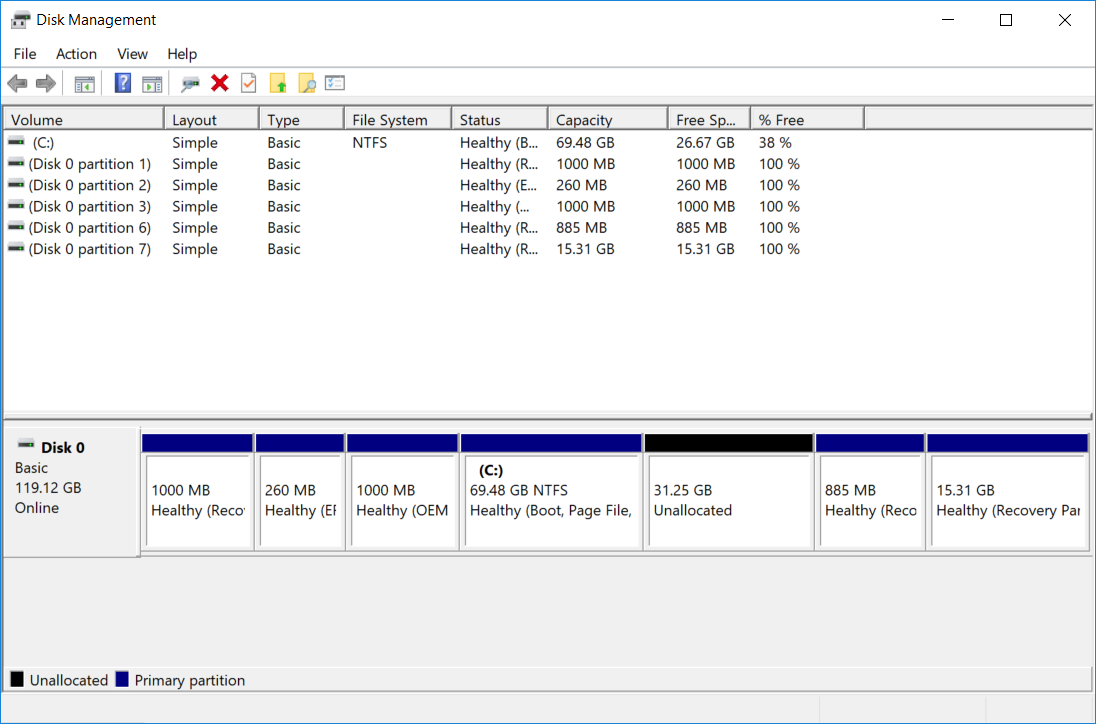
After putting in Windows 11, boot up your PC into Windows and launch the Disk Management device (Windows Key + X, choose Disk Management from the listing).
Select the present disk which has Windows 11 put in, after which right-click and select “Shrink Volume.” In our instance under, that’s the C drive, which is at roughly 100GB.
In the pop-up window, enter the quantity of house you wish to scale back the disk house by and click on the “Shrink” button to execute. In our instance, the drive already has knowledge within the Windows partition, so we are going to solely shrink it by ~32 GB.
Remember to backup your recordsdata earlier than performing any disk administration operations.
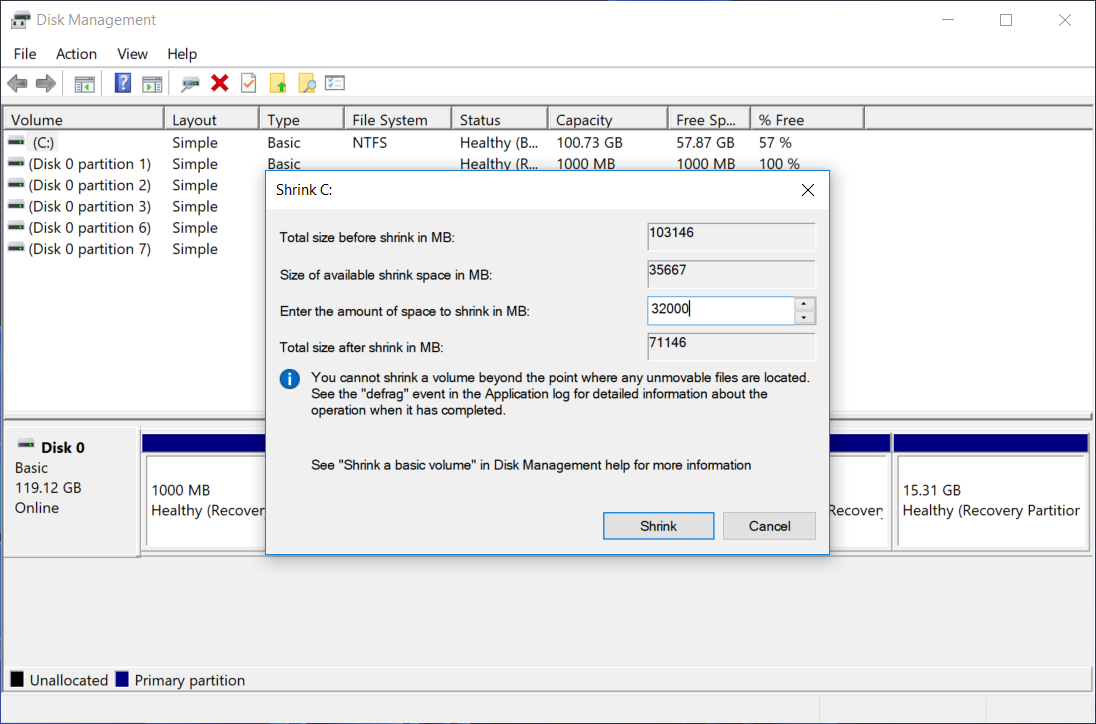
After performing this step, you’ll have “Unallocated” house on the disk at about ~32GB, which we are going to use when putting in Ubuntu for the twin boot.
The Windows partition is now diminished to ~70GB, as proven under.
5. Installing OS 2: Ubuntu 20.04 LTS
After making ready your disk for Ubuntu by partitioning your drive, restart your pc with the Ubuntu flash drive in your PC.
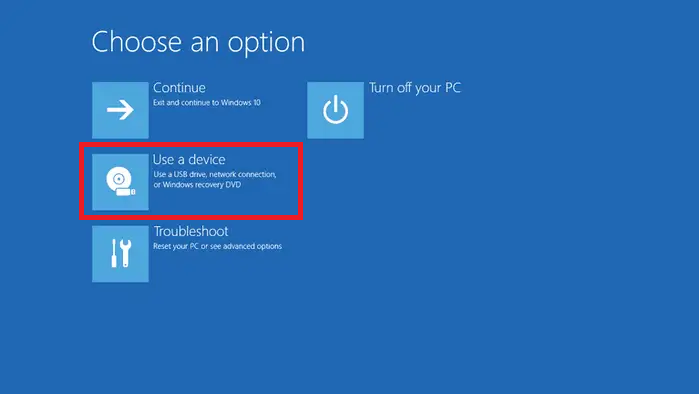
Boot into Ubuntu utilizing your machine’s boot menu, usually by urgent the F12 button throughout boot (or, relying on the motherboard, the button would possibly as a substitute be Escape, F2, or F10).
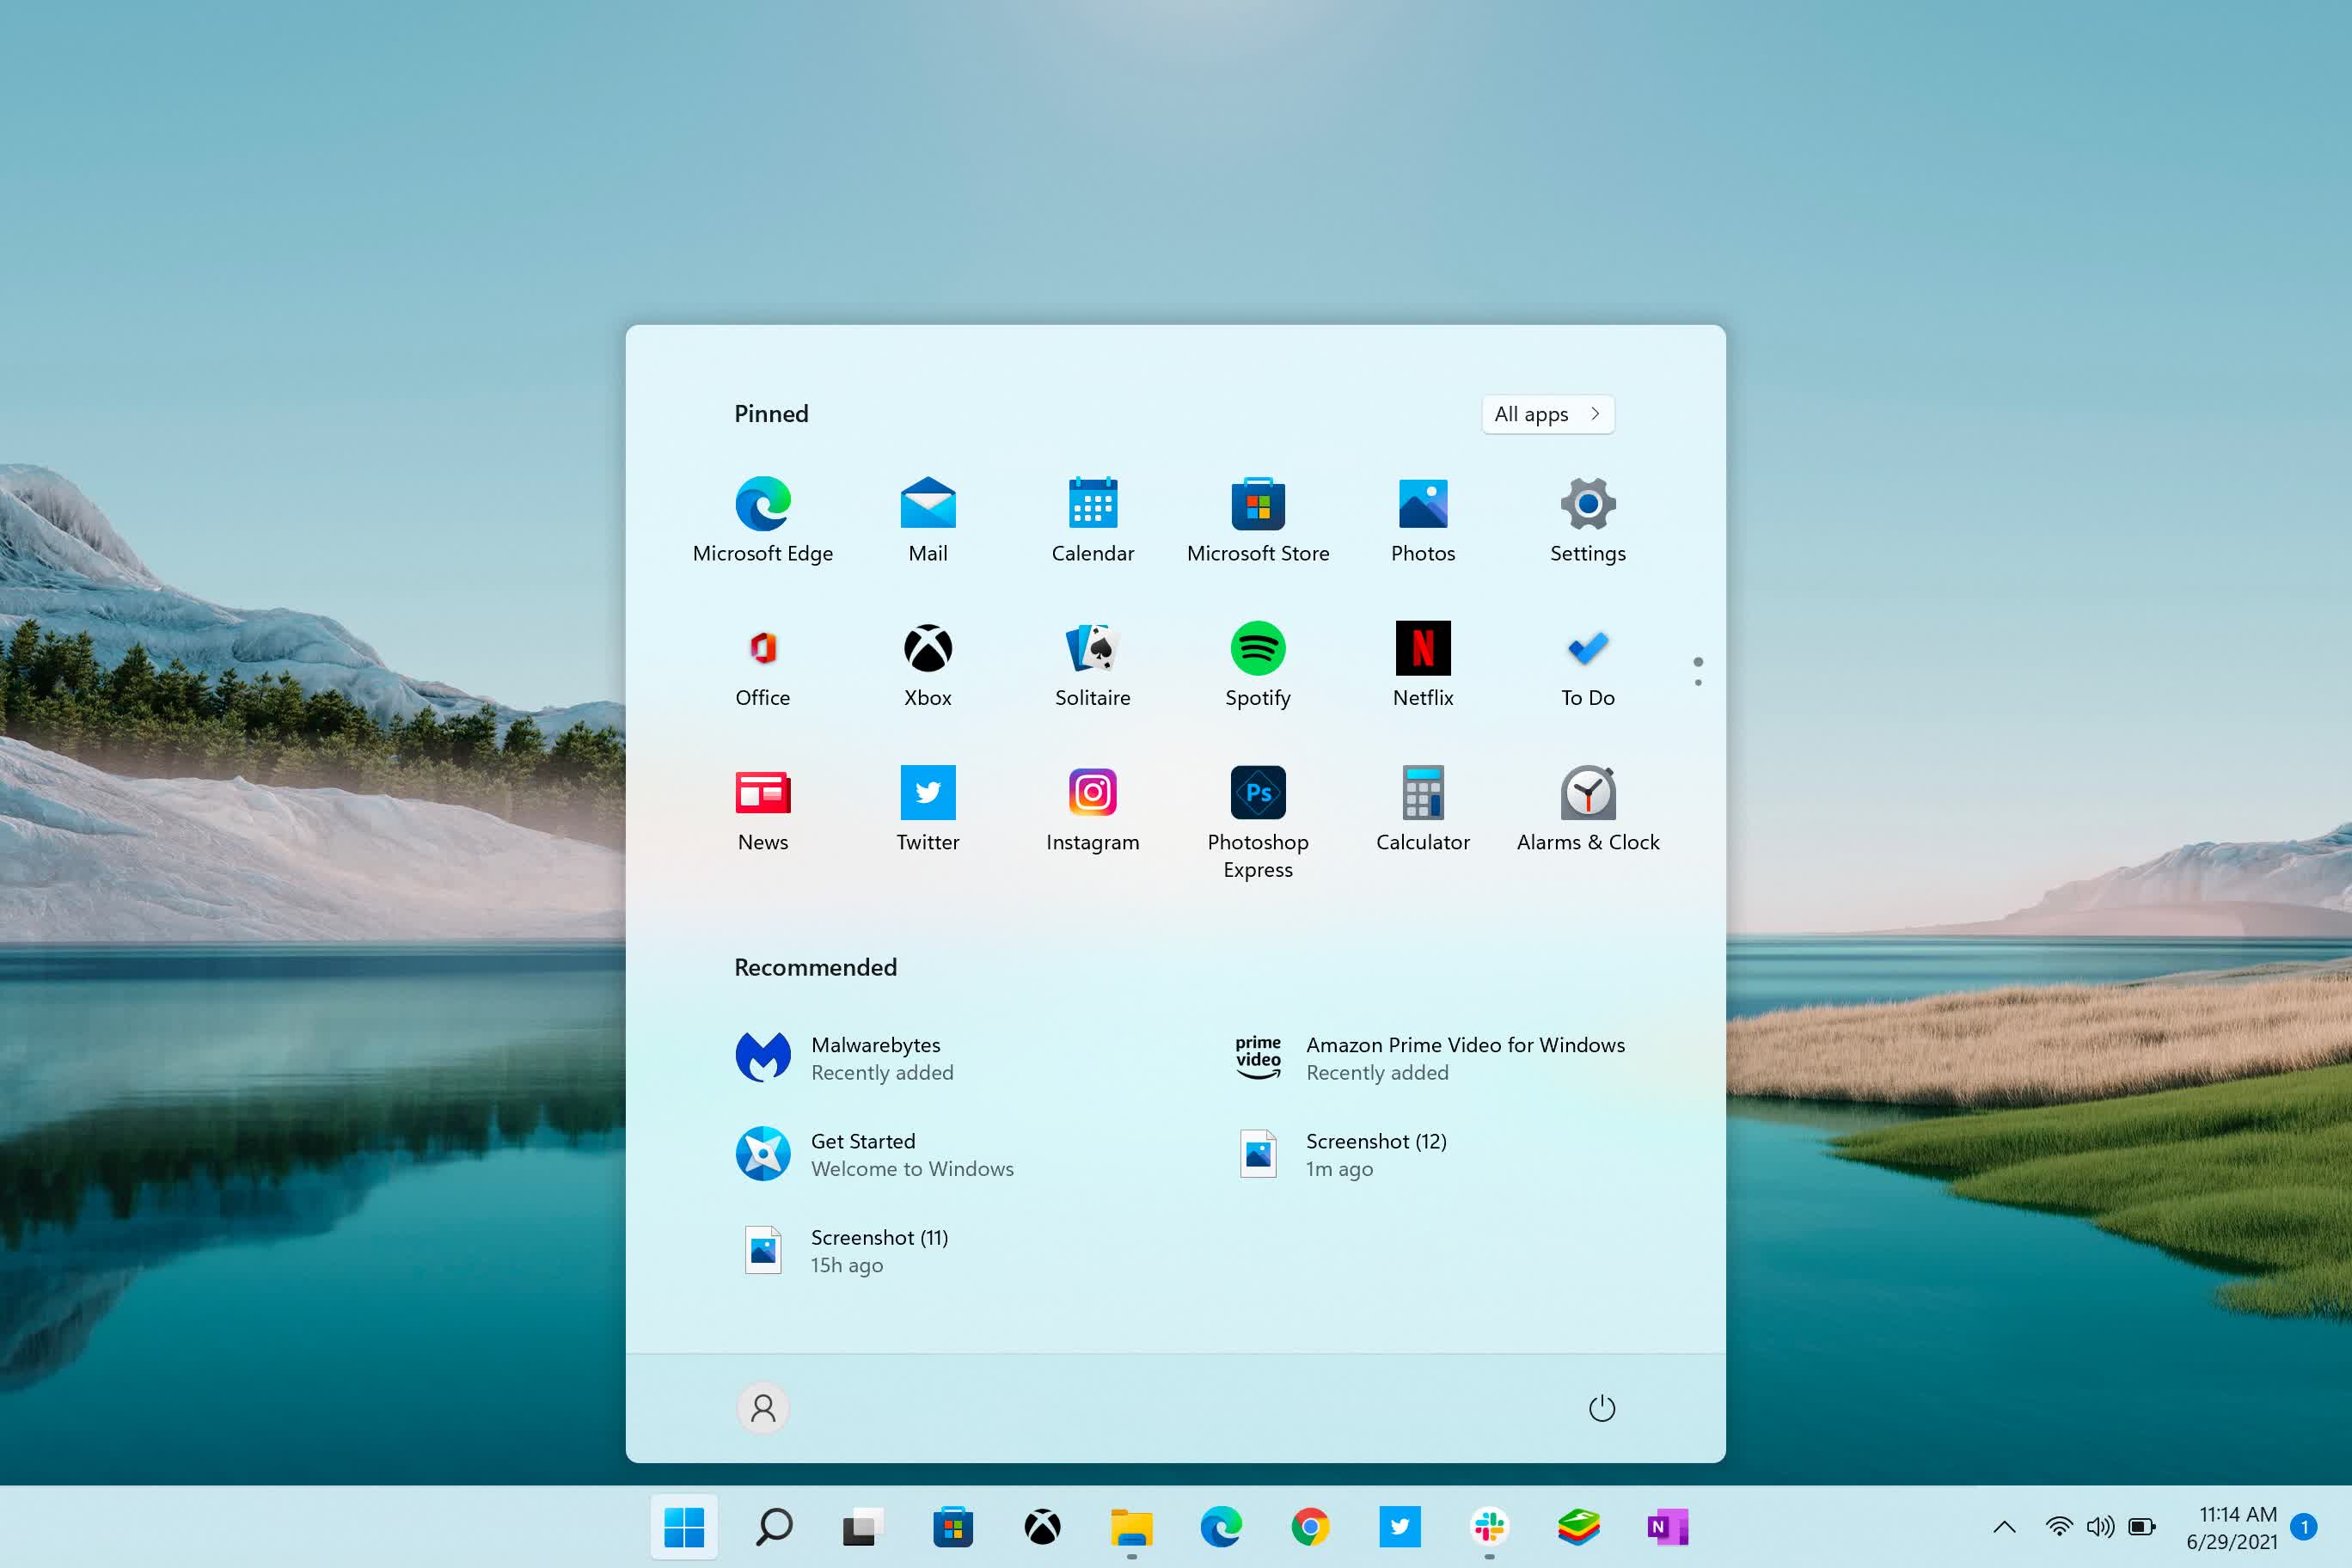
Alternatively, maintain Shift whereas clicking on “Restart” in Windows. That will present a menu as proven under, the place you possibly can choose “Use a tool”. When your machine boots, it would mechanically boot from the Ubuntu flash drive.
5.1: Begin set up
You ought to see a welcome display as proven under, permitting you to “Try Ubuntu” or “Install Ubuntu.”
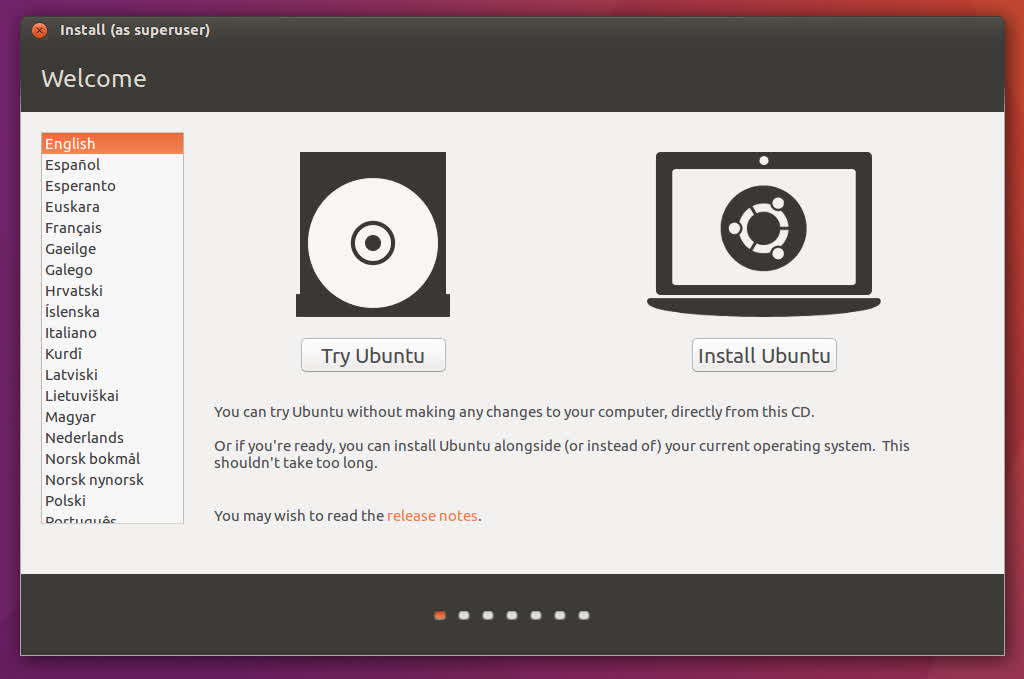
You can instantly start the set up course of by selecting “Install Ubuntu,” or you possibly can discover Ubuntu out of your stay USB.
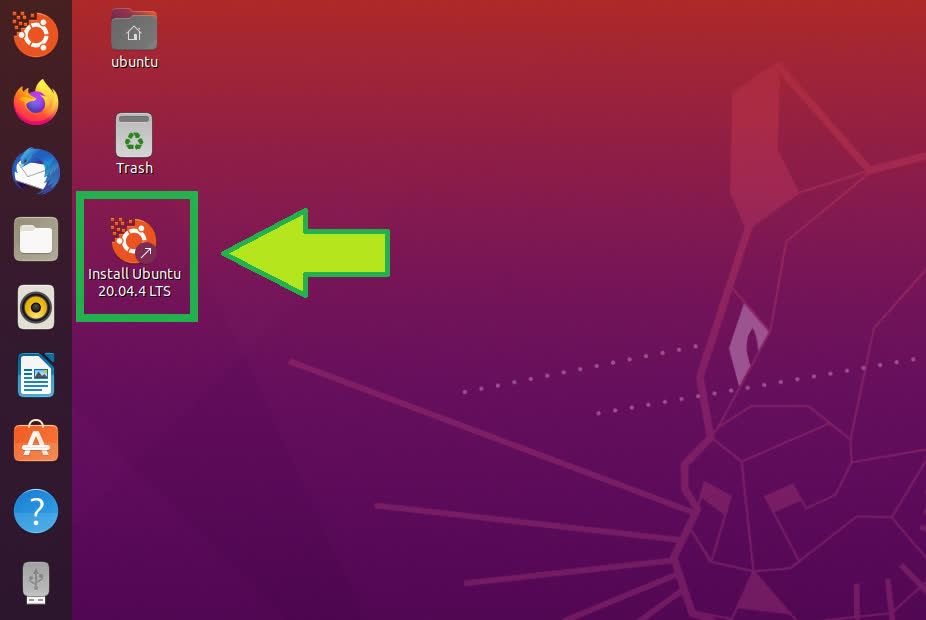
If you go along with “Try Ubuntu,” you possibly can start the set up course of at any level by selecting the “Install Ubuntu 20.04.4 LTS” icon on the desktop.
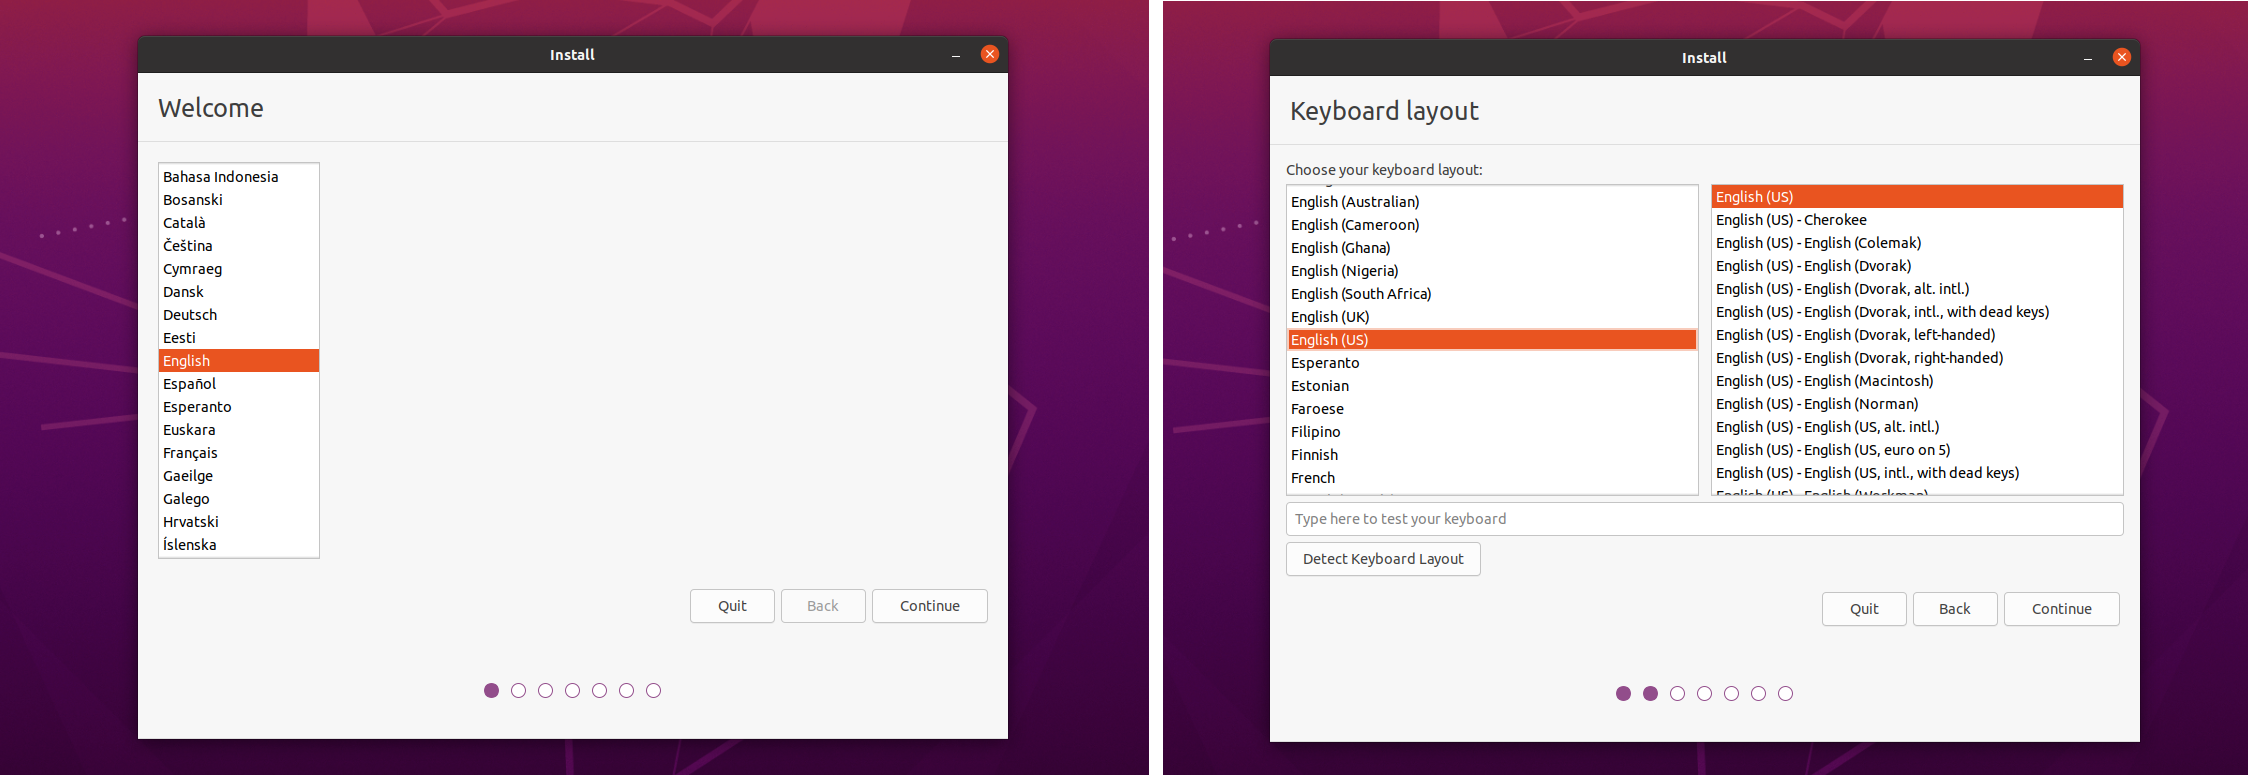
5.2: Language Selection
The Ubuntu set up begins with the language and keyboard format. Select your most well-liked selections, and proceed with the set up.
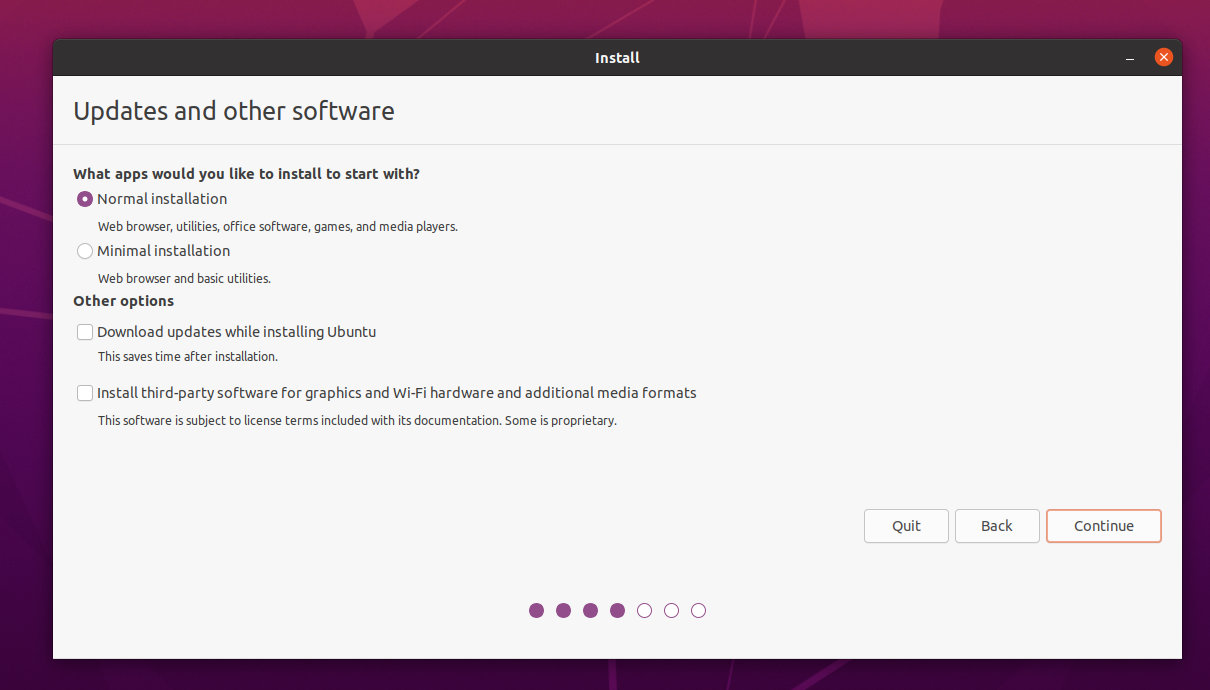
5.3: Wireless Access and Other Updates
After choosing your language, you may be requested to enter Wi-Fi settings on your residence community. This is non-compulsory.
If you do, the next step will ask about updates and different software program downloads to be a part of the set up course of. Again, that is non-compulsory, since you possibly can at all times carry out the updates and firmware installations after you end the twin booting course of.
To pace up the set up course of, we propose skipping non-compulsory downloads for later, and continuing with the “Normal set up”.
5.4: Installation Type
This is the vital step: telling the set up course of to put in Ubuntu and Windows on the identical disk and side-by-side, relatively than overwriting your Windows partition.
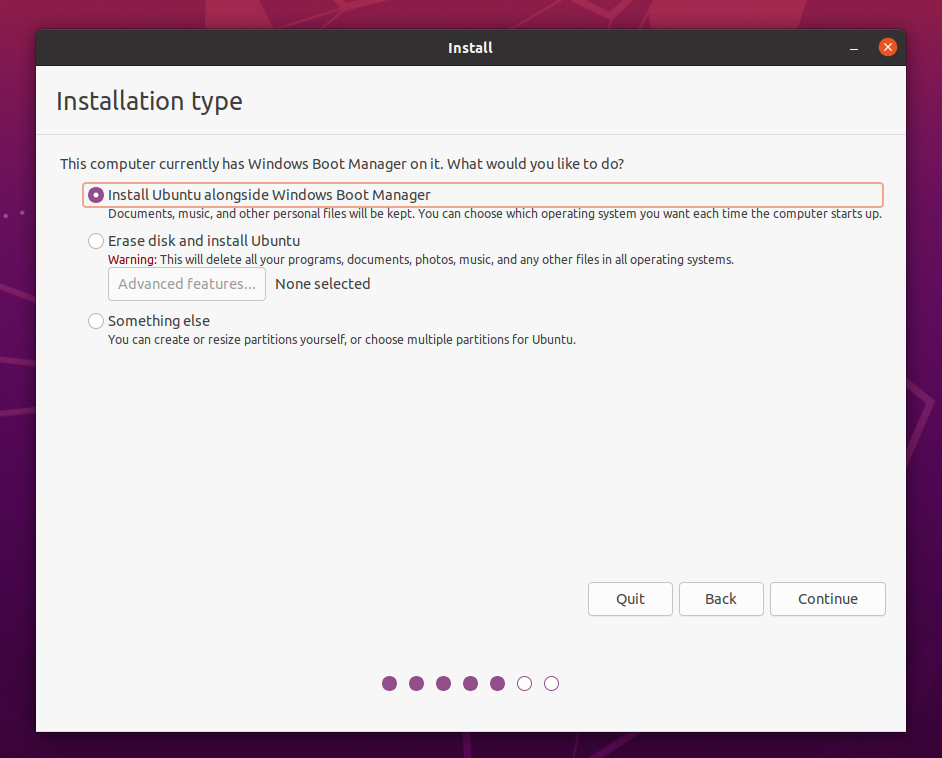
The first selection, “Install Ubuntu alongside Windows Boot Manager,” is the simplest and most well-liked method. If your disk has sufficient house on it, then continuing with this technique will give you a easy divider to determine how a lot house to partition to your Windows OS and the way a lot to partition for Ubuntu.
We counsel allocating not less than 25 GB of disk house for Ubuntu, as per the set up necessities.
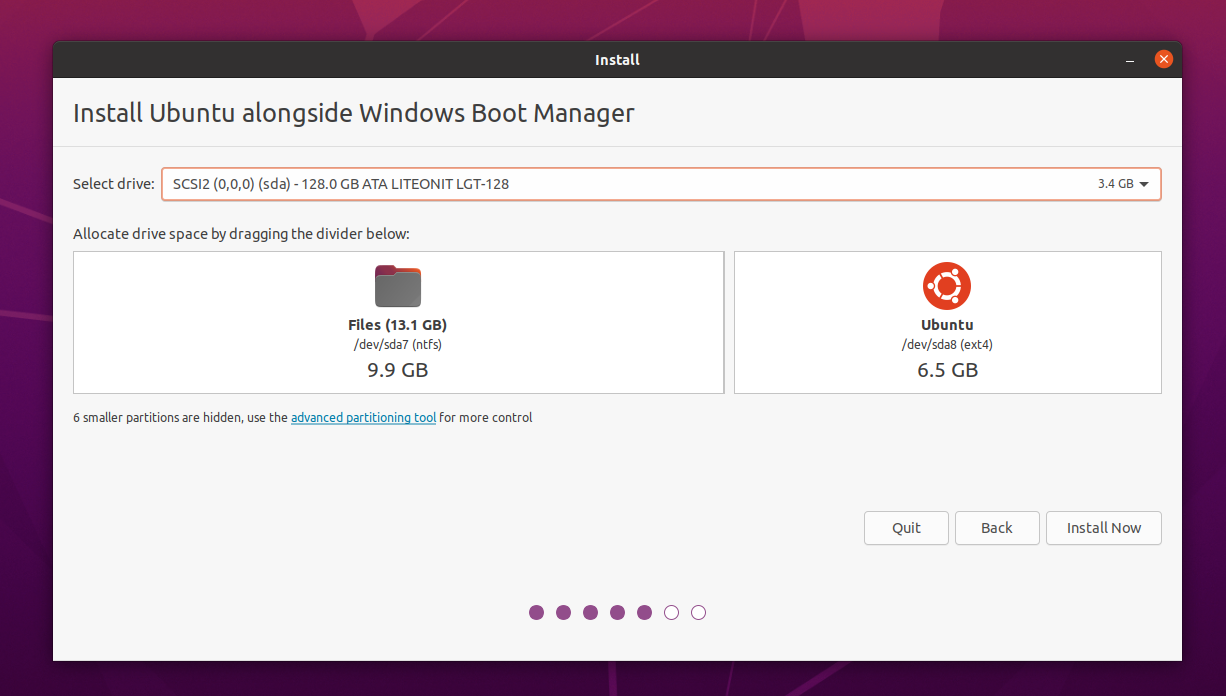
For numerous causes, this technique won’t work (or be out there altogether). In our setup in making ready this information, our 128 GB disk didn’t handle to mechanically determine all of the free house, and solely left us with 6.5 GB of disk house for Ubuntu.
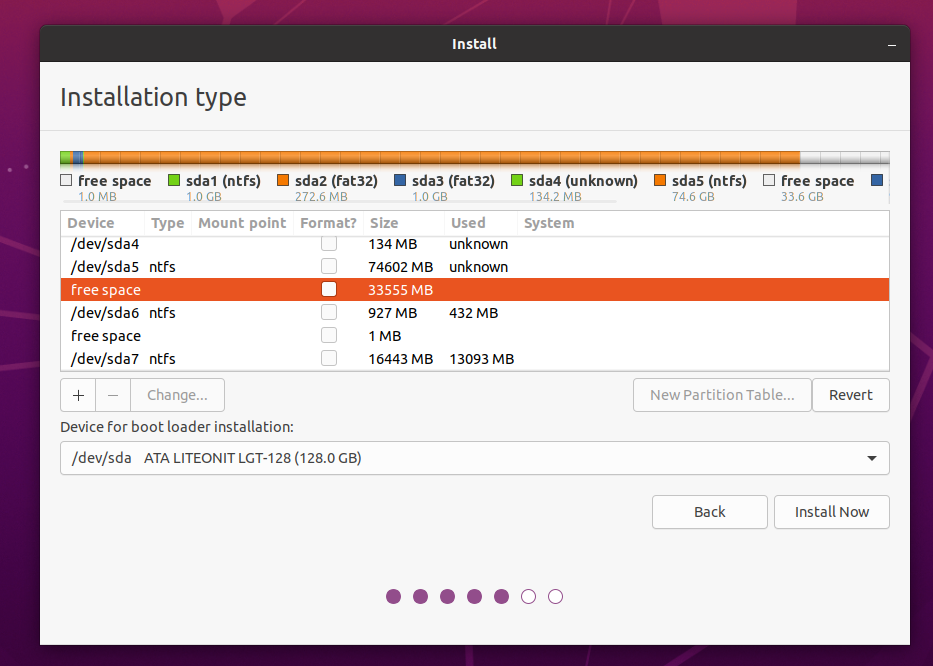
In most eventualities, you may most likely want to pick out “Something else” for the Installation Type, and manually put together your disk for the twin boot.
Choose your SSD from the drop-down menu on the backside (“Device for boot loader set up”), which can populate with the assorted partitions in your disk. Next, discover the free house you’ve got put aside from Step 4 above. While it won’t be tremendous apparent which partition that’s, you possibly can search for the “free house” identify underneath “Device”, and test the scale.
In our instance, we had allotted roughly 32 GB for Ubuntu, and thus we discover the partition with the closest disk dimension as highlighted under.
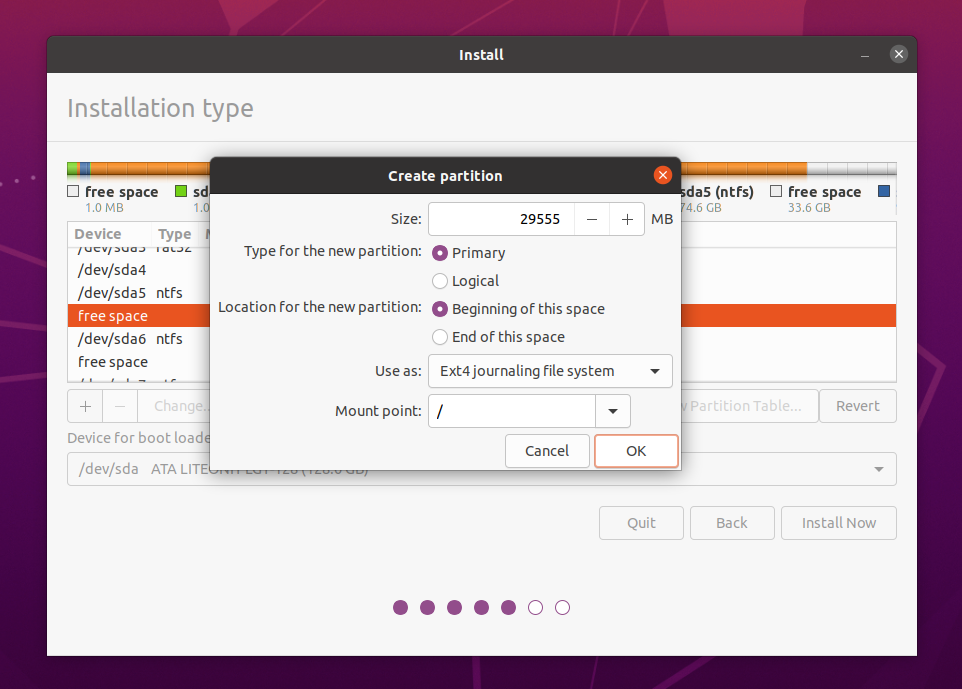
Now, click on on the “+” signal to create a brand new partition. You will get a pop-up like under, permitting you to pick out the partition kind and dimension. We might want to manually create two partitions out of the free house: one for the file system and one for swap house.
The first partition is for the precise file system, which will likely be within the ext4 format. Set the mount level to ” and ensure it’s a “Primary” partition kind and the placement is from the “Beginning of this house”. Notice that we diminished the scale by about 4 GB, which we are going to use for “swap” house, described subsequent.
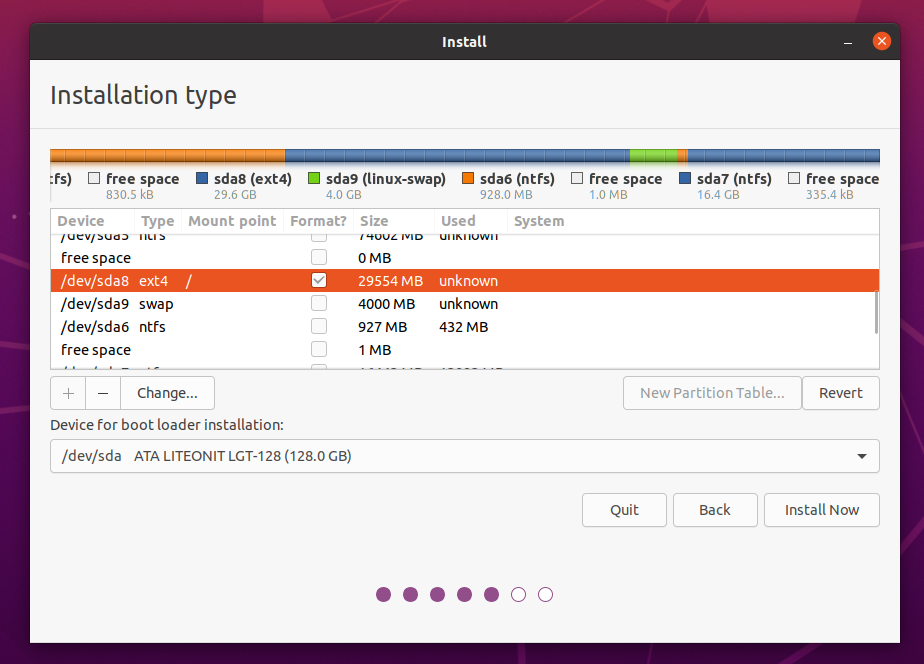
Next, select the remaining free house (in our instance, ~4 GB), and create a brand new partition as “swap space.” Swap house is actually reserved house on the drive for use if the bodily RAM turns into full, to swap pages out and in of RAM.
The steered quantity of swap house is determined by the quantity of bodily RAM in your system, and the quantity of disk house you wish to allocate as swap (which you will not be capable to use for recordsdata). The normal rule of thumb is:
- Systems with lower than 2 GB RAM – 2 instances the quantity of RAM
- Systems with 2 to eight GB RAM – the identical quantity of RAM
- Systems with greater than 8 GB RAM – not less than 4 GB of swap house

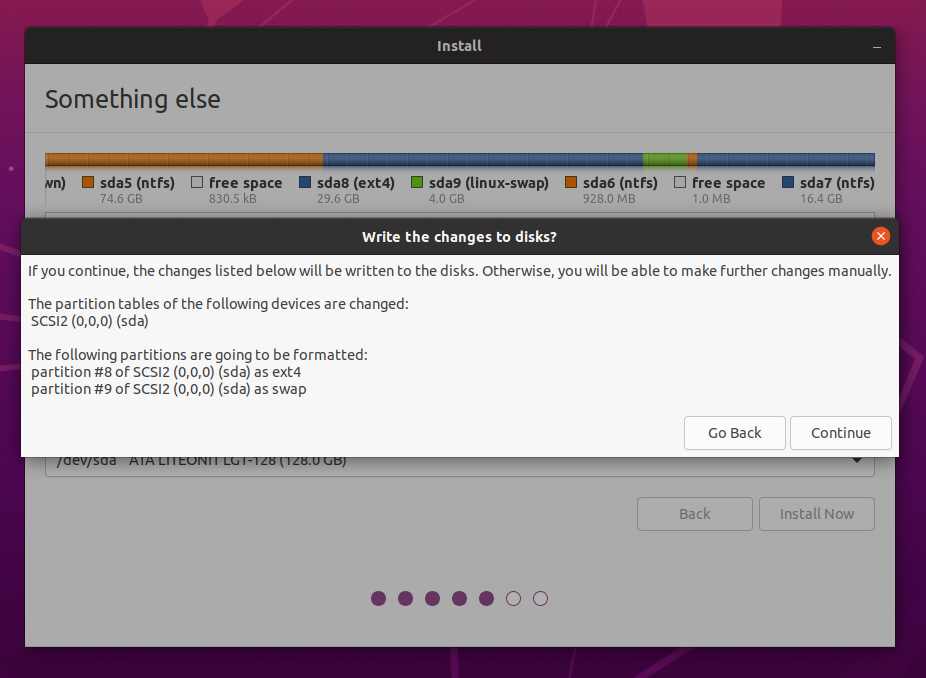
Everything ought to now be ready, and you’ll proceed the set up of Ubuntu by clicking the “Install Now” button.
You will get another affirmation describing the modifications you simply made. In this case, you’ll make two new partitions within the free house: an ext4 partition for the Ubuntu file system, and a swap partition for swap house.
If every part is so as, click on “Continue.” At this level, the disk will start formatting and making use of your modifications, adopted by the Ubuntu set up.
Proceed by way of the remainder of the set up till it’s full. Once carried out, you may be requested to reboot your machine.
6. Reboot and choose the OS you wish to use
After you end putting in Ubuntu, you will note the GRUB menu each time you boot up your PC. When GRUB reveals up, you possibly can choose whether or not to enter into Ubuntu or boot into your Windows 11 partition.

And that’s about it! Your PC now can run each Windows and Ubuntu from the identical SSD.
Now, you possibly can go about customizing your Linux setting, or boot again into Windows as if nothing modified.
More Resources
[ad_2]